
Have you done with the “introduction of CSS”, we studied last time. So feel fresh now, because I have come up with a very interesting topic today. We are going to try making a webpage and are going to use CSS files to apply styles to the web pages.
Today we are going to make a homepage for our website of “Blue Developer Directory” and are going to provide links to the various webpages developed in the previous lectures. This will help us to make a webpage, through which we can navigate to different pages.
We have completed webpages containing tables, a contact form etc. Now we will try for the homepage, step by step. We by now, know all the html tags for creating a webpage. In this chapter of our course; we will learn, how to divide a webpage in blocks so that we could apply styles to it using CSS.
Our target is to make our homepage somewhat like this:
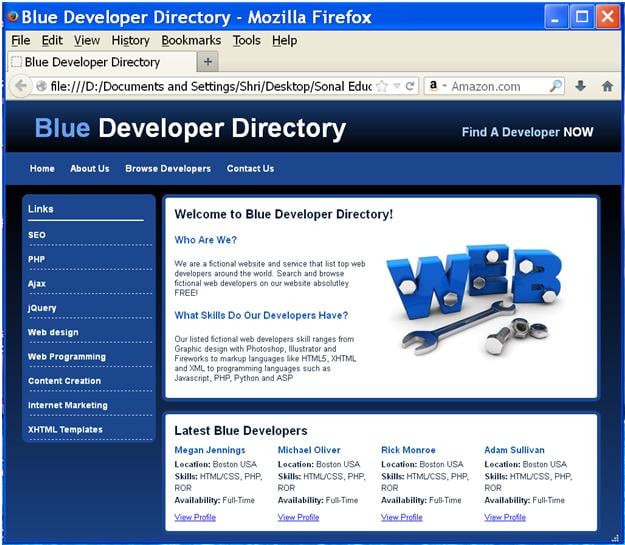
fig 1
So let’s move towards our target slowly.
- Open a notepad++ editor:
- First thing you need to do is, open the notepad editor and save a new file with the name “homepage.html” as shown below.
- We have saved our webpage in a folder “Making Webpages” placed on desktop.
- Write html code for the content of the homepage in it and save it (Ctrl+S) again.
- The code is as follows:
- The output of above code is shown below in two figures (partly in each):
- This page looks totally different from the actual webpage shown in fig 1.
- But don’t worry, it will become like one by applying styles. Because this page is without styles.
- First let’s have a look at the above html code.
- The contents of starting title tag and ending title tag is shown on the title bar of the browser.
- “Blue Developer Directory” and “Find A Developer NOW” will be shown as the heading, since they are in h1 tag and h2 tag respectively.
- The code below shows some links which will be displayed in the form of menubar.
- The hyperlinks in the un-ordered list are displayed vertically now, but after styling they will be displayed horizontally like a menubar.
- Here, each list item is given a class=”menuitem”. This will help us to style these hyperlinks in the format of a menubar as shown in fig 1.
- The next hyperlinks under the caption of “Links” will be displayed vertically.
- Then we have a image displayed due to img tag that has a class attribute as class=”float”, which will be later used for styling.
- Then again we have some headings and paragraph content.
- Creating a CSS file:
- As we know from fig 1, the background of the actual webpage is blue and we need to add some more features to it.
- We have one way of adding a starting style tag and ending style tag in the head section and applying styles to different tags.
- But this is not the best way to implement CSS. Best way is to create a .css file and link it with the html file.
- To create a .css file, first create a new folder named “CSS” in your website folder named “Making Webpages”.
- You need to save all your .css files in this “CSS” folder, so that all .css files are at one place.
- Now, open a new notepad++ document and save it in CSS folder with the name “style.css”. Select “Save as type:” as “Cascading Style Sheets file ( *.css)”.
- The blue colour of the webpage is actually an image which is saved in the “images” folder in “Making Website” folder.
- The “Making Webpages” folder is shown below:
- The image is shown below:
- This image is repeatedly drawn horizontally on the whole webpage, to get the effect of blue background colour.
- Now write the code as follows:
- The styling in the above code tells us the following things:
- margin:0; – this means there is no (0 pixels) margin for the webpage.
- padding:0; – padding is also 0 pixels.
- text-align:left; – This tells us that, alignment of the text is to the left side of the webpage. i.e. content will be left aligned.
- font-size:13px; – Font size is 13 pixels.
- font-family:arial,Helvetica,sans-serif; – The content will be shown in one of these fonts whichever is supported by the browser.
- color:#000000; – Fore-colour of the text will be black. (#000000 is the hexadecimal code for black colour).
- background-color:#1c478e; – Remember, you want to use the image (shown in fig 2.3.) as the background of the webpage. It might not cover the whole page, so to avoid any visibility of default white background of the webpage, we need to give a blue background colour to the webpage, hence the code.
- background-image:url(../images/background.png); – This code places the background image on the webpage. How is it placed?
- Background image shown in fig 2.3 is named “background.png” and is placed in the “images” folder in our “Making Webpages” folder.
- url(path of image) is used to place the image on the webpage.
- We have written code for “style.css” file recently. So we are inside the “CSS” folder.
- How did we write the path? –in the url–>
“../” –> This indicates that we have come out from the “CSS” folder/directory.
“/images/background.png” –>This indicates that after coming out of the “CSS” folder, we entered into “images” folder and reached “background.png” image. - background-repeat:repeat-x; – If you just write the above line for background image, the image will be repeated on the webpage automatically in the vertical as well as horizontal direction. To replicate the image in only horizontal direction, you need to use this code. repeat-x means: horizontally and repeat-y means: vertically.
- The code file, “style.css” is shown as follows:
- The above code will have no effect on the “homepage.html” unless and until “style.css” is linked with “homepage.html” file.
- To link the “style.css” to “homepage.html”, we have to use link tag in the head section of “homepage.html” as shown below.
- Here, rel gives the relation between the two files i.e. “stylesheet”
href gives the path of the style.css file, containing styles for the webpage.
And type gives the type of the file. - Now, after linking the two files output will be shown as follows in fig 2.5 and fig 2.6:
- Can you see the blue colour strip in fig 2.5, this is the space left for our menubar.
- We have finished linking our “style.css” file to “homepage.html”. Now our last work in this chapter is defining blocks to apply styles.
- Defining blocks using div and span tags:
- To take decision for defining blocks in the “homepage.html” file, please refer the actual webpage in fig 1.
- So let’s start:
- The whole body of the webpage is one block, so define a block having “container” as “id” around it. It is shown as follows:
- You have the “Blue Developer Directory” heading and the slogan “Find A Developer NOW” together, so define a block having “header“ as it’s “id”.
- It is shown in the code below:
- After the “header”, you have a horizontal menubar or a menustrip in fig 1. So create a div block of menubar with “menu” as it’s “id”, as shown below.
- Next you can see a vertical menu of “Links” in fig 1, make it a separate block to apply styles with id “leftmenu”, since it is at the left side of the webpage. div block is shown below:
- Now, you can see a white colour block with heading “Welcome to Blue Developer Directory!” in fig 1.
- Make it a block with id as “content”. It is shown below:
- This is the first content block.
- Now, below this block there is another content block having “Latest Blue Developers” as its heading. So make it a block with id as “content”. The above block and this present block are named with same “id”, because they have same styling.
- It is shown below.
- Now, this “content2” block containes more four separate blocks inside it.
- These blocks describes the details of the developers each.
- All the four blocks have the same styling. You can say that, same styling is applied four times.
- So, instead of having “id” for this, we will use class for each block. This is shown as follows:
- For now, we have finished defining the blocks and now a final task for this chapter is remaining.
- Just observe the block having “id” as “header”, first thing you will notice that the heading “Blue Developer Directory” has “Blue” in blue colour and “Developer Directory” in white colour. In the same way, “Find A Developer” is in blue colour and “NOW” is in white colour.
- Second thing is that, “Blue Developer Directory” and “Find A Developer NOW” both are headings, that means they both must start on a new line, but they are on the same line i.e. inline. How did this happen?
- We know div tag is a block level element and span tag is inline level element.
- To bring heading and the slogan inline we need to use span tag instead of div tag.
- Please see the code below:
- Here, in the above code you can see that we have used starting span and ending span tags to bring the heading and slogan in one line.
- Moreover, we have also used the class attribute for the blue and white colour which will gain its effect after styling.
- Whatever we have done uptill now, will not affect our webpage now. All this we have done only to simplify our styling.
- So, try till here, the remaining we will see in next chapter.
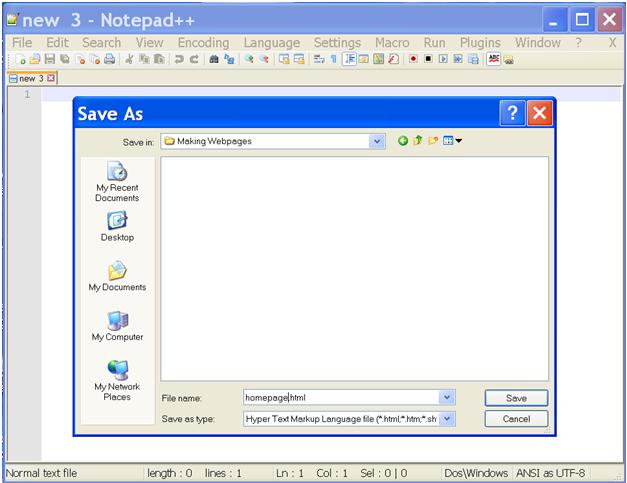
fig 1.1
<html>
  <head>
     <title>Blue Developer Directory</title>
  </head>
  <body>
     <h1>Blue Developer Directory</h1>
     <h2>Find A Developer NOW</h2>
     <ul>
       <li class="menuitem"><a  href="homepage.html">HOME</a></li>
       <li class="menuitem"><a href="about.html">About  Us</a></li>
       <li class="menuitem"><a href="browse.html">Browse  Developers</a></li>
       <li class="menuitem"><a href="contact.html">Contact Us</a></li>
    </ul>

     <h3>Links</h3>
     <ul>
      <li><a href="browse.html">SEO</a></li>
      <li><a href="browse.html">PHP</a></li>
      <li><a href="browse.html">Ajax</a></li>
      <li><a href="browse.html">jQuery</a></li>
      <li><a href="browse.html">Web design</a></li>
      <li><a href="browse.html">Web Programming</a></li>
      <li><a href="browse.html">Content Creation</a></li>
      <li><a href="browse.html">Internet Marketing</a></li>
      <li><a href="browse.html">XHTML Templates</a></li>
     </ul>

     <h2>Welcome to Blue Developer Directory!</h2>
     <img class="float" src="images/web.jpg" alt="web developer  directory!">

     <h3>Who Are We?</h3>
     <p>we are a fictional website and service that list top web developers around the world. Search and browse fictional web developers on our website absolutely FREE!
     </p>

     <h3>What Skills Do Our Developers Have?</h3>
     <p>Our listed fictional web developer’s skill ranges from Graphic design with Photoshop. Illustrator and Fireworks to markup languages like HTML5, XHTML and XML to programming languages such as Javascript, PHP, Python and ASP.
     </p>

     <h2>Latest Blue Developers</h2>

     <h4>Adam Sullivan</h4>
     <ul>
       <li><strong>Location:</strong>Boston USA</li>
       <li><strong>Skills:</strong>HTML/CSS, PHP, ROR</li>
       <li><strong>Availability:</strong>Full-Time
     </ul>
     <a href="#">View Profile</a>

     <h4>Rick Monroe</h4>
     <ul>
       <li><strong>Location:</strong>Boston USA</li>
       <li><strong>Skills:</strong>HTML/CSS, PHP, ROR</li>
       <li><strong>Availability:</strong>Full-Time
     </ul>
     <a href="#">View Profile</a>

     <h4>Michael Oliver</h4>
     <ul>
       <li><strong>Location:</strong>Boston USA</li>
       <li><strong>Skills:</strong>HTML/CSS, PHP, ROR</li>
       <li><strong>Availability:</strong>Full-Time
     </ul>
     <a href="#">View Profile</a>

     <h4>Megan Jennings</h4>
     <ul>
       <li><strong>Location:</strong>Boston USA</li>
       <li><strong>Skills:</strong>HTML/CSS, PHP, ROR</li>
       <li><strong>Availability:</strong>Full-Time
     </ul>
     <a href="#">View Profile</a>
   </body>
</html>
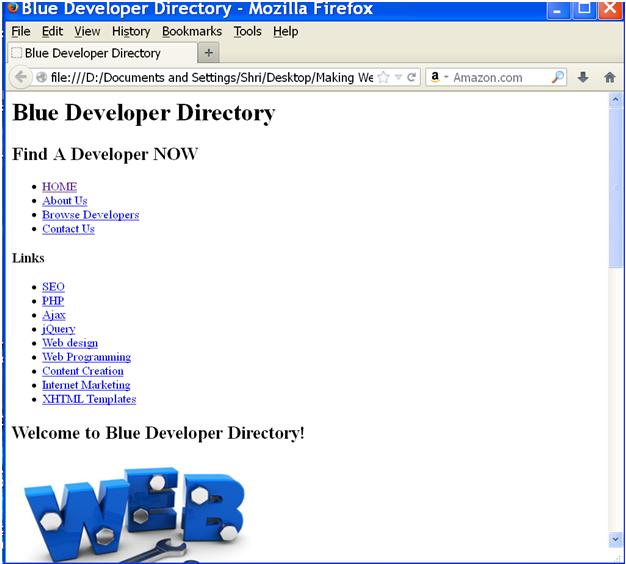
fig 1.2
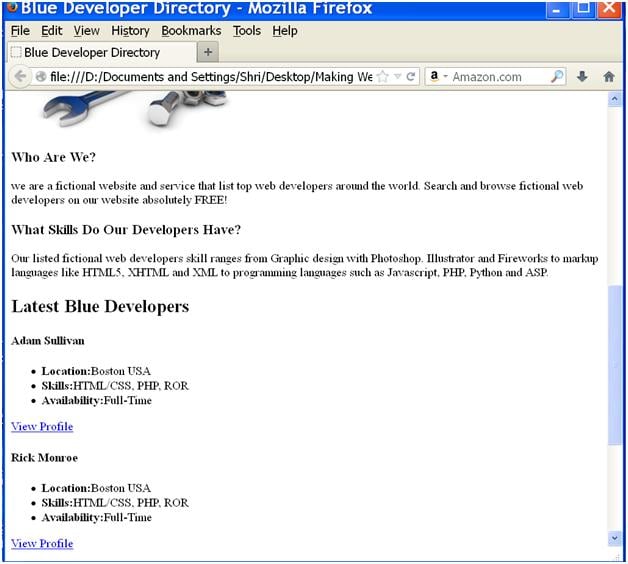
fig 1.3
<ul>
 <li class="menuitem"><a  href="homepage.html">HOME</a></li>
 <li class="menuitem"><a href="about.html">About  Us</a></li>
 <li class="menuitem"><a href="browse.html">Browse  Developers</a></li>
 <li class="menuitem"><a href="contact.html">Contact Us</a></li>
</ul>

fig 2.1
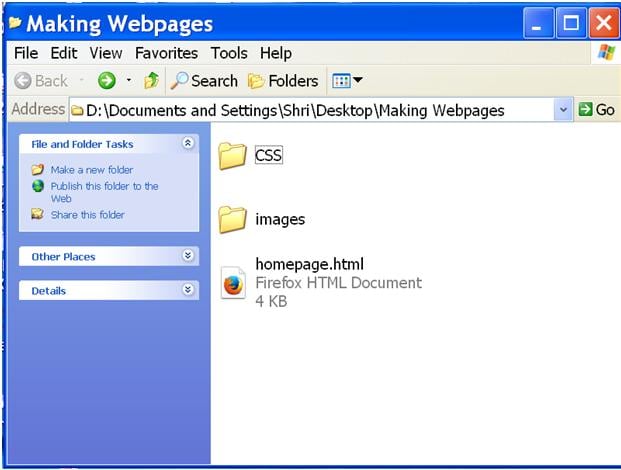
fig 2.2

fig 2.3
body
{
	margin:0;
	padding:0;
	text-align:left;
	font-size:13px;
	font-family:arial,helvetica,sans-serif;
	color:#000000;
	background-color:#1c478e;
	background-image:url(../images/background.png);
	background-repeat:repeat-x;
}
fig 2.4
<head>
	<title>Blue Developer Directory</title>
	<link rel="stylesheet" href="CSS/style.css" type="text/css">
</head>
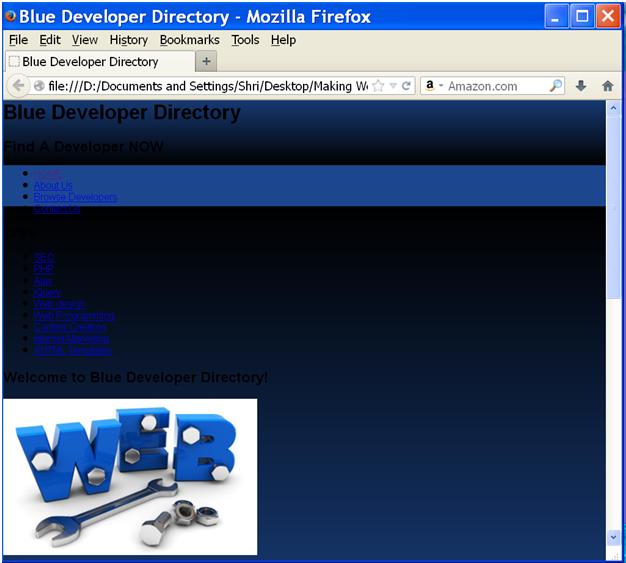
fig 2.5
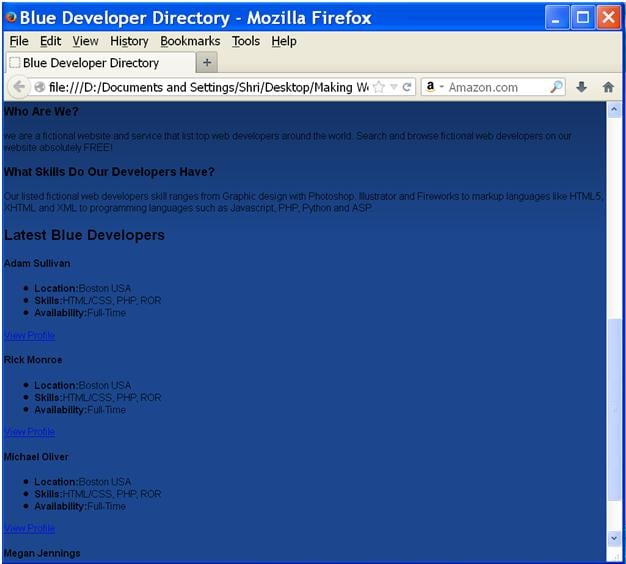
fig 2.6
<body>
      <div id=”container”>
           -
           -          <!—code in between-->
           -
      </div> <!—container end-->
</body>
<body>
      <div id="container">
       <div id="header">
	     <h1><span class="blue-text">Blue</span> Developer Directory</h1>
	     <h2>Find A Developer <span class="white-text">NOW</span></h2>
       </div> <!--header end-->
       -           <!--Some code here-->
       -
      </div> <!--container end-->
</body>
<body>
      <div id="container">
       <div id="header">
          <h1><span class="blue-text">Blue</span> Developer Directory</h1>
          <h2>Find A Developer <span class="white-text">NOW</span></h2>
       </div> <!--header end-->

       <div id="menu">
	     <ul>
	     <li class="menuitem"><a href="homepage.html">Home</a></li>
	     <li class="menuitem"><a href="about.html">About Us</a></li>
	     <li class="menuitem"><a href="browse.html">Browse Developers</a></li>
	     <li class="menuitem"><a href="contact.html">Contact Us</a></li>
	     </ul>
	  </div> <!--menu end-->
        -
        -      <!--Some Logic here-->
        -
     </div> <!--container end-->
</body>
<div id="leftmenu">
     <h3>Links</h3>
     <ul>
	 <li><a href="browse.html">SEO</a></li>
	 <li><a href="browse.html">PHP</a></li>
	 <li><a href="browse.html">Ajax</a></li>
	 <li><a href="browse.html">jQuery</a></li>
	 <li><a href="browse.html">Web design</a></li>
	 <li><a href="browse.html">Web Programming</a></li>
	 <li><a href="browse.html">Content Creation</a></li>
	 <li><a href="browse.html">Internet Marketing</a></li>
	 <li><a href="browse.html">XHTML Templates</a></li>
     </ul>
</div> <!--leftmenu end-->
<div id="content">
     <h2>Welcome to Blue Developer Directory!</h2>
     <img class="float" src="images/web.jpg" alt="web developer directory!">

     <h3>Who Are We?</h3>
     <p>we are a fictional website and service that list top web developers around the world. Search and browse fictional web developers on our website absolutely FREE!
     </p>

     <h3>What Skills Do Our Developers Have?</h3>
     <p>Our listed fictional web developer's skill ranges from Graphic design with Photoshop. Illustrator and Fireworks to markup languages like HTML5, XHTML and XML to programming languages such as Javascript, PHP, Python and ASP.
     </p>
</div> <!--content1 end-->
<body>
      -----
      -----          <!—code in between-->
      -----
</div> <!--content1 end-->

<div id="content">
   <h2>Latest Blue Developers</h2>

   <h4>Adam Sullivan</h4>
   <ul>
	<li><strong>Location:</strong>Boston USA</li>
	<li><strong>Skills:</strong>HTML/CSS, PHP, ROR</li>
	<li><strong>Availability:</strong>Full-Time
   </ul>
   <a href="#">View Profile</a>
            -----
            -----                    <!—code in between-->
            -----
</div> <!--content2 end-->
</div> <!--container end-->
</body>
<body>
     -----
     -----    <!--Some code here-->
     -----
<div id="content">
     <h2>Latest Blue Developers</h2>
     <div class="developer">
         <h4>Adam Sullivan</h4>
	     <ul>
		<li><strong>Location:</strong>Boston USA</li>
		<li><strong>Skills:</strong>HTML/CSS, PHP, ROR</li>
		<li><strong>Availability:</strong>Full-Time
	     </ul>
             <a href="#">View Profile</a>
      </div> <!--developer end-->

      <div class="developer">
	  <h4>Rick Monroe</h4>
	  <ul>
	     <li><strong>Location:</strong>Boston USA</li>
	     <li><strong>Skills:</strong>HTML/CSS, PHP, ROR</li>
	     <li><strong>Availability:</strong>Full-Time
	  </ul>
	  <a href="#">View Profile</a>
      </div> <!--developer end-->

      <div class="developer">
	  <h4>Michael Oliver</h4>
	  <ul>
	     <li><strong>Location:</strong>Boston USA</li>
	     <li><strong>Skills:</strong>HTML/CSS, PHP, ROR</li>
	     <li><strong>Availability:</strong>Full-Time
          </ul>
	  <a href="#">View Profile</a>
      </div> <!--developer end-->

      <div class="developer">
	  <h4>Megan Jennings</h4>
	     <ul>
		<li><strong>Location:</strong>Boston USA</li>
		<li><strong>Skills:</strong>HTML/CSS, PHP, ROR</li>
		<li><strong>Availability:</strong>Full-Time
	     </ul>
	  <a href="#">View Profile</a>
      </div> <!--developer end-->
    			</div> <!--content2 end-->
</div> <!--container end-->
</body>
<div id="header">
     <h1><span class="blue-text">Blue</span> Developer Directory</h1>
     <h2>Find A Developer <span class="white-text">NOW</span></h2>
</div> <!--header end-->

