In the last article, we discussed the architecture of spring framework. In this article, we are going to build our workspace with required spring framework 4.3.9 APIs and develop our first application using the Spring Framework.
Spring framework environment setup
In this article, we will use eclipse and the maven plugin in order to build a Java based application using the spring framework. The following are the steps.
• Step 1: – Download the maven plugin [apache-maven-3.5.0] from the following link. Unzip the downloaded package under the following path [C:\work\app].
|
Maven Plugin Download Link |
|
https://maven.apache.org/download.cgi |
• Step 2: – Set up the following windows operating system environment variables as M2_REPO, PATH M2_HOME, and MAVEN_OPTS as shown below.
|
S No |
Variable Name |
Variable value |
|
1. |
M2_REPO |
C:\Users\Aparajita\.m2\repository |
|
2. |
M2_HOME |
C:\work\app\apache-maven-3.5.0 |
|
3. |
PATH |
%Path%;C:\work\app\apache-maven-3.5.0\bin; |
|
4. |
MAVEN_OPTS |
-Xms256m -Xmx512m |
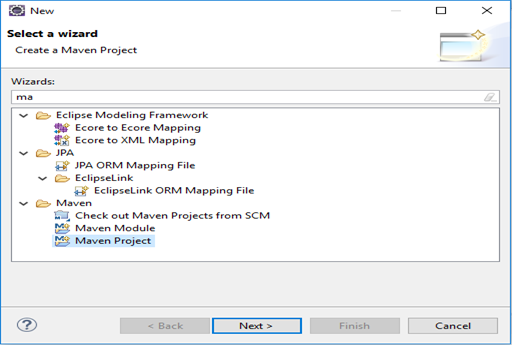
• Step 3: – Open a new Maven Project in eclipse and navigate in eclipse as New others… Maven Project as shown below.
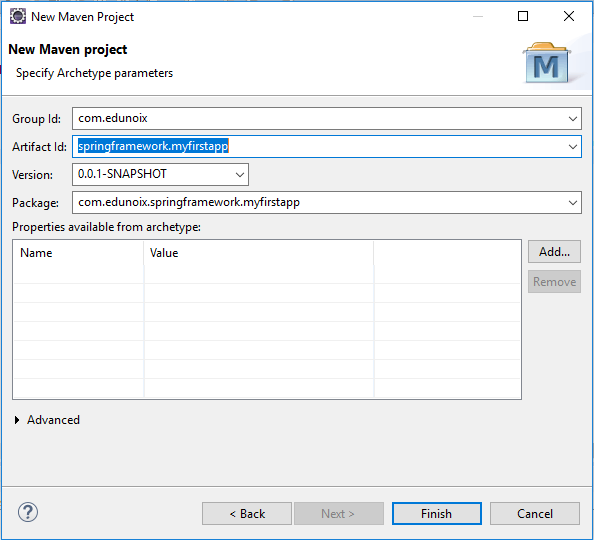
• Step 4: – In this step, you need to enter the group id, artifact id and version field as the Archetype parameters are required for a maven project as shown below.
• Step 5: – Open pom.xml file for the maven project ‘springframework.myfirstapp’ which you have just created and add the maven repository URL for spring framework 4.3.9 version APIs as shown below.
<project xmlns="http://maven.apache.org/POM/4.0.0" xmlns:xsi="http://www.w3.org/2001/XMLSchema-instance"
	xsi:schemaLocation="http://maven.apache.org/POM/4.0.0 http://maven.apache.org/xsd/maven-4.0.0.xsd">
	<modelVersion>4.0.0</modelVersion>

	<groupId>com.eduonix</groupId>
	<artifactId>springframework.myfirstapp</artifactId>
	<version>0.0.1-SNAPSHOT</version>
	<packaging>jar</packaging>

	<name>springframework.myfirstapp</name>
	<url>http://maven.apache.org</url>

	<properties>
		<project.build.sourceEncoding>UTF-8</project.build.sourceEncoding>
	</properties>
	<build>
		<resources>
			<resource>
				<directory>src/main/resources</directory>
				<filtering>true</filtering>
				<targetPath>${project.build.directory}</targetPath>
			</resource>
		</resources>
	</build>
	<repositories>
		<repository>
			<id>org.springframework.spring-core</id>
			<url>https://mvnrepository.com/artifact/org.springframework/spring-core</url>
		</repository>
		<repository>
			<id>org.springframework.spring-webmvc</id>
			<url>https://mvnrepository.com/artifact/org.springframework/spring-webmvc</url>
		</repository>
		<repository>
			<id>org.springframework.spring-test</id>
			<url>https://mvnrepository.com/artifact/org.springframework/spring-test</url>
		</repository>
		<repository>
			<id>org.springframework.spring-aspects</id>
			<url>https://mvnrepository.com/artifact/org.springframework/spring-aspects</url>
		</repository>
		<repository>
			<id>org.springframework.spring-jdbc</id>
			<url>https://mvnrepository.com/artifact/org.springframework/spring-jdbc</url>
		</repository>
		<repository>
			<id>org.springframework.spring-jms</id>
			<url>https://mvnrepository.com/artifact/org.springframework/spring-jms</url>
		</repository>
		<repository>
			<id>org.springframework.spring-messaging</id>
			<url>https://mvnrepository.com/artifact/org.springframework/spring-messaging</url>
		</repository>
		<repository>
			<id>org.springframework.spring-orm</id>
			<url>https://mvnrepository.com/artifact/org.springframework/spring-orm</url>
		</repository>
		<repository>
			<id>org.springframework.spring-orm</id>
			<url>https://mvnrepository.com/artifact/org.springframework/spring-oxm</url>
		</repository>
		<repository>
			<id>org.springframework.spring-tx</id>
			<url>https://mvnrepository.com/artifact/org.springframework/spring-tx</url>
		</repository>
		<repository>
			<id>org.springframework.spring-webmvc-portlet</id>
			<url>https://mvnrepository.com/artifact/org.springframework/spring-webmvc-portlet</url>
		</repository>
		<repository>
			<id>org.springframework.spring-websocket</id>
			<url>https://mvnrepository.com/artifact/org.springframework/spring-websocket</url>
		</repository>
		<repository>
			<id>org.springframework.spring-instrument</id>
			<url>https://mvnrepository.com/artifact/org.springframework/spring-instrument</url>
		</repository>
		<repository>
			<id>org.springframework.spring-instrument-tomcat</id>
			<url>https://mvnrepository.com/artifact/org.springframework/spring-instrument-tomcat</url>
		</repository>
		<repository>
			<id>org.springframework.spring-instrument-tomcat</id>
			<url>https://mvnrepository.com/artifact/org.springframework/spring-context-support</url>
		</repository>
	</repositories>
	<dependencies>
		<dependency>
			<groupId>junit</groupId>
			<artifactId>junit</artifactId>
			<version>3.8.1</version>
			<scope>test</scope>
		</dependency>
		<dependency>
			<groupId>org.springframework</groupId>
			<artifactId>spring-core</artifactId>
			<version>4.3.9.RELEASE</version>
		</dependency>
		<dependency>
			<groupId>org.springframework</groupId>
			<artifactId>spring-webmvc</artifactId>
			<version>4.3.9.RELEASE</version>
		</dependency>
		<dependency>
			<groupId>org.springframework</groupId>
			<artifactId>spring-test</artifactId>
			<version>4.3.9.RELEASE</version>
			<scope>test</scope>
		</dependency>
<!-- 		 <dependency> <groupId>org.springframework</groupId> <artifactId>spring-aspects</artifactId>
			<version>4.3.9.RELEASE</version> </dependency>  -->
		<dependency>
			<groupId>org.springframework</groupId>
			<artifactId>spring-jdbc</artifactId>
			<version>4.3.9.RELEASE</version>
		</dependency>
		<dependency>
			<groupId>org.springframework</groupId>
			<artifactId>spring-jms</artifactId>
			<version>4.3.9.RELEASE</version>
		</dependency>

		<dependency>
			<groupId>org.springframework</groupId>
			<artifactId>spring-messaging</artifactId>
			<version>4.3.9.RELEASE</version>
		</dependency>
		<dependency>
			<groupId>org.springframework</groupId>
			<artifactId>spring-orm</artifactId>
			<version>4.3.9.RELEASE</version>
		</dependency>
		<dependency>
			<groupId>org.springframework</groupId>
			<artifactId>spring-oxm</artifactId>
			<version>4.3.9.RELEASE</version>
		</dependency>
		<dependency>
			<groupId>org.springframework</groupId>
			<artifactId>spring-tx</artifactId>
			<version>4.3.9.RELEASE</version>
		</dependency>
		<dependency>
			<groupId>org.springframework</groupId>
			<artifactId>spring-webmvc-portlet</artifactId>
			<version>4.3.9.RELEASE</version>
		</dependency>
		<dependency>
			<groupId>org.springframework</groupId>
			<artifactId>spring-websocket</artifactId>
			<version>4.3.9.RELEASE</version>
		</dependency>
		<dependency>
			<groupId>org.springframework</groupId>
			<artifactId>spring-instrument</artifactId>
			<version>4.3.9.RELEASE</version>
		</dependency>
		<dependency>
			<groupId>org.springframework</groupId>
			<artifactId>spring-instrument-tomcat</artifactId>
			<version>4.3.9.RELEASE</version>
		</dependency>
		<dependency>
			<groupId>org.springframework</groupId>
			<artifactId>spring-context-support</artifactId>
			<version>4.3.9.RELEASE</version>
		</dependency>

	</dependencies>
</project>
• Step 6: – Maven tool will automatically download the required APIs for the spring framework and set the project build path for the Java/J2EE application as shown below.
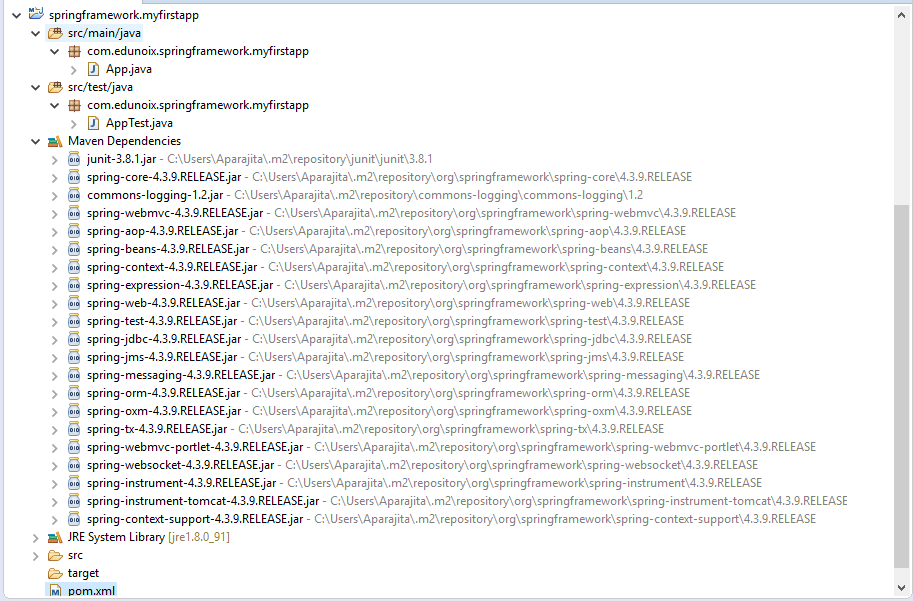
At this point, the installation of the following spring framework APIs have completed and we are ready to implement them on our first Java application with spring framework.
|
S No. |
Spring Framework APIs |
|
1. |
spring-core-4.3.9.RELEASE.jar |
|
2. |
commons-logging-1.2.jar |
|
3. |
spring-webmvc-4.3.9.RELEASE.jar |
|
4. |
spring-aop-4.3.9.RELEASE.jar |
|
5. |
spring-beans-4.3.9.RELEASE.jar |
|
6. |
spring-context-4.3.9.RELEASE.jar |
|
7. |
spring-expression-4.3.9.RELEASE.jar |
|
8. |
spring-web-4.3.9.RELEASE.jar |
|
9. |
spring-test-4.3.9.RELEASE.jar |
|
10. |
spring-jdbc-4.3.9.RELEASE.jar |
|
11. |
spring-jms-4.3.9.RELEASE.jar |
|
12. |
spring-messaging-4.3.9.RELEASE.jar |
|
13. |
spring-orm-4.3.9.RELEASE.jar |
|
14. |
spring-oxm-4.3.9.RELEASE.jar |
|
15. |
spring-tx-4.3.9.RELEASE.jar |
|
16. |
spring-webmvc-portlet-4.3.9.RELEASE.jar |
|
17. |
spring-websocket-4.3.9.RELEASE.jar |
|
18. |
spring-instrument-4.3.9.RELEASE.jar |
|
19. |
spring-instrument-tomcat-4.3.9.RELEASE.jar |
|
20. |
spring-context-support-4.3.9.RELEASE.jar |
My first Java Application Using Spring Framework
We have to create the following JAVA classes and bean configuration XML file in order to develop our JAVA application using Spring Framework.• Step 1: – Create a source class say SpringSource.java, the following will be the code for this file.
package com.eduonix.springframework.myfirstapp;

/**
 *
 * @author Aparajita
 *
 */
public class SpringSource {

	private String welcomeMessage;
	private String projectType;

	public String getProjectType() {
		return projectType;
	}

	public void setProjectType(String projectType) {
		this.projectType = projectType;
	}

	public String getWelcomeMessage() {
		return welcomeMessage;
	}

	public void setWelcomeMessage(String welcomeMessage) {
		this.welcomeMessage = welcomeMessage;
	}

}
• Step 2: – Create a SpringMain.java class, the following will be the code for this file.
package com.eduonix.springframework.myfirstapp;

import org.springframework.context.ApplicationContext;
import org.springframework.context.support.ClassPathXmlApplicationContext;
/**
 *
 * @author Aparajita
 *
 */
public class SpringMain {

	   public static void main(String[] args) {

		      ApplicationContext context = new ClassPathXmlApplicationContext("application-beans.xml");
		      SpringSource obj = (SpringSource) context.getBean("welcomeMessage");
		      System.out.println("Message: "+ obj.getWelcomeMessage()+ "" + obj.getProjectType());
		   }
}
Explanation of the code: –
To understand the above program that uses spring framework, it is very important to remember the following two points.
• Firstly, we have created an application context by using spring framework API ClassPathXmlApplicationContext (). This API helps load the beans configuration file which is ultimately based on the provided API and further it can help to create and initialize all the objects based on the beans mentioned in the actual configuration file.
• Secondly, we have to get the required bean by using getBean () method from the instance of the created context object. This method ultimately uses a bean ID in order to return a generic object. This generic object can be further down casted to the actual object of the required type (here SpringSource). Once we have an object of the required type (i.e. SpringSource), we can use this object and call any of the method present in that class.
• Step 3: – Create a Bean Configuration File
It is a very important XML (application-beans.xml) file as it contains the required Bean Configuration. It acts as an adhesive that keeps beans (i.e. classes) intact. Always, this file should be created under the resource directory in any maven project as shown below.
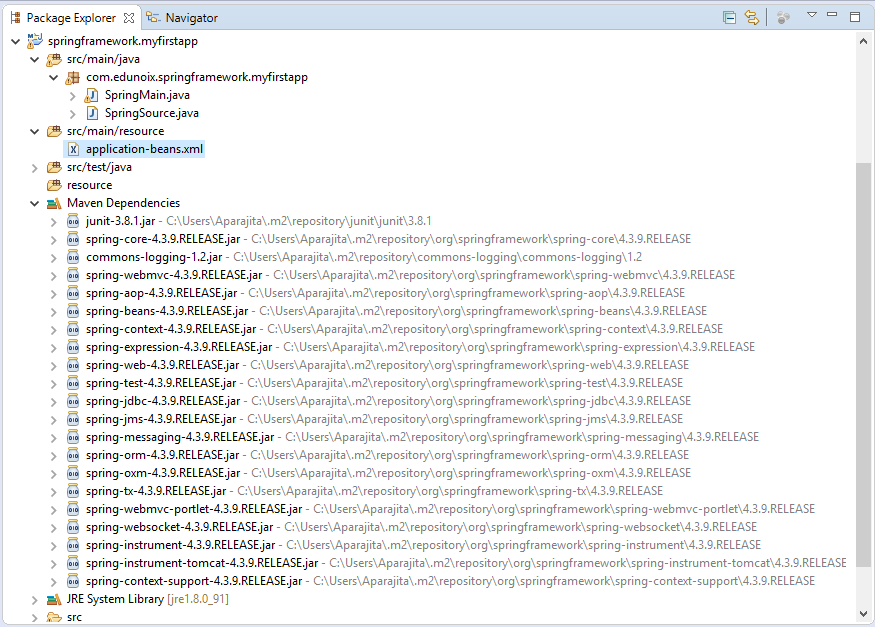
The application-beans.xml file
<?xml version = "1.0" encoding = "UTF-8"?>

<beans xmlns = "http://www.springframework.org/schema/beans"
   xmlns:xsi = "http://www.w3.org/2001/XMLSchema-instance"
   xsi:schemaLocation = "http://www.springframework.org/schema/beans
   http://www.springframework.org/schema/beans/spring-beans-3.0.xsd">

   <bean id = "welcomeMessage" class = "com.eduonix.springframework.myfirstapp.SpringSource">
      <property name = "welcomeMessage" value = "This is my first application using "/>
      <property name = "projectType" value = "Spring Framework 4.3.9."/>
   </bean>

</beans>
Output: –
When we will execute the SpringMain.java class as a Java application in eclipse then we will observe the following output.
Aug 05, 2017 8:40:28 PM org.springframework.context.support.ClassPathXmlApplicationContext prepareRefresh
INFO: Refreshing org.springframework.context.support.ClassPathXmlApplicationContext@21b8d17c: startup date [Sat Aug 05 20:40:28 EDT 2017]; root of context hierarchy
Aug 05, 2017 8:40:29 PM org.springframework.beans.factory.xml.XmlBeanDefinitionReader loadBeanDefinitions
INFO: Loading XML bean definitions from class path resource [application-beans.xml]
Message: This is my first application using Spring Framework 4.3.9.
Source code for first java app using spring framework
Conclusion: –
In this tutorial, we have learnt how to setup our environment using Eclipse, Maven and Spring Framework 4.3.9 and developed our first JAVA application using spring framework.

