

Wiring of Spring beans is one of the principal factors underlying the smooth operation of Spring-based software applications. The wiring feature combines the capabilities of disparate Spring beans or objects to achieve a common goal. The beans are wired and yet not tightly coupled with one another so that such beans can be reused for other purposes or tested without ever depending on the beans they were wired with. Two common approaches are followed to wire the Spring beans: XML configuration and Java class. Wiring can be done manually by configuring XML files or with Java classes or let Spring do the wiring based on a few specifications. The main idea behind this article is to show how Spring beans can be wired with the two approaches mentioned above.
Why Spring framework?
Spring framework is one of the most popular application development frameworks that are available because it offers the following benefits:
- Use the modules you need
Spring offers a number of different packages and classes but also gives you the option of choosing only those you need and not worry about the rest. - Best of other technologies made available
When you use Spring, you get the benefits of the best of other technologies because Spring leverages other technologies such as logging frameworks, ORM frameworks, Quartz, JEE, and JDK timers, other view technologies. - Lightweight
The Spring container or the IoC container is lightweight compared to the EJB container which enables Spring-based applications deployment on computers with limited memory and CPU resources. - Flexible transaction management system
Spring’s transaction management interface can be scaled up to handle global transactions such as the Java Transaction API or scaled down to handle local transactions such as those in a single database.
What is wiring of Beans?
When a software application works, behind the scenes, multiple objects or beans work together. Such objects or beans are likely to be independent of one another so that they can be reused for other purposes or tested independently without having to depend on other objects. To make such objects work together, they are loosely coupled through the Dependency Injection of Spring framework. This act of combining the objects or beans is known as wiring. Think of wiring as a process that ties together disparate beans for a specific purpose while such beans can be used elsewhere for a different purpose.
When the Spring-based application is started, an application context loads the definitions of all required beans or objects from a configuration file and wires the beans together.
There are two approaches of wiring beans in Spring framework:
- Wiring through XML.
- Wiring through Java classes.
What is auto wiring?
There are two ways to wire beans in the Spring framework: one, you wire the beans manually by declaring the beans, using the Dependency Injection (DI) and so on and two, let the Spring container wire the required beans. The latter process is known as auto wiring. When you let the Spring container auto wire beans, you configure how it is going to wire the beans. The Spring container can auto wire on the basis of the following parameters:
- byName: – When this parameter is set, Spring container looks for beans on which the auto wire attribute is set to byName in the XML configuration file.
- byType: – When this parameter is set, Spring container looks for beans on which the auto wire attribute is set to byType in the XML configuration file.
- constructor: – When this parameter is set, beans on which the auto wire attribute is set to constructor are searched.
- autodetect: – In this parameter, the first way to auto wire is by constructor. If that does not work, auto wiring is done by the byType parameter.
What is wiring by Java and XML?
As mentioned earlier in this article, wiring of Spring beans can be done by both Java classes and XML configuration. This section provides an overview of how the wiring is done with these two approaches.
XML: – Wiring is done typically in an XML configuration file. The configuration file contains the definitions of the beans. When the Spring-based software application starts up, the beans are called and based on the Dependency Injection (DI), the beans are wired. In the file, the element needs to be declared and the <constructor-arg> and <property> elements need to be used.
Java Classes: – To wire Spring beans with the help of Java class, a Spring Configuration class needs to be created and the class @Configuration needs to be annotated. The @Configuration tells Spring that the beans that should be wired are configured within this class.
Environment setup: –
Setting up the environment for Spring based application development involves just three major steps.
- Setting up Java Development Kit
Download JDK from the Oracle site and then, install and configure it. Then the PATH and JAVA_HOME environment variables must be set. - Setting of Eclipse IDE
Eclipse can be downloaded from the official website. Once downloaded, unpack the binaries and then set the PATH as well. - Setting up Spring libraries
The Spring libraries may be obtained from http://repo.spring.io/release/org/springframework/spring/. Again, it is important to set the CLASSPATH correctly.
Now your environment is ready to start developing Spring with Java applications.
Sample application: –
In this section, we will directly jump into coding part and develop two applications. The first would be showing beans wiring by using annotations and the second application will show beans wiring by XML configuration file.
Wiring by annotations – Here we will have three Java classes as shown below.
Listing 1: – Bean class
package com.dashboardapp.beanwire;

public class BeanWire {
	private String message;

	   public void setMessage(String message){
	      this.message  = message;
	   }

	   public void getMessage(){
	      System.out.println("Message is : " + message);
	   }

}
In the following class two annotations are used to inform the Spring container that the BeanWire bean will be loaded. The @Configuration annotation informs the Spring container that this class is a source of bean definitions. The @Bean annotation informs the spring framework that the method will return an object which needs to be registered as a bean with Spring application context.
Listing 2: – Bean configuration class with annotations
package com.dashboardapp.beanwire;

import org.springframework.context.annotation.*;

@Configuration
public class BeanWireConfig {
	@Bean
	   public BeanWire beanwire(){
	      return new BeanWire();
	   }

}
Following is the final call to run the application and check the output.
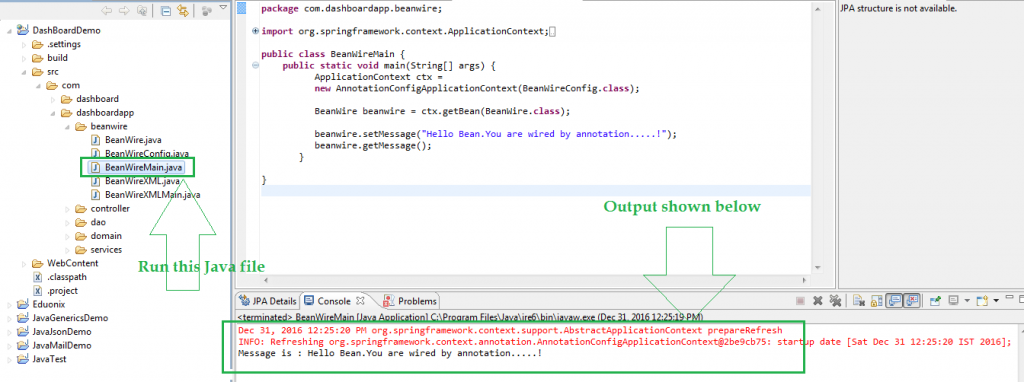
Listing 3: – Main class to run the application
package com.dashboardapp.beanwire;
import org.springframework.context.ApplicationContext;
import org.springframework.context.annotation.*;
public class BeanWireMain {
	public static void main(String[] args) {
	      ApplicationContext ctx =
	      new AnnotationConfigApplicationContext(BeanWireConfig.class);
	      BeanWire beanwire = ctx.getBean(BeanWire.class);
	      beanwire.setMessage("Hello Bean. You are wired by annotation.....!");
	      beanwire.getMessage();
	   }
}
When this Java program is executed it will show the following output.
Now we will check how to wire beans using XML file.
Wiring by XML file: – Here we will have two Java files and one XML configuration file as shown below.
The bean Java class is almost similar to the previous one.
Listing 1: – Bean file
package com.dashboardapp.beanwire;
public class BeanWireXML {
	private String message;
	   public void setMessage(String message){
	      this.message  = message;
	   }
	   public void getMessage(){
	      System.out.println("Message is : " + message);
	   }
}
This is the XML configuration file to wire the bean.
Listing 2: – XMLconfiguration file
<?xml version="1.0" encoding="UTF-8"?>
<beans xmlns="http://www.springframework.org/schema/beans"
    xmlns:xsi="http://www.w3.org/2001/XMLSchema-instance"
    xsi:schemaLocation="http://www.springframework.org/schema/beans
http://www.springframework.org/schema/beans/spring-beans-3.2.xsd">
    <bean id="beanwire" class="com.dashboardapp.beanwire.BeanWireXML">
            </bean>
</beans>

This is the main file to get the bean from XML configuration file and call the methods.
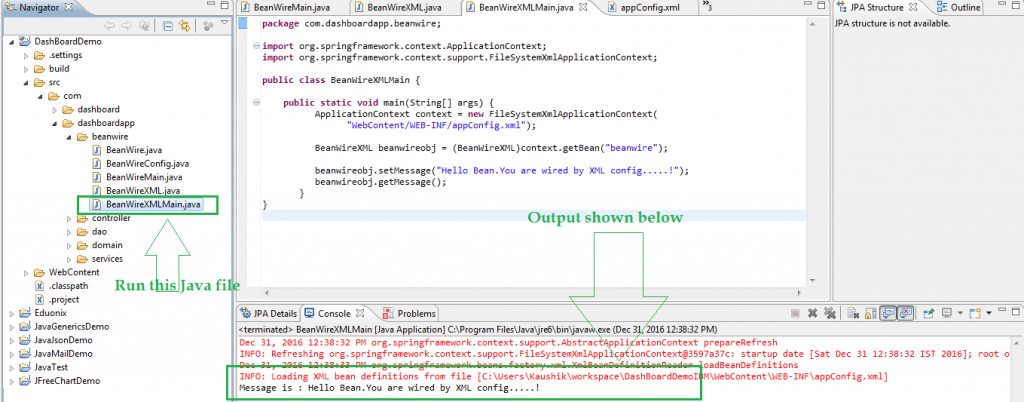
Listing 3: – Main Java file
package com.dashboardapp.beanwire;
import org.springframework.context.ApplicationContext;
import org.springframework.context.support.FileSystemXmlApplicationContext;
public class BeanWireXMLMain {
	public static void main(String[] args) {
		  ApplicationContext context = new FileSystemXmlApplicationContext(
                "WebContent/WEB-INF/appConfig.xml");
	      BeanWireXML beanwireobj = (BeanWireXML)context.getBean("beanwire");
	      beanwireobj.setMessage("Hello Bean. You are wired by XML config.....!");
	      beanwireobj.getMessage();
	   }
}
Now, run the application and it will show the following output.
Conclusion:-
While the auto wiring feature seems a great thing to have, it requires caution to be exercised. First, not all wiring should be done using the auto wiring feature. In fact, auto wiring may not be suitable for all scenarios, especially complex wiring cases. The scope of auto wiring, it is important to realize, is limited.


Hi,
This is very helpfull for java people but can you add spring MVC and spring AOP these concepts are more helpfull for all.