In this chapter, we are going to assist novices in understanding the basic features and functionality of Jackson library API. The Jackson library API is a very widespread and efficient Java-based library which is used to map or serialize the Java objects to JSON and vice versa.
In this tutorial, it is expected that the Jackson`s novices possess a thorough knowledge of basic Java programming irrespective of being beginners or experts.
Jackson library API Features: –
• Open Source and Free to use: Jackson library API is an open source library and is absolutely free to use.
• Clean and Compact JSON Results: Jackson API is widely used by the Java developers in order to create clean and compact JSON results which are very simple to read.
• Simple to use: Jackson API is well known for providing a high-level facade, which is very helpful in the simplification of the commonly used use-cases.
• Mapping creation not required: It provides the default mapping for most of the objects which can be serialized. Therefore, the mapping creation is not required.
• No Dependency Required: Jackson library API is quite independent as it does not require any other library except JDK or JRE (Java Runtime Environment).
• Good Performance: Jackson API is very good at its performance as it is quite fast in operations, consumes very less memory space to operate, and is very suitable for the large object systems or graphs.
Steps to Process JSON using Jackson API
There are three different approaches which Jackson API provides to process JSON Objects.
1. Streaming API: This approach allows to reads and writes JSON content as discrete events. Here the JsonParser reads the data, whereas the JsonGenerator writes the data.
-> It is known to be the most powerful approach among the three approaches which the Jackson API provide.
-> This approach has the lowest overhead and it is the fastest way to conduct read and write operations.
-> It can be considered equivalent to the SAX parser which is used for XML.
2. Tree Model: – This approach allows preparing an in-memory tree representation of the JSON document. Here, the ObjectMapper builds tree of JsonNode nodes.
-> It is known to be the most flexible approach.
-> It can be considered equivalent to the DOM parser which is used for XML.
3. Data Binding – This approach allows converting JSON to and from Plain Old Java Object (POJO) with the use of the property accessor or annotations. Here, the ObjectMapper reads or writes JSON for both types of data bindings. It can be considered equivalent to the JAXB parser which is used for XML. Data binding can be of two types as follows:
-> Simple Data Binding: In this type of data binding, we can convert JSON to and from Java collection types such as Maps, Lists, Strings, Numbers, Booleans, and null objects.
-> Full Data Binding: In this type of data binding, we can convert JSON to and from any Java type.
Local Environment Setup for Jackson
In this tutorial, we require JRE (Java Runtime Environment) 8 and eclipse as the IDE (Integrated development environment). The following are the steps to set up local environment to build any Jackson application using Maven.
Jackson environment setup using Maven
In this article, we will use eclipse and the maven plugin in order to build a Java based application using Jackson API. The following are the steps.
Step 1: – Download the maven plugin [apache-maven-3.5.0] from the following link. Unzip the downloaded package under the following path [C:\work\app].
|
Maven Plugin Download Link |
|
https://maven.apache.org/download.cgi |
Step 2: – Set up the following windows operating system environment variables as M2_REPO, PATH M2_HOME, and MAVEN_OPTS as shown below.
|
S No |
Variable Name |
Variable value |
|
1. |
M2_REPO |
C:\Users\Aparajita\.m2\repository |
|
2. |
M2_HOME |
C:\work\app\apache-maven-3.5.0 |
|
3. |
PATH |
%Path%;C:\work\app\apache-maven-3.5.0\bin; |
|
4. |
MAVEN_OPTS |
-Xms256m -Xmx512m |
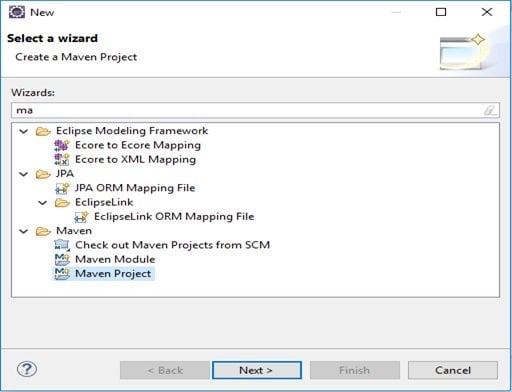
Step 3: – Open a new Maven Project in eclipse and navigate to New others… Maven Project as shown below.

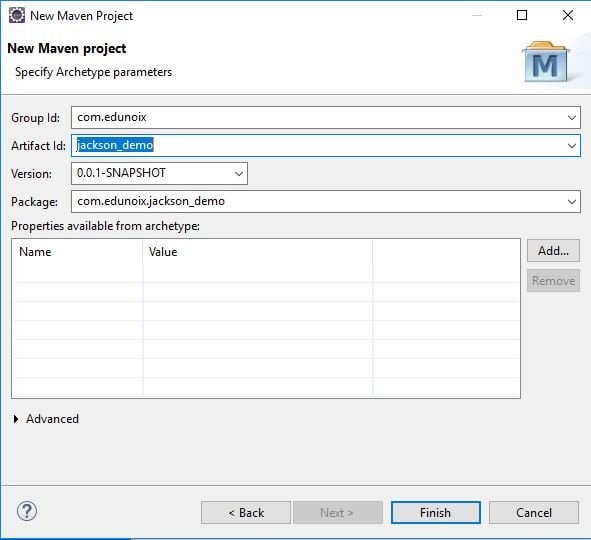
Step 4: – In this step, you need to enter the group id, artifact id and version field as the Archetype parameters are required for a maven project as shown below.

Step 5: – Open pom.xml file for the maven project ‘jackson_demo’, which you just created and add the maven repository URL for Jackson API as shown below.
<project xmlns="http://maven.apache.org/POM/4.0.0" xmlns:xsi="http://www.w3.org/2001/XMLSchema-instance"
	xsi:schemaLocation="http://maven.apache.org/POM/4.0.0 http://maven.apache.org/xsd/maven-4.0.0.xsd">
	<modelVersion>4.0.0</modelVersion>

	<groupId>com.eduonix</groupId>
	<artifactId>jackson_demo</artifactId>
	<version>0.0.1-SNAPSHOT</version>
	<packaging>jar</packaging>

	<name>jackson_demo</name>
	<url>http://maven.apache.org</url>

	<properties>
		<project.build.sourceEncoding>UTF-8</project.build.sourceEncoding>
	</properties>
	<repositories>
		<repository>
			<id>org.codehaus.jackson</id>
			<url>https://mvnrepository.com/artifact/org.codehaus.jackson/jackson-mapper-asl</url>
		</repository>
	</repositories>
	<dependencies>
		<dependency>
			<groupId>org.codehaus.jackson</groupId>
			<artifactId>jackson-mapper-asl</artifactId>
			<version>1.9.0</version>
		</dependency>

		<dependency>
			<groupId>junit</groupId>
			<artifactId>junit</artifactId>
			<version>3.8.1</version>
			<scope>test</scope>
		</dependency>
	</dependencies>
</project>
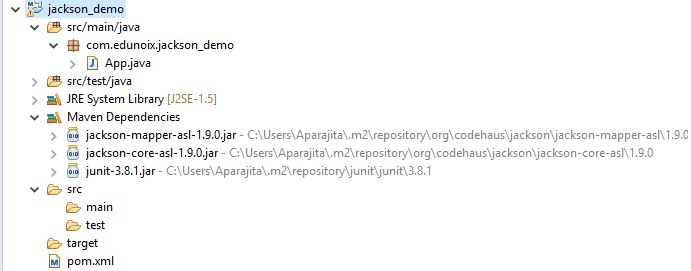
Step 6: – The Maven tool will automatically download the required APIs for the Jackson module and set the project build path for the Java/J2EE application as shown below.

At this point, the local environment setup for Jackson API and eclipse have completed and you are ready to implement it in your Jackson based Java application.
Conclusion: –
In this chapter, we discussed about the following items related to Jackson library API.
• Basic features of Jackson API.
• Steps and different ways to Process JSON using Jackson API.
• Steps to build Jackson environment using Maven plugin in eclipse.


