
")
cut and paste commands
The cut command prints selected parts of lines from file(s) to standard output.
The most common syntaxes used:
cut –d field_separator –f fields,to,select
cut –c range_or_list_of_charcter_positions_to_select
Example
The following command will select the 3rd field in the /etc/passwd file:

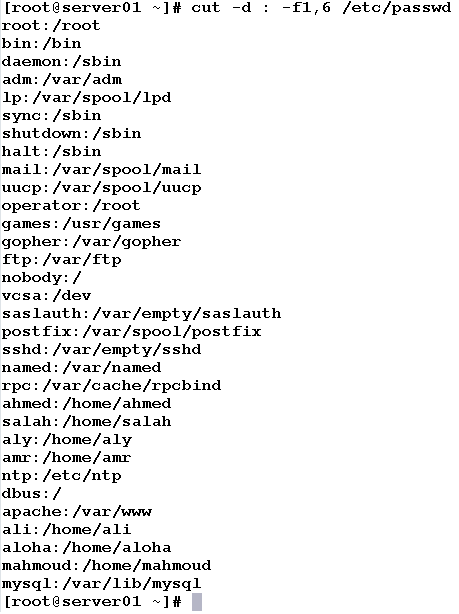
Example
The following command will select first and sixth fields of the /etc/passwd file.
Example
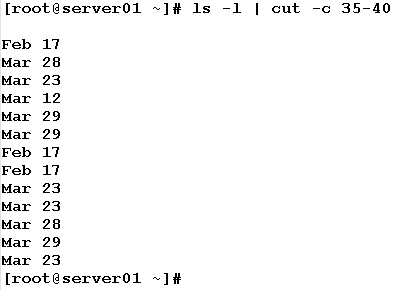
The following command will select characters at positions from 35 to 40 out of the output of the ls –l command:
Example
Consider the following output from ifconfig command:

How could we extract the IP address of the network interface card eth0, and assign it to a variable (say IPADDRESS)?
From the output, we can see that the IP address is located in the second line. So, we need first to extract this line:

Now, we need to extract the IP address from the line. This could be done using the cut command on two steps:

This has used the cut command with colon ‘:’ as field separator, and chose the second field. The second step will extract the IP address by using the same command with white space as field separator, and the first field as the chosen field.

Wow, the IP address finally!! Now assign this output to the IPADDRESS variable:

Lovely, isn’t it?!
* * * * * *
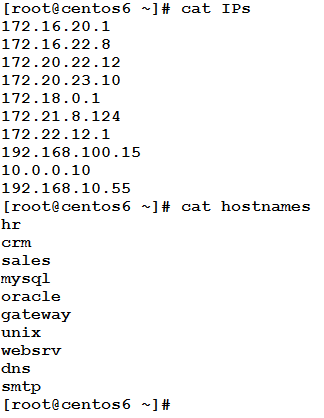
As the name implies the paste command is the opposite of the cut command. It simply merges lines from multiple files. In other words, consider we have two files whose contents are as follows:
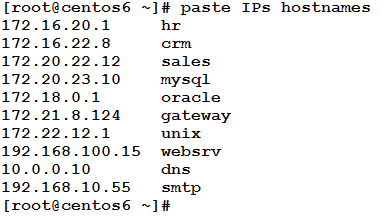
The paste commands will merge lines from both files to be columns in the result, and print that result to the standard output. The result could be something like this:
This is the default behavior of the command if used without options. The following is the syntax of the paste command:
paste –d delimiter_to_use [FILE] …
If used without providing a delimiter (like the case above), the tab character is used as a field separator in the generated result.

Example
Consider the same two files IPs and hostnames. We need to merge lines from both files, and separate them by colons ‘:’. This could be achieved using the following command:
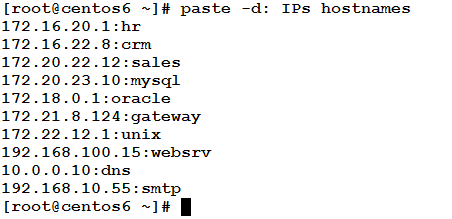
So simple and powerful!! I love it!!!
The grep Command
One of the most important shell commands ever used. As a UNIX/Linux system admin, you may never have a day at work wherein you don’t need to use the grep command.
This command prints lines matching a specific pattern. It simply searches input file(s), or output from another command that is piped to it as input.
Syntax
grep [OPTIONS] PATTERN FILE …
command | grep [OPTIONS] PATTERN
Where:
PATTERN is the string to look for.
OPTIONS are the command-line switches that change/control the behavior of the command.
Commonly-Used grep Options
The following are the most commonly-used options for the grep command:
-i causes the command to ignore the letter case when performing search.
-v inverts the selection; i.e. the lines matching the search pattern are discarded.
-r, -R performs recursive search in all files, under all subdirectories, in the specified path.
-n prints the line number (within the input file) for each line matching the search pattern.
-w matches a whole word.
–color causes the pattern match to be printed in different color.
-q quiet search. Using this option causes the command to not print anything to standard output. In case of match, a zero exit status reports command success. Otherwise (no match), a non-zero exit status is returned. Usually, such quiet search is followed by a test condition that checks the exit status, and makes decision based on its value.
Example
We need to search the /etc/passwd file for any occurrences of the string “ahmed”. This could be achieved using the following command:

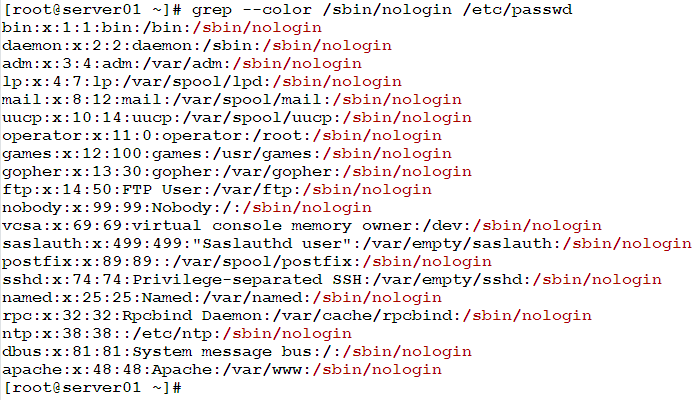
Example
We need to search the /etc/passwd file for users who have /sbin/nologin as their login shell. The matched string should be marked by different color in the output.
This can be done using the following command:
Example
Back to example of extracting the IP address out of the ifconfig command output. Given the following command output:
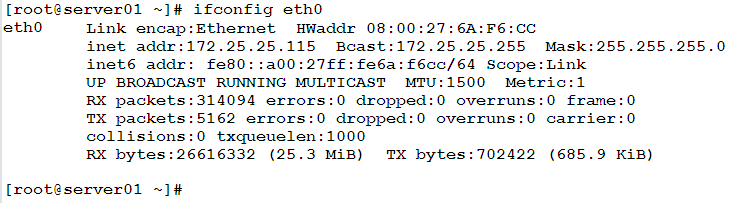
This time we will use grep to get the line containing the IP address.

Notice the usage of the –w option. This is necessary to match the pattern “inet” as a whole word (not part of a larger word). If –w wasn’t used, two lines would be matched: this one, and the other containing “inet6”.
Example
In the first example (searching for the pattern “ahmed” in the /etc/passwd file), we need to know the line number of any matching line(s).
I heard you, Bravo!!! We should use the –n option.

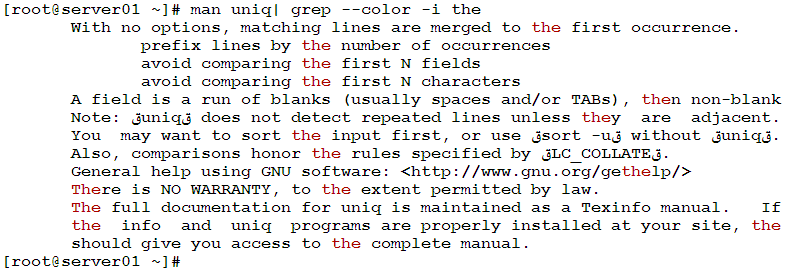
Example
The following command will look for every occurrence of the pattern “the” (ignoring the case) in the manual page of the uniq command.
Example
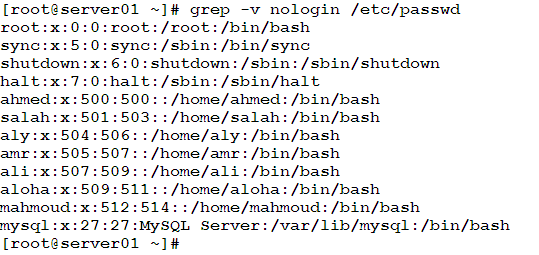
In this example, we want to retrieve all lines from the /etc/passwd file that don’t contain the pattern “nologin”. This can be done using the following command:
grep Variants
There are two variants of the grep command: egrep and fgrep. egrep means extended grep, while fgrep is the fast grep.
Example
We need to get lines from the /etc/passwd file that match any of the following strings: ahmed, ali, amr. egrep has the solution for this problem:

The above command has used the following syntax:
egrep “PATTERN1|PATTERN2|…| PATTERNn” FILE …
Matching the Start and End of Line
There will be cases wherein you need to look for a specific pattern, and ensure the matched occurrences come at the beginning or at the end of lines. For these two purposes, the grep command makes use of the two regular expressions ^ and $. This would use the syntaxes:
grep [OPTIONS] ^PATTERN FILE … Matches a pattern that comes at start of the line.
grep [OPTIONS] PATTERN$ FILE … Matches a pattern that comes at end of the line.
Example
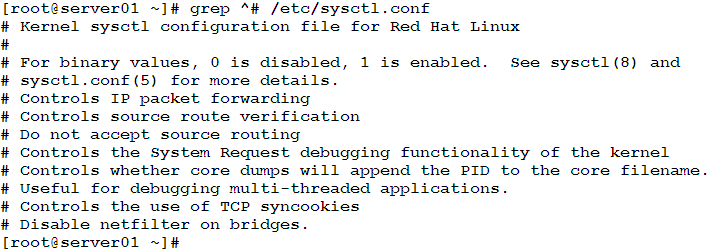
In a script or a configuration file, we need to retrieve all the commented lines. As you remember, to comment a line, we precede it by a hash ‘#’ character. So, we need to locate all lines starting with ‘#’.
Example
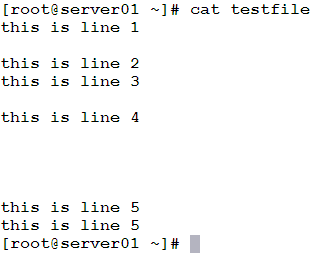
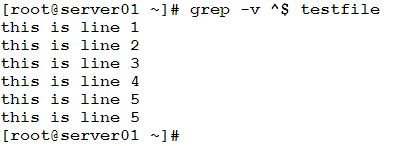
In this example, we need to print the contents of a file, with empty lines excluded.
An empty line can be located by searching for the pattern ^$
* * * * * *
That was part two of the articles on Text Processing Tools in Linux Shells. There will be one more. So, stay here, and don’t go anywhere.

