

Apache Flex is an open source application framework which allows us to build a mobile application for various operating systems such as iOS, Android, and BlackBerry Tablet OS based devices, etc. It is a very powerful framework, that builds traditional software applications, on browsers and desktops and they are based on using the same Flex programming model, codebase, and tools. In this article, we will be analyzing Apache Flex in depth.
Adobe Flash Builder helps to build Flex applications very easily. It is an enterprise-class Eclipse based IDE (Integrated Development Environment). In this article, we are going to analyze Apache Flex for FLEX SDK 4.6.0, Adobe Flash Builder 4.7, Flex development environment setup, FLEX concepts, advantages, and disadvantages building web and mobile applications.
Analyzing Apache FLEX SDK and Environment Set up
Apache Flex delivers FLEX SDK (Software Development Kit). FLEX SDK supplies the following components to build mobile and interactive rich internet applications (RIA).
- Flex class library i.e. ActionScript classes
- The debugger
- The Flex compilers
- The MXML
- ActionScript programming languages
- Utilities
Flex builds Graphical User interfaces (GUI) which are client-side web development. The server side coding is done in the traditional programming languages such as JAVA, PHP, etc. An application built in Flex supplies SWF file, an HTML wrapper, and CSS file(s) which resembles to HTML / JavaScript traditional web application coding. Like any traditional web application, these resources are delivered to client’s browser from a web or application server via HTTP request and response model to run the web application.
The development environment setup can be done in the following steps.
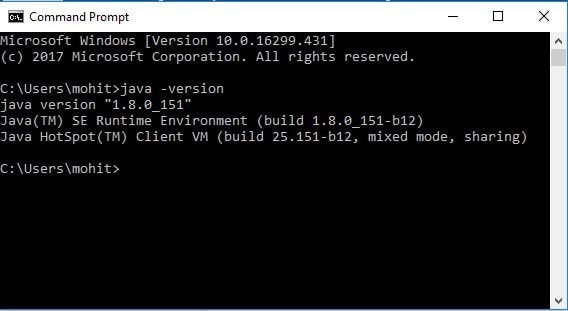
STEP 1: Flex requires JDK 1.4 and above. JDK can be downloaded from the following link http://www.oracle.com/technetwork/pt/java/javase/downloads/jdk8-downloads-2133151.html.
After installation, check the JAVA version by simply issuing command [java -version] as shown below.

STEP 2: In this step, we will setup Adobe Flash Builder 4.7. We can download and install Adobe Flash Builder IDE from the following link
https://helpx.adobe.com/in/creative-cloud/kb/creative-cloud-apps-download.html

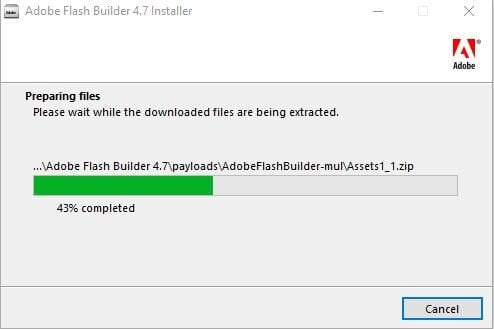
Once a download is completed, we can install and unpack the binary distribution at a suitable location on PC (say C:\flash-builder on windows). Click on the executable file, the system will start preparing files as shown below.
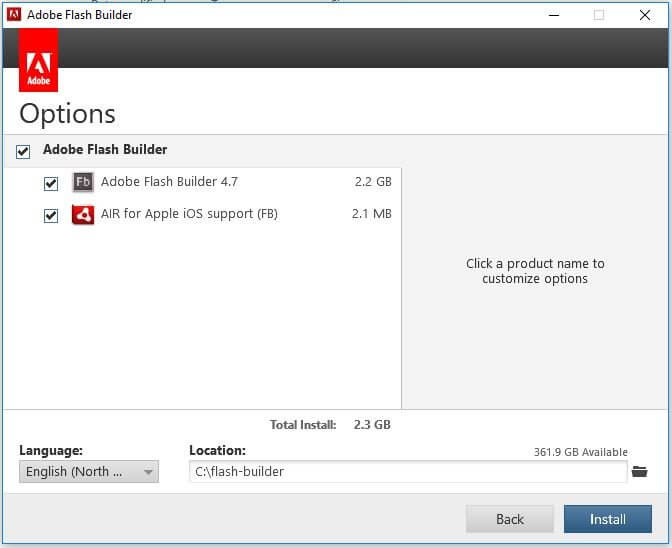
Next, create an Adobe ID account and proceed towards the installation of Adobe builder 4.7 as shown below.
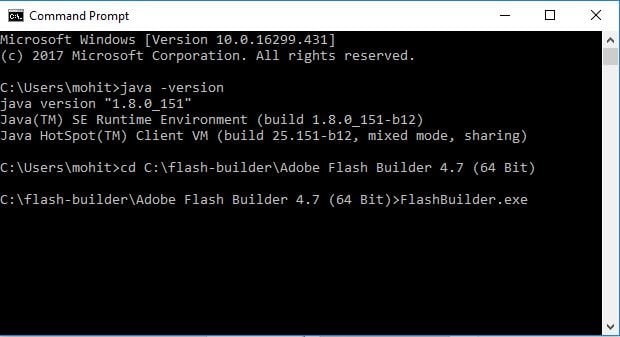
After installation has completed, we can start Flash Builder through command line by simply double-clicking on C:\flash-builder\Adobe Flash Builder 4.7 (64 Bit)\FlashBuilder.exe.
Flash builder 4.7 has started successfully on Windows as shown below.
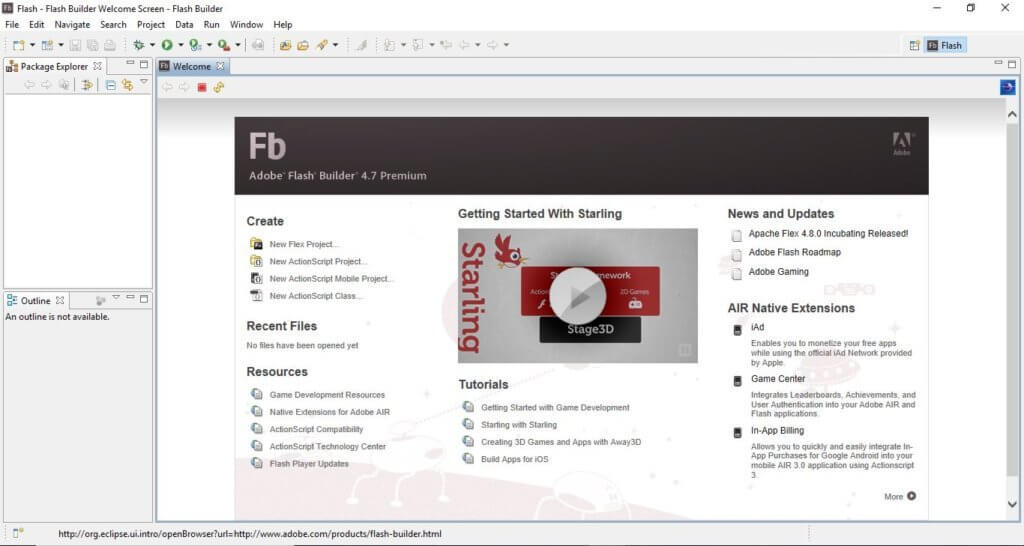
This should be noted that Adobe Flash Builder comes pre-configured with FLEX SDKs. We are going to use FLEX SDK 4.6.0 in our examples which are bundled with Adobe Flash Builder 4.7.
STEP 3: In this step, we will Install Apache Tomcat Web server. We can download Apache Tomcat from the following link
https://tomcat.apache.org/
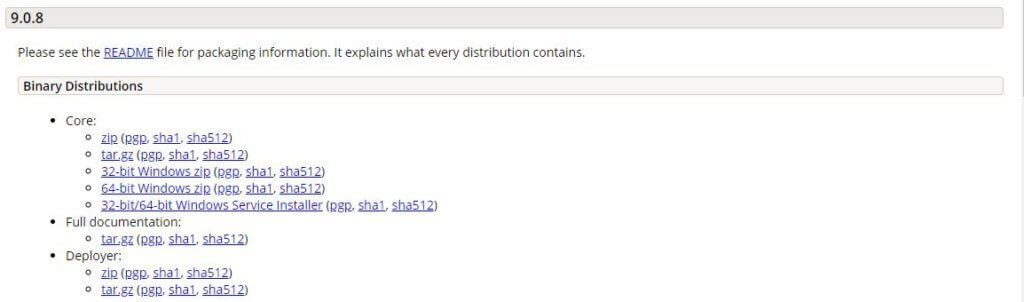
We will download a zip file for 64-bit windows for Apache Tomcat version 9.0.8 as shown above in the screenshot. Extract binaries from the zip file at C:\Software\apache-tomcat-9.0.8.
Next, we can start Apache Tomcat webserver by executing startup.bat file present at C:\Software\apache-tomcat-9.0.8\bin through windows command line. Tomcat requires JAVA_HOME variable to be setup in environment variables for Window operating. If it is not set, then set up JAVA_HOME as shown below.

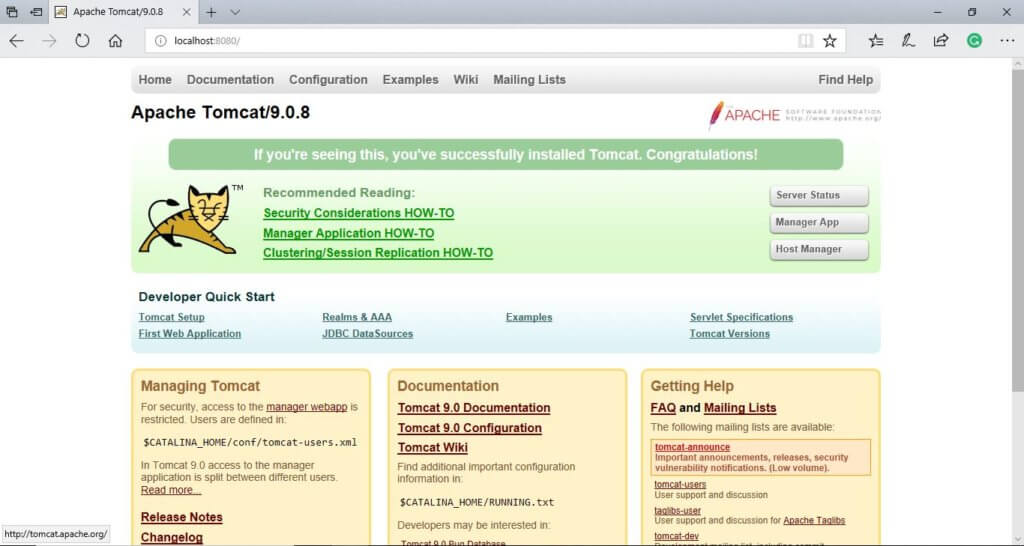
Once Tomcat server has started, we can access it through below URL.
http://localhost:8080/ http://localhost:8080/
If Apache Tomcat server has started successfully, then it should display the following result on browser.
We can shutdown Apache tomcat web server by issuing the following command through windows command line.
C:\Software\apache-tomcat-9.0.8\bin\shutdown.sh
This has completed the development environment setup for building Flex Application.
Example of Flex Application
We can build Flex application through the following steps.
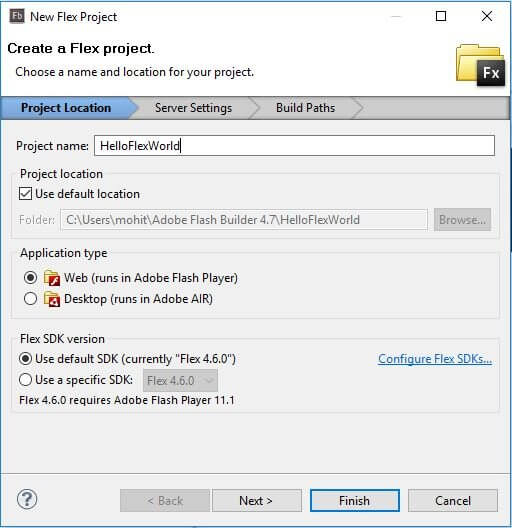
STEP 1: Create a Flex Project by using Flash Builder IDE 4.7. Launch the project wizard using the navigation option File > New > Flex Project.
STEP 2: Expand the project in the Project explorer to view project components and libraries as shown below.

STEP 3: Create external CSS File i.e. styles.css for Wrapper HTML page in html-template folder as shown below.
html, body {
	height:100%;
}

body {
	margin:0;
	padding:0;
	overflow:auto;
	text-align:center;
}

object:focus {
	outline:none;
}

#flashContent {
	display:none;
}

.pluginHeader {
	font-family:Arial, Helvetica, sans-serif;
	font-size:14px;
	color:#9a1304;
	text-decoration:none;
	font-weight:bold;
}

.pluginInstallText {
	font-family:Arial, Helvetica, sans-serif;
	font-size:13px;
	color:#000000;
	line-height:18px;
	font-style:normal;
}

.pluginText {
	font-family:Arial, Helvetica, sans-serif;
	font-size:13px;
	color:#000000;
	line-height:17px;
	font-style:normal;
}
STEP 4: Modification of Wrapper HTML page template i.e. index.template.html in html-template folder.
<!DOCTYPE html PUBLIC "-//W3C//DTD XHTML 1.0 Transitional//EN"
"http://www.w3.org/TR/xhtml1/DTD/xhtml1-transitional.dtd">
<html xmlns = "http://www.w3.org/1999/xhtml" lang = "en" xml:lang = "en">

   <head>
      <title>${title}</title>
      <meta name = "google" value = "notranslate" />
      <meta http-equiv = "Content-Type" content = "text/html; charset = utf-8" />
      <link rel = "stylesheet" href = "styles.css" type = "text/css"></link>
      <link rel = "stylesheet" type = "text/css" href = "history/history.css" />
      <script type = "text/javascript" table table-bordered = "history/history.js">
      </script>
      <script type = "text/javascript" table table-bordered = "swfobject.js"></script>

      <script type = "text/javascript">
         // For version detection, set to min. required Flash Player version,
         //or 0 (or 0.0.0), for no version detection.
         var swfVersionStr = "${version_major}.${version_minor}.${version_revision}";

         // To use express install, set to playerProductInstall.swf,
         //otherwise the empty string.
         var xiSwfUrlStr = "${expressInstallSwf}";
         var flashvars = {};
         var params = {};
         params.quality = "high";
         params.bgcolor = "${bgcolor}";
         params.allowscriptaccess = "sameDomain";
         params.allowfullscreen = "true";

         var attributes = {};
         attributes.id = "${application}";
         attributes.name = "${application}";
         attributes.align = "middle";
         swfobject.embedSWF (
            "${swf}.swf", "flashContent",
            "${width}", "${height}",
            swfVersionStr, xiSwfUrlStr,
            flashvars, params, attributes);

         // JavaScript enabled so display the flashContent div in case
         //it is not replaced with a swf object.
         swfobject.createCSS("#flashContent", "display:block;text-align:left;");
      </script>
   </head>

   <body>
      <div id = "flashContent">
         <p style = "margin:100px;">

            <table width = "700" cellpadding = "10" cellspacing = "2" border = "0">
               <tr>
                  <td class = "pluginHeader">Flash Player Required</td>
               </tr>

               <tr>
                  <td class = "pluginText">The Adobe Flash Player version
                     10.2.0 or greater is required.</td>
               </tr>

               <tr>
                  <td class = "pluginInstallText" align = "left">

                  <table border = "0" width = "100%">
                     <tr class = "pluginInstallText" >
                        <td>Click here to download and install Adobe Flash Player:</td>
                        <td> </td>
                        <td align = "right">
                           <script type = "text/javascript">
                              var pageHost
                                 = ((document.location.protocol == "https:") ? "https://" : "http://");
                              document.write("<a target = '_blank'"
                                 +" href = 'http://get.adobe.com/flashplayer/'><"
                                 +"img style = 'border-style: none' table table-bordered = '"
                                 +pageHost
                                 +"www.adobe.com/images/shared/download_buttons/get_flash_player.gif'"
                                 +" alt = 'Get Adobe Flash player' /></a>" );
                           </script>
                        </td>
                     </tr>
                  </table>
               </tr>
            </table>
         </p>
      </div>

      <noscript>
         <object classid = "clsid:D27CDB6E-AE6D-11cf-96B8-444553540000"
            width = "${width}" height = "${height}" id = "${application}">
            <param name = "movie" value = "${swf}.swf" />
            <param name = "quality" value = "high" />
            <param name = "bgcolor" value = "${bgcolor}" />
            <param name = "allowScriptAccess" value = "sameDomain" />
            <param name = "allowFullScreen" value = "true" />

            <!--[if !IE]>-->
            <object type = "application/x-shockwave-flash" data = "${swf}.swf"
               width = "${width}" height = "${height}">
               <param name = "quality" value = "high" />
               <param name = "bgcolor" value = "${bgcolor}" />
               <param name = "allowScriptAccess" value = "sameDomain" />
               <param name = "allowFullScreen" value = "true" />
            <!--<![endif]-->

            <!--[if gte IE 6]>-->
               <p>
                  <p style = "margin:100px;">
                     <table width = "700" cellpadding = "10" cellspacing = "2"
                        border = "0">
                        <tr>
                           <td class = "pluginHeader">Flash Player Required</td>
                        </tr>

                        <tr>
                           <td class = "pluginText">The Adobe Flash Player version
                           10.2.0 or greater is required.</td>
                        </tr>

                        <tr>
                           <td class = "pluginInstallText" align = "left">

                           <table border = "0" width = "100%">
                              <tr class = "pluginInstallText" >
                                 <td>Click here to download and install Adobe Flash
                                    Player:</td>
                                 <td> </td>
                                 <td align = "right">
                                    <script type = "text/javascript">
                                       var pageHost
                                          = ((document.location.protocol == "https:") ? "https://" : "http://");
                                       document.write("<a target = '_blank'"
                                          +" href = 'http://get.adobe.com/flashplayer/'><"
                                          +"img style = 'border-style: none' table table-bordered = '"
                                          +pageHost
                                          +"www.adobe.com/images/shared/download_buttons/get_flash_player.gif'"
                                          +" alt = 'Get Adobe Flash player' /></a>" );
                                    </script>
                                 </td>
                              </tr>
                           </table>
                        </tr>
                     </table>
                  </p>
               </p>
            <!--<![endif]-->

            <p style = "margin:100px;">
               <table width = "700" cellpadding = "10" cellspacing = "2" border = "0">
                  <tr><td class = "pluginHeader">Flash Player Required</td></tr>
                  <tr><td class = "pluginText">The Adobe Flash Player version
                     10.2.0 or greater is required.</td></tr>
                  <tr>
                     <td class = "pluginInstallText" align = "left">
                        <table border = "0" width = "100%">
                           <tr class = "pluginInstallText" >
                              <td>Click here to download and install Adobe Flash
                                 Player:</td>
                              <td> </td>
                              <td align = "right">
                                 <script type = "text/javascript">
                                    var pageHost
                                       = ((document.location.protocol == "https:") ? "https://" : "http://");
                                    document.write("<a target = '_blank'"
                                       +" href = 'http://get.adobe.com/flashplayer/'><"
                                       +"img style = 'border-style: none' table table-bordered = '"
                                       +pageHost
                                       +"www.adobe.com/images/shared/download_buttons/get_flash_player.gif'"
                                       +" alt = 'Get Adobe Flash player' /></a>" );
                                 </script>
                              </td>
                           </tr>
                        </table>
                     </td>
                  </tr>
               </table>
            </p>
         <!--[if !IE]>-->
         </object>
         <!--<![endif]-->
         </object>
      </noscript>
   </body>
</html>
STEP 5: Creation of Internal CSS file i.e. com/edunoix/css/Style.css for HelloFlexWorld.mxml. Flex delivers similar css styles for its UI Controls as there are css styles for HTML UI controls.
/* CSS file */
@namespace s "library://ns.adobe.com/flex/spark";
@namespace mx "library://ns.adobe.com/flex/mx";

.heading {
	fontFamily: Arial, Helvetica, sans-serif;
	fontSize: 16px;
	color: #9a1305;
	textDecoration:none;
	fontWeight:normal;
}

.button {
	fontWeight: bold;
}

.container {
	cornerRadius :10;
	horizontalCenter :0;
	borderColor: #766776;
	verticalCenter:0;
	backgroundColor: #dededf;
}
STEP 6: Modification of Entry Level Class i.e. com/edunoix/flex/HelloFlexWorld.mxml with the following piece of code.
<?xml version = "1.0" encoding = "utf-8"?>
<s:Application xmlns:fx = "http://ns.adobe.com/mxml/2009"
			   xmlns:s = "library://ns.adobe.com/flex/spark"
			   xmlns:mx = "library://ns.adobe.com/flex/mx"
			   width = "100%" height = "100%"
			   minWidth = "450" minHeight = "450"
			   initialize = "application_initializeHandler(event)">

	<fx:Style source = "/HelloFlexWorld/src/com/edunoix/css/Style.css.css" />
	<fx:Script>
		<![CDATA[
			import mx.controls.Alert;
			import mx.events.FlexEvent;
			protected function btnClickMe_clickHandler(event:MouseEvent):void {
				Alert.show("Hello Flex World!");
			}

			protected function application_initializeHandler(event:FlexEvent):void {
				lblHeader.text = "Hello Flex World Application";
			}
		]]>
	</fx:Script>

	<s:BorderContainer width = "450" height = "450" id = "mainContainer"
					   styleName = "container">
		<s:VGroup width = "100%" height = "100%" gap = "50" horizontalAlign = "center"
				  verticalAlign = "middle">
			<s:Label id = "lblHeader" fontSize = "40" color = "0x677677"
					 styleName = "heading" />
			<s:Button label = "Click Here!" id = "btnClickMe"
					  click = "btnClickMe_clickHandler(event)" styleName = "button" />
		</s:VGroup>
	</s:BorderContainer>
</s:Application>
STEP 7: Flex application development for display “Hello Flex World” has completed successfully. We can use Flex builder play button to run the application.
Flex Application deployment
We can prepare Flex application for deployment through the following steps.
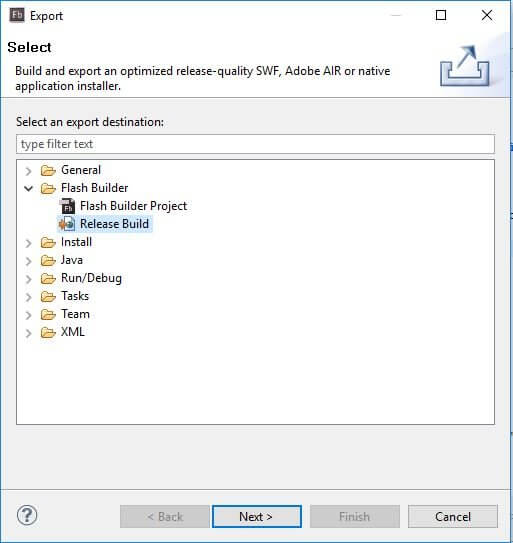
STEP 1: Right click on the project in the project explorer and click Export option. It will open the dialogue window as shown below. Click on the “Release Build” option and click Next.
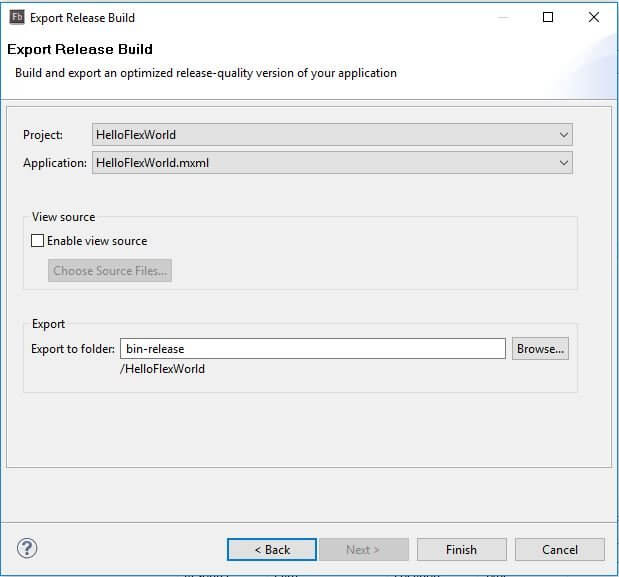
STEP 2: Review the project details along with the export folder and click on the Finish button as shown below.
STEP 3: Creation of WAR File. After Flex application is working fine, we can export it as a war file.
- Go to bin-release directory
- Here, select all the files and folders available inside bin-release directory.
- Zip all the selected files and folders inside bin-release directory into a zip file called
- HelloFlexWorld.zip.
- Rename HelloFlexWorld.zip to HelloFlexWorld.war.
STEP 4: Deployment of WAR file into Apache Tomcat web Server.
- Stop the tomcat server by executing shutdown.bat file.
- Copy the HelloFlexWorld.war file into tomcat installation directory i.e. webapps folder.
- Start the tomcat server by executing startup.bat script.
- Now observer inside the webapps directory that a new folder HelloFlexWorld has created.
- At this point HelloFlexWorld.war has successfully deployed into Apache Tomcat Webserver root.
STEP 5: Run Flex Application as Web application via Apache Tomcat.
- Enter below URL in the web browser where Flex player is already enable to view the “Hello Flex World” application which we have created.
Flex Application Web URL
http://localhost:8080/HelloFlexWorld/HelloFlexWorld.html
Advantages of Flex based Applications
- Flex applications are usually executed on Flash Player. Therefore, these applications can access various device capabilities such as GPS, local database, camera, graphics accelerometer, etc.
- Flex applications can be easily built and executed on the browsers and desktop as web and windows applications respectively.
- Flex based applications can be executed easily on iOS, Android, and BlackBerry Tablet OS devices.
- Flex applications are based on open source framework which is platform independent. Therefore, GUI (Graphical User Interface) can be native to a platform or developed on the same, across all.
- Flex applications are client-side applications which can easily interact with a server, irrespective of a type of server-side technologies used. It can work with varieties of server-side technologies such as JAVA, Spring, Hibernate, PHP, Ruby, .NET, Adobe ColdFusion, REST, SOAP, JSON, JMS, and AMF.
- Flex is capable to build mobile and interactive rich internet applications (RIA). These applications assure rich user experience in terms of intuitive application interaction, and information presented through a visually richer interface.
- Flex based application is known to be good in terms of performance as it is a single page application. The states get transitioned from one state to other states without fetching a new page from the server or refreshing the browser. It drastically reduces the page loading time.
- Flex based application dramatically reduces the load on the server as it returns the application only once. It does not return to a new page every time as server response on each request made to the server when the user views get changed.
Disadvantages of Flex based Applications
- Flex applications are single threaded applications which may cause the issue on a multi-threaded platform. But Flex also provides an asynchronous programming model which can completely mitigate this concern.
- Flex is ActionScript and XML based open source framework. Therefore, the Flex application developer requires the learning of these two technologies in order to develop Flex based applications.
Conclusion
In this article, we have explored FLEX SDK 4.6.0, Adobe Flash Builder 4.7, Flex development environment setup, FLEX concepts, advantages, and disadvantages to build web and mobile applications.


