

This article is part 3 of a four part series where we look at the issues around developing secure applications. In Part 1 we looked upon Securing applications with Secure Socket Layer and in Part 2 we will looked at the OpenID Connect from the OpenID Foundation. In this third part we will look at the issues in using OAuth to underpin the OpenID Connect flows and in provide application security in the domain of application user authorisation and access.
Designing and implementing security systems on OAuth is a complex process. OAuth 2.0 is version 2 of OAuth and attempts to provide a developer more simplicity when implementing specific authorization flows.
We can think of OAuth as a implementing protocol in that it provides a useful starting point for implementing other protocols such as OpenID Connect as we saw in Part 2 of this series.
In the last article we outlined a secure access design with OpenID Connect that follows the delegation pattern. In any large organisation certain roles have specific permissions. These permissions are delegated to the actor in the role. As an example to illustrate this pattern a CEO of a company delegates the company’s financial transactions to the financial officer.
When the financial officer contacts the bank to transfer funds the bank complies because it accepts the corporation has delegated authority to the financial officer to access the corporation’s funds. If a cleaner tried to transfer the funds the Bank would reject the request as it would not believe the cleaner possessed the delegated authority to transfer funds.
In this analogy the relying party (wso2 identity server) has the delegated authority to authorise the User attempting to access our application. If an application authenticates users with a password, the only way to revoke access is for the user to change their password. This results in all delegated access being revoked. With OAuth and OpenID Connect, users can revoke access to specific roles for any single application, while other applications can continue to act on their behalf.
Implementing the delegation pattern requires a schema that works with roles and identities when accessing resources.
OAuth Schema Actors and Roles
| Actor | Role | Description |
| Resource Owner | entity that needs the data exposed by the API | generally the end user |
| Client | Application that provides the data | mobile, web or embedded application |
| Authorization Server | OAuth server that issues tokens | EG WSO2 identity server |
| Resource Server | A service that provides data | EG FaceBook Social Graph api |
Scopes
Scopes define the delegated permissions that the Resource Owner requires the client to have. The client may request access to a set of data, but the user (Resource Owner) may only grant access to a subset of the data.
Tokens
OAuth has a proliferation of tokens that get passed around in a series of steps in the process of authentication. We will call this set of steps the OAuth dance. We can simplify the complexity by creating a high level scheme for these tokens.
| Type of Token | Use Case |
| Access Tokens | presented when requesting access to a resource, they have a set time to live |
| Refresh Tokens | presented to get a new access token if the old one has expired |
Sadly there are many ways tokens are used to increase complexity. Just as we need locked down keystores to store digital certificates we need schemes to protect tokens from malicious token theft. Tokens are being passed around online so are vulnerable, we can employ various schemes to protect all the tokens and importantly when they relate to identity.
OAuth Flow (Dance)
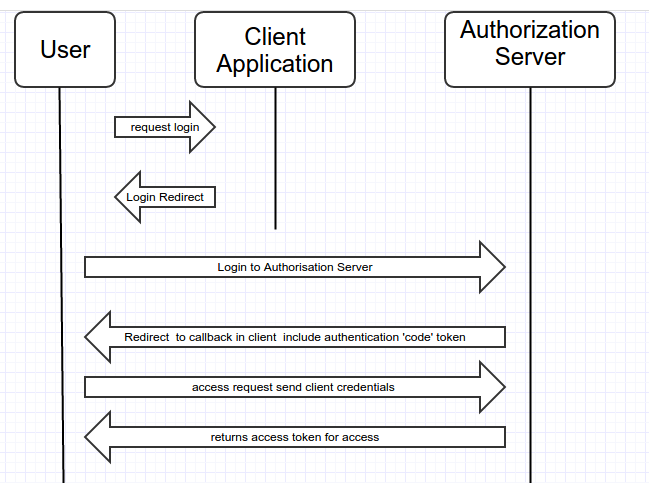
Using our source code to look at a simple OAuth2 use case, what follows is an outline with the relevant code fragments and generated urls containing the OAuth artifacts. Outline the OAuth2 dance steps.
Step 1 Login to Authorisation Server (WSO2)
Login to Authorisation Server (WSO2) URL
Url pattern
<Authorize URL><Scope><Grant Type><Callback URL><Application Key>
Example Url
https://localhost:9443/oauth2/authorize?scope=openid&response_type=code&redirect_uri=http://localhost:8000/edusecure/oauth2client&client_id=uZ9Rh5dfdhS8RAfRho_QpCuaJoQa
Link to source code that builds this url
Code fragment
 OAuthClientRequest authzRequest = OAuthClientRequest
                	.authorizationLocation(authzEndpoint)
                	.setClientId(consumerKey)
                	.setRedirectURI((String) session.getAttribute("callbackurl"))
                	.setResponseType(authzGrantType)
                	.setScope(scope)
                	.buildQueryMessage();
Step 2 Redirect to callback from Authorisation Server (WSO2)
Url pattern
<Callback URL><Code>
Example Url
http://localhost:8000/edusecure/oauth2client?code=d7e71611759cabd15ca1d54165ac2e6
This link is generated by the relying party in this case that is the WSO2 identity server, it is handled in the callback servlet here
Step 3 Access request with client credentials to Authorisation Server (WSO2)
Url pattern
<Request Access Token Endpoint URL><Application Secret><Grant Type><Callback URL><Code><Application Key>
Example Url
https://localhost:9443/oauth2/token?client_secret=wxc6HNiZveR8k4UvP13mQFVloUEa&grant_type=authorization_code&redirect_uri=http://localhost:8000/edusecure/oauth2client&code=27ee9210f09be65dfb9ebbe41522182&client_id=uZ9Rh5dfdhS8RAfRho_QpCuaJoQa
Link to source code that builds this url
Code fragment
   OAuthClientRequest accessRequest = OAuthClientRequest.tokenLocation(tokenEndpoint)
            	.setGrantType(GrantType.AUTHORIZATION_CODE)
            	.setClientId(consumerKey)
            	.setClientSecret(consumerSecret)
            	.setRedirectURI(callbackurl)
            	.setCode(code)
            	.buildBodyMessage();
Step 4 OAuth2 access token and openid token
Using the Amber OAuth client we can pull the access token and openid token from the WSO2 server response to the access request
Code fragment
 OAuthClient oAuthClient = new OAuthClient(new URLConnectionClient());
 OAuthClientResponse oAuthResponse = oAuthClient.accessToken(accessRequest);

 String accessToken = oAuthResponse.getParam(SecureUtils.ACCESS_TOKEN);
 String idToken = oAuthResponse.getParam(SecureUtils.ID_TOKEN);
Step 5 Request the openId profile
The access token is used as a ‘bearer token when we request the openId profile from the Authorisation Server (WSO2) with the request headers containing. For the WSO2 identity server we set the Authorisation header for a get request with the following key value pair.
 Key value pair
"Authorization", “Bearer” + accessToken

 Example key value pair
 Authorization  Bearera64a35cbc3483fb5334d4476dfd1297
Here we are appending “Bearer” with the token we received in Step 4
Link to source code that sets the header
Code fragment
URL myURL = new URL(targetURL);
        URLConnection myURLConnection = myURL.openConnection();
        myURLConnection.setRequestProperty("Content-Type", "application/x-www-form-urlencoded");
        myURLConnection.setRequestProperty("Authorization","Bearer " + accessToken);
        myURLConnection.setRequestProperty("Content-Language", "en-US");
        myURLConnection.setUseCaches (false);
        myURLConnection.setDoInput(true);
        myURLConnection.setDoOutput(true);
The WSO2 Identity server sends the response as Json key value paris limited by the scope of the initial request and the user granting access to the full set of requested information.
Important Token Security Details
Now that we have stepped through the initial underlying Oauth2 dance steps to support the OpenID Connect user /application discover identity and grant permission for application flow we are in a position to reflect on the artifacts involved and their roles. The WSO2 server guards its security artifacts in its sections of the flow with SSL/TLS security, all the WAO2 urls are ‘https: //’. However in this last step with the ‘bearer token’ we are sending it in the header, while this is better that transporting it in the url itself it is far from secure. So the important point to note is that without the SSL/TLS we are highly vulnerable to MITM attack. Bearer tokens are inherently insecure whoever has the token can use it for access.
Moving beyond the WSO2 identity server
In the example given here the WSO2 fulfils the role of the relying party. That is it is capable of federated authentication as a service and the underlying standard/protocol is OAuth2. In the second article we went through the conceptual basis of how this is architected in the effective non backward compatible OpenID version 3 that is OpenID Connect. Then we configured the WSO2 to act as the relying party and we ran the application authorisation dance.
In this article we have looked under the covers at how this dance is choreographed via the OAuth 2 specification. What I like about WSO2 is it is a lot easier to set up than equivalent systems like.
- Windows Live ID (Not OpenID Connect but very similar)
- Google Identity Platform (OpenID Connect)
- FaceBook Connect (Not OpenID Connect but somewhat similar)
- Twitter Sign In (OAuth 2.0 delegated access)
However obviously you will need to host and maintain the system yourself, this could be a good thing in the case of a corporate or otherwise firewall enclosed large intranet.
Whatever solution you adopt you cannot just ‘opt out’ of application security. Hopefully the skills you have learnt here for WSO2 can be put to good use.
However WSO2 is a large application that sadly while open source is very top heavy Java based JSP Servlet container code. Hence WSO2 itself may be vulnerable to exploits. In the last article we’ll look at lightweight small footprint solution using Scala with the Play framework.

