

In the previous tutorials we have covered different aspects of Docker such as pulling images from repositories, running containers, managing images and containers, using Dockerfiles and debugging applications. Understanding how to efficiently test Docker applications is very important. In this tutorial we will use an example of a static website and a web application to demonstrate testing web applications. Later on we will demonstrate how to use the Jenkins platform for continuous integration.
A local environment helps you simulate a production environment therefore you can be sure your application will work as expected in the production environment. For our first example we will create a container with Nginx to help us run a simple website. Create a directory and add a new Dockerfile.
mkdir test1
cd test1
sudo touch Dockerfile

We need to add commands to our Dockerfile so open it using a text editor. Add the content highlighted in yellow, save and close the file.
sudo gedit Dockerfile
FROM ubuntu:14.04
MAINTAINER Sammy "[email protected]"
ENV REFRESHED_AT 2014-06-01
RUN apt-get update
RUN apt-get -y -q install nginx
RUN mkdir -p /home/a4548705/fb958e2be5.nxcli.io/html
ADD test1/global.conf /etc/nginx/conf.d/
ADD test1/nginx.conf /etc/nginx/nginx.conf
EXPOSE 80

The Dockerfile we created above helps us set up a simple application. First it will install Nginx and create a directory where we can place our website. The Dockerfile will include the configuration files that we will place in our directory. Finally port 80 is exposed to the image.
In our Dockerfile we used the ADD command to specify that a global.conf configuration file will be added to our container. We need to add global.conf file in our directory. We also need to add the specifications highlighted in yellow, save and close the file.
sudo gedit global.conf
server {
listen 0.0.0.0:80;
server_name _;
root /home/a4548705/fb958e2be5.nxcli.io/html/website;
index index.html index.htm;
access_log /var/log/nginx/default_access.log;
error_log /var/log/nginx/default_error.log;
}
In the configuration file above we are assigning port 80 to Nginx and pointing it to an appropriate web server root.

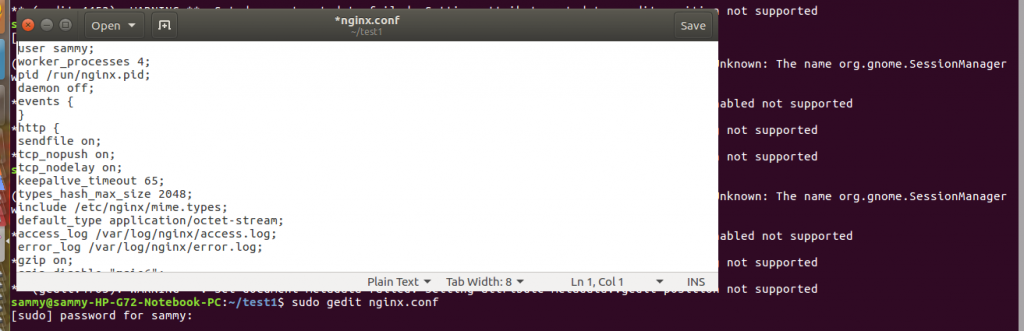
We also need to add a nginx.conf file that will enable us to instruct Nginx to run not as a daemon. This setting will ensure our container runs continuously because the daemon is always running in the foreground. Create a nginx.conf file and add the settings highlighted in yellow, save and close the file.
sudo gedit nginx.conf
user sammy;
worker_processes 4;
pid /run/nginx.pid;
daemon off;
events {
}
http {
sendfile on;
tcp_nopush on;
tcp_nodelay on;
keepalive_timeout 65;
types_hash_max_size 2048;
include /etc/nginx/mime.types;
default_type application/octet-stream;
access_log /var/log/nginx/access.log;
error_log /var/log/nginx/error.log;
gzip on;
gzip_disable "msie6";
include /etc/nginx/conf.d/*.conf;
}
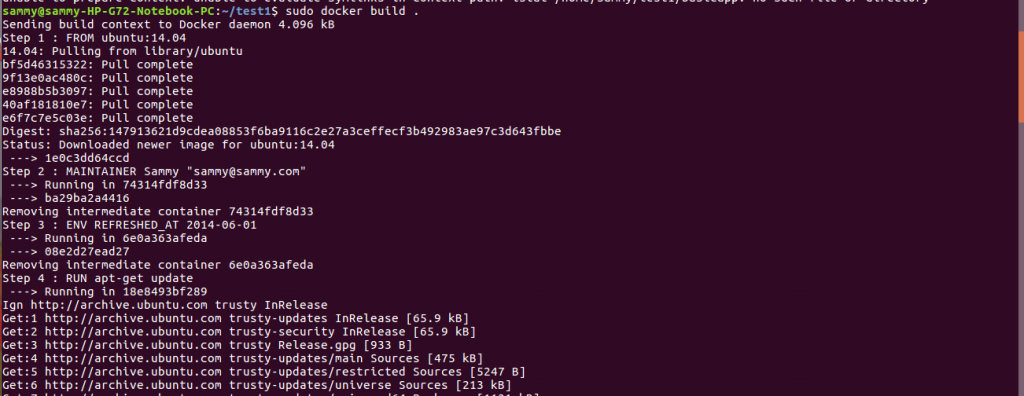
After creating our Dockerfile and its associated configuration files we can go ahead and build an image using the command below:
sudo docker build
After successfully building our image we can use it to create a container. Knowledge of creating containers from images is assumed therefore we will not delve into that. After creating your container we can place a sample website code on your container so that we can use it for testing. We place our website code on a local directory then we mount it to the docker container. We mount the local directory to the root directory that we specified in global.conf configuration file.
To mount a directory we use the -v flag when starting a container. An example of starting a container and mounting a directory is shown below.
sudo docker run -d -p 80 –name website \ -v $PWD/website:/home/a4548705/fb958e2be5.nxcli.io/html/website \
we pass the name of the image we are using to build our container and the directory to be mounted in the -v flag. Once our container is running we use the docker ps command to identify the port where our container is running. We then use a url consisting of localhost and the port number. Once we navigate to the address our website will be shown. Therefore we have completed our testing successfully.
The previous example was very basic. Next we will look at a more complex application that involves an application. We need to create a Dockerfile for our example. The commands below create a new directory and add a Dockerfile.
sudo mkdir test2
cd test2
sudo touch Dockerfile
Add the commands highlighted in yellow below to your Dockerfile, save and close
sudo gedit Dockerfile
FROM ubuntu:14.04
MAINTAINER James Turnbull "[email protected]"
ENV REFRESHED_AT 2014-06-01
RUN apt-get update
RUN apt-get -y install ruby ruby-dev build-essential redis-tools
RUN gem install --no-rdoc --no-ri sinatra json redis
RUN mkdir -p /opt/webapp
EXPOSE 4567
CMD [ "/opt/webapp/bin/webapp" ]

In the above Dockerfile we are creating an image consisting of ubuntu, RubyGems and Ruby. We are also installing sinatra, redis and json. In the Dockerfile we have also specified that port 4500 will be used and we have also specified a directory for our application.
We build our image and then download the sinatra source code to the localhost. We then make our directory where the sinatra code is stored executable. Finally we create a container from our image and mount the directory containing sinatra code.
sudo docker run -d -p 4567 –name test2 \-v $PWD/webapp:/opt/webapp test2/sinatra
In the above command we creating a container from our image and mounting the directory with our sinatra application code.
In this first part of testing our Docker applications we demonstrated how to build a simple web application. We demonstrated how to test the application. We moved on to demonstratinge how to create a more complex web application and test it. In the second part of this tutorial we will look at continuous integration in Docker.

