

Google App Engine is an incredible way to getting to know net development. It presents a bunch of useful capabilities which includes sharding, automatic database replication, computerized scaling, Memcache, and so forth. However, the procedure to sign-up and set up your first test hello global app is not very intuitive. Let us try to learn a very sincere and easy to understand method to install your first Python Webapp on Google App Engine. So let’s get started now.
Step 1. Download The Primary House Responsibilities Stuff.
No matter what platform you build merchandise on, there is continuously some housekeeping belongings you want to install location before you could hit the floor jogging. And deploying apps in the Google App Engine is no exception.
Download Python 2.7
The Google App Engine fashionable surroundings support Python simplest up to version 2.7. However, it is handiest a matter of time before support for Python 3.x is delivered. You can check the App Engine medical doctors for the latest information.
Download Google Cloud SDK
This can help you fork apps onto your neighborhood device, make changes (edit and expand the app), and set up your app lower back to the cloud.
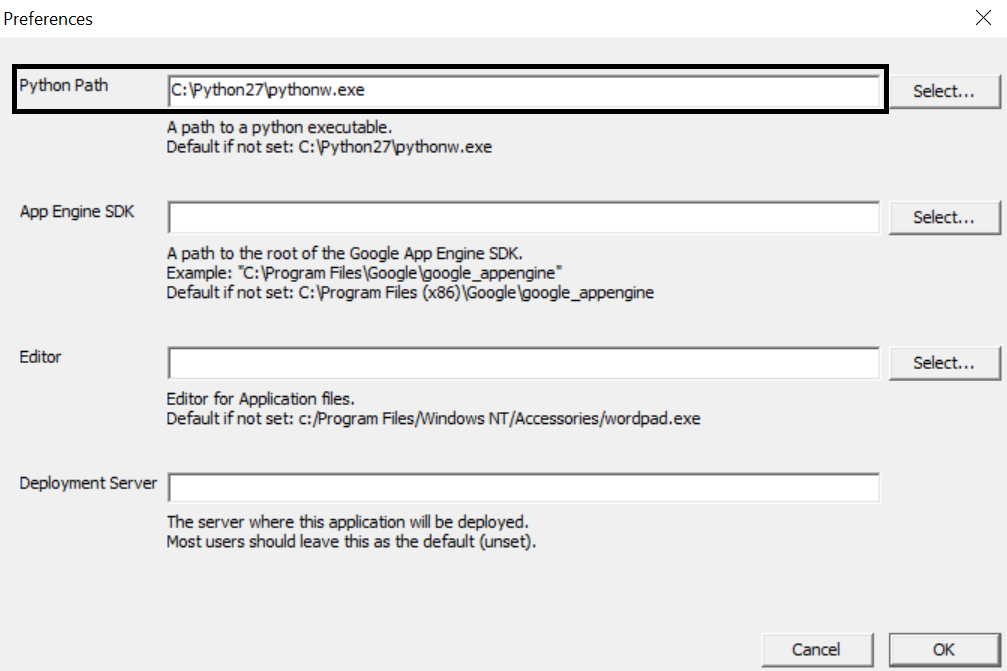
- Set the Python direction in the Google App Engine launcher
- After downloading the SDK, release the App Engine launcher, visit Edit -> possibilities and ensure you set the course for in which you set up Python in step 1 above.
- Set the Python route in Google App Engine Launcher.
- That’s all you need. Your neighborhood system must now be equipped to build web apps.
Step 2. App Engine Signal-up
This is frequently the maximum puzzling part of the whole setup. Things you ought to realize when you signal-up. Currently, App Engine gives a free trial for one year. The trial consists of three hundred dollars of credit that may be used all through the one-year trial length.
You’ll want to feature a credit score card to sign-up (for verification purposes).
You may no longer be charged for the duration of the sign-up method.
You’ll no longer be charged at some stage in the trial period as long as you do no longer pass the credit score limit supplied.
Here are the steps you need to comply with to signal-up:
- Visit the Google Cloud landing page.
- Observe the signal-up procedure and visit your App Engine dashboard.
- Maximum of the hard work is complete after a successful signal-up.
Step 3. Create a New Assignment
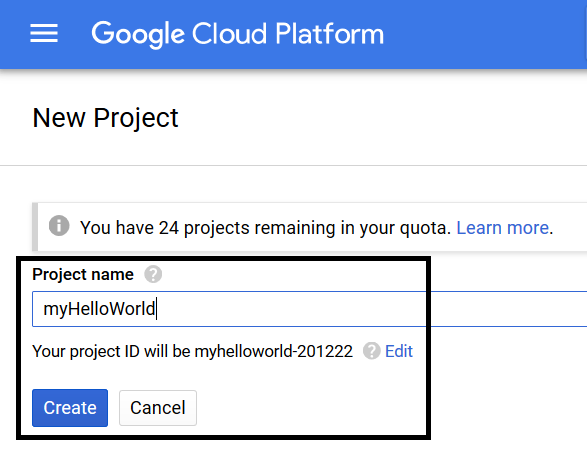
The next step is to create a brand new Python assignment that you could work on. Observe the screenshots beneath to create a brand new mission.
- Launch the brand new undertaking wizard.
- Deliver your app a name and make a notice of your undertaking id.
- Hit the create button and Google ought to take a couple of minutes to install all this is important in your newly created app.
Step 4. Fork the App to Develop It Locally
The subsequent step within the procedure is to fork the app on your nearby machine. This can allow you to make changes to the app locally and install it.
- Go to Google App Engine launcher and create new software.
- Input the undertaking identity of your newly created app. Additionally, offer the folder (nearby destination) where you want to keep the app domestically. Ensure you pick the
- Python 2.7 as your runtime engine.
- Hit the create button, and also you ought to see your app listed at the window that follows. You should also take a look at which you now see a few files for your nearby storage (the listing you selected within the screenshot above) after this step.
Step 5. Run the App Regionally
Earlier than you cross beforehand and make some adjustments to the app, it’s far critical to test whether or not you have finished all the above steps effectively. This can be done by way of genuinely jogging the app locally.
- Choose the app and hit the run button on the window.
- Watch for a few seconds until you may hit the Browse button. As soon as the Browse button becomes clickable, click on it. This must take you to the browser, and also you must see the hiya international text seem to your browser window. As a substitute, you may manually go to the browser and use the port distinctive to get admission to the app.
- So long as you spot the above display screen, you are ready.
Step 6. Understand the App Structure
It is ultimately time to examine the strains of code that are strolling this web app. Open your app folder within the textual content editor of your choice. I advocate chic text or VS Code. However, feel unfastened to choose the one you decide on.
Here is a description of the various files (app.yaml). This file is a simple markup file that shops information (some metadata) of the app. It is vital to observe the following critical parts of the report.
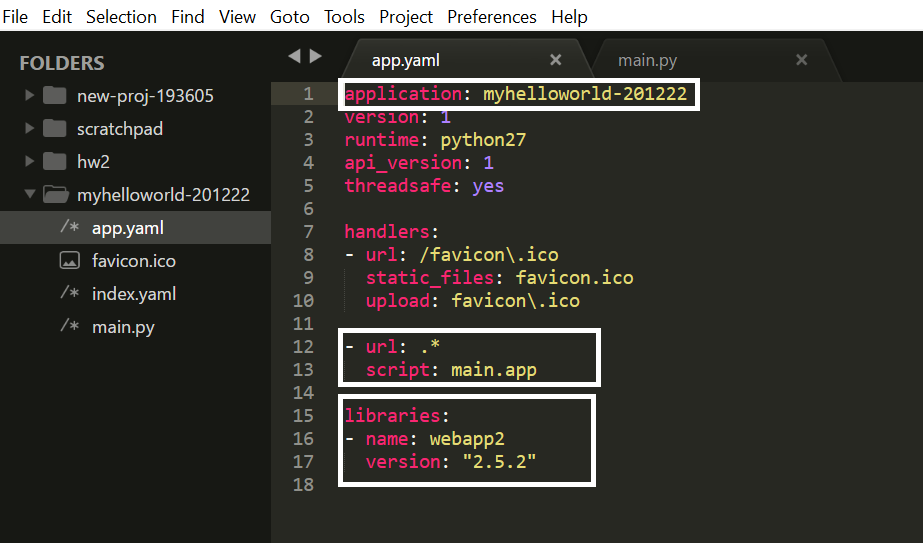
Application
This is the task identification which you have to never alternate. This is the particular identifier for the app Url -> script
This is the homepage for the app. In different phrases, this report will be rendered to your browser whilst you launch the app.
Libraries
That is the place in which you may consist of outside libraries to apply within the web app app.yaml file within the web app folder
fundamental.py
This is the homepage of the app. Note that the howdy international text in the browser window (step 5) is because of the code you notice highlighted underneath.
Step 7. Make Your Changes and Installation the Brand New App
No hello, world app is ever complete without the developer changing the hiya global textual content to something else just to make sure that the whole lot occurring behind the curtain is working as it should.
- Go in advance and alternate the text within the above screenshot to something else.
- Shop the changes, go to the browser and refresh the page. You have to see the webpage with the text “MEOW” displayed.
- In the end, it’s time to install your changes to the cloud to lead them to globally handy via a URL. Go to the App Engine launcher, make the selection of the app, and hit the install button.
- This can ensure your app receives deployed onto Google Cloud. To test whether or not or no longer the whole thing labored simply excellent, go to the URL beneath:
Https://.Appspot.Com/
- You must see the same precise window as above, count on now, it is a URL that is globally on hand.
Step 8. Misc
Congratulations, you’ve in the end get your first Python web app deployed on the Google App Engine. Here is another point which you may find beneficial, Jinja 2 is a top-notch front stop templating library for Python which could do some cool stuff, which includes moving objects from Python to HTML, the use of for loops, if situations, and so on at once out of the box.

