
“Everything in Linux is a file”.
A rule we have learned very early, and we should always remember.
But, how all these file are stored, and where?
As you remember, files are stored inside logical containers called directories (actually, directories themselves are also files of special type that allows them to act as containers). Directories could be located inside parent directories, and so on. This will continue (resulting in a shorter path name for each parent directory) until we reach the shortest path / which is the root of all file systems and the grandpa of all directories.
So, file systems come at last. That is what we are searching for.
In this article, we are going to start our journey with system storage and file systems. So, bring your coffee and give me your attention.
Configuring Basic Partitions
Hardware devices are represented in Linux by device files. Such device files are located under /dev. Disk drives are represented as follows:
/dev/hda                   The first IDE hard disk.
/dev/hdb                   The second IDE hard disk.
And so on.
/dev/sda                    The first SATA, SCSI, or SAN disk drive.
/dev/sdb                    The second SATA, SCSI, or SAN disk drive.
And so on.
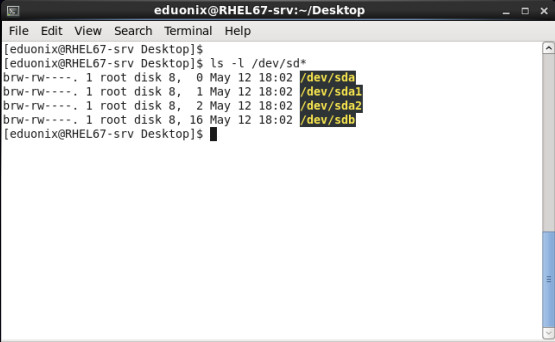
As you could notice: two disk drives exist: sda and sdb. But, what about that sda1 and sda2?
sda1 and sda2 are two examples for what we call partitions. A disk could be divided into one or more partitions.
– Why to use partitions while we could use only one big-enough root file system?
Ok. That is a good question. To answer it, consider the following cases:
- You need to format different file systems using different filesystem types, like ext2, ext3, ext4, and etc.
- You need to apply different security settings on the different file systems.
- You need to separate users’ data from system system partitions like /, /usr, /tmp.
- You need to put system and application logs on a separate file system so that you ensure they will not grow in size and fill your root directory /.
How your Disk Looks Like?
The disk having the Red Hat Linux operating system should look like this:
| MBR | sda1 | sda2 | sda3 | sda4 |
Where MBR is the Master Boot Record. The MBR is the first 512 bytes in a hard disk. It contains important info about the bootloader and the partition table.
Partitions from sda1 to sda4 are called the primary partitions. sda1 is always for /boot. A disk can have a maximum of four primary partitions. If more are needed, one of the four primary partitions can be created as extended partition, under which more logical partitions could be created.
Working with your Disks
To check the existing disks on your system and start partitioning them, two methods are available:
- The Graphical method using the Palimpsest utility.
- The Command line method using the fdisk command.
Using the GUI Method
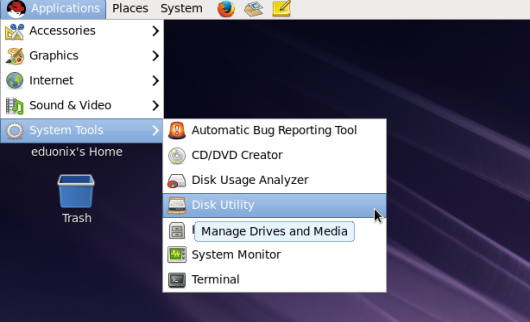
To start the Palimpsest, either:
- Type the command palimpsest in your terminal, or
- Click the Applications menu à System Tools à Disk Utility.
The Disk Utility application is started. You should see a window like the following:

From the left pane, you could see that we have two main Hard Disks: the first is 11 GB, and the other is 4.3 GB. Selecting the first disk from the left pane shows the following on the right pane:
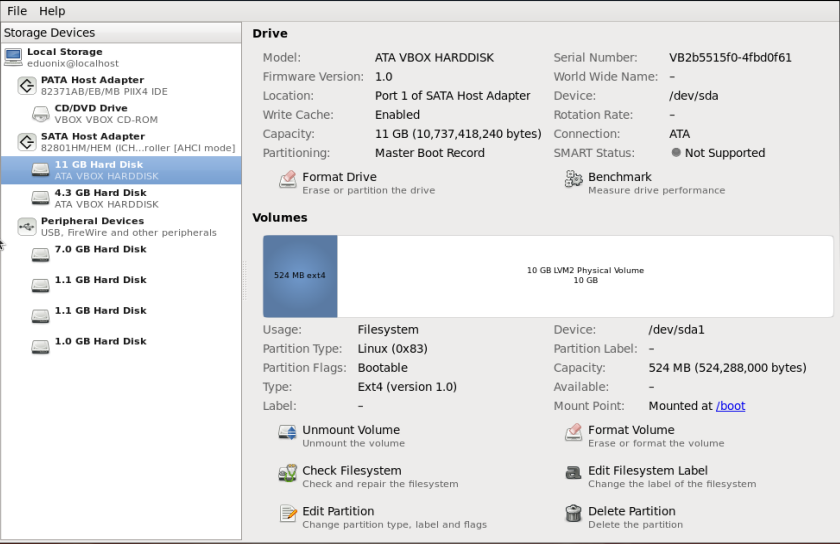
From the right pane, we could easily notice the following:
- This disk is /dev/sda
- It contains the Master Boot Record.
- It has been already partitioned into two partitions: the first is 524 MB in size, assigned to /boot. The other partition has been configured as an LVM physical volume.
Selecting the 4.3 GB disk from the left pane gives the following view in the right pane:
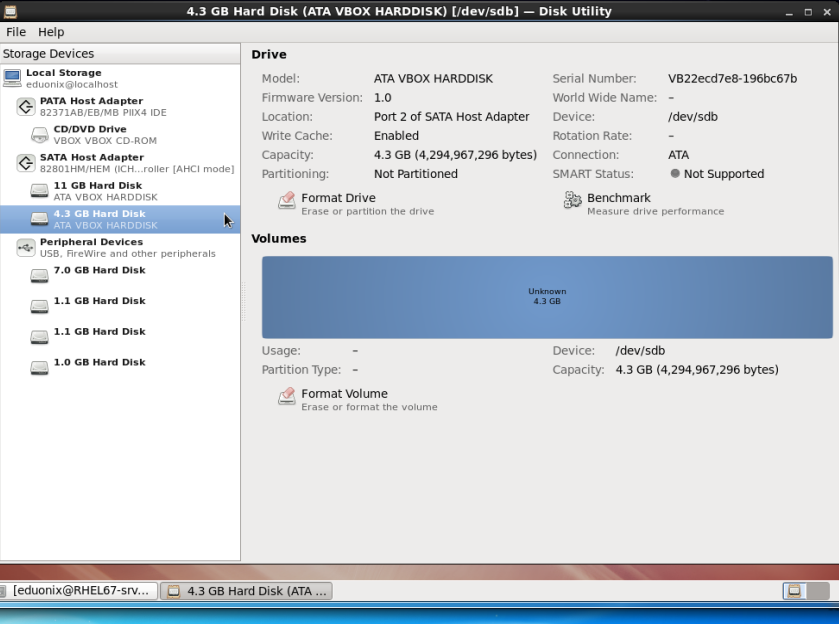
To prepare the 4.3 GB disk for use, click Format Drive. From the Scheme drop down list, select Master Boot Record, and click Format.
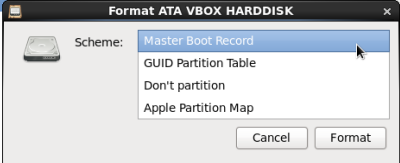
The wizard will ask you to enter the root password for authentication. Type the password. When complete, the formatted disk should look like the following:
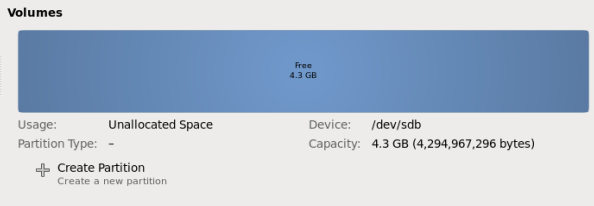
Now, we should create a partition:
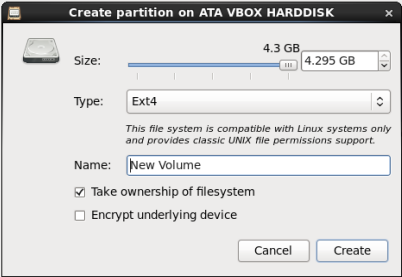
Use the slide bar, or type in the text box to set the size in Giga Bytes. Choose the partition type (default is Ext4) then write a name for this new partition.
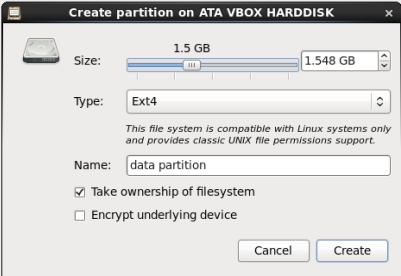
This will create a 1.5 GB partition of type Ext4, whose name is data partition.
Press Create to start creating the new partition.
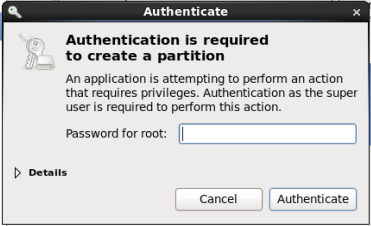
Again, authentication is required. Type the root password.
The partition is created as /dev/sdb1. The right pane of the screen should now look as follows:
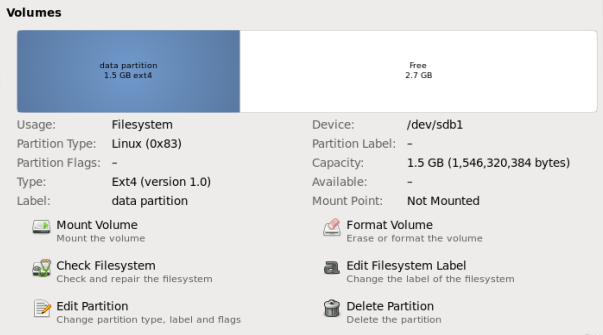
Now, this is an ext4 partition that is almost ready for use. Almost because it is not mounted yet.
To mount it, we could use the Mount Volume button:
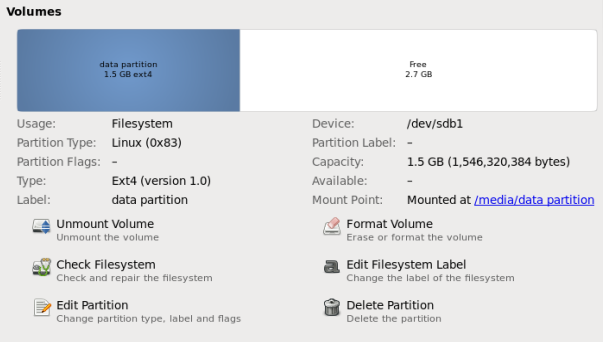
![]()
This will mount the partition to /media/data partition
Of course, it is a bad idea to use spaces in file and directory names.
Unmount the volume, and close the Disk Utility.
Now, we will learn how to mount the newly created partition manually.
Mounting a File System
A disk partition is linked to the file system hierarchy by mounting it to a directory.
Syntax
mount [-o OPTIONs] DEVICE DIRECTORY
This will tell the kernel to attach the file system found on DEVICE at the directory DIRECTORY.
Example
Open your terminal, and switch to root.
The following will mount the newly created partition /dev/sdb1 to /data:
mkdir /data
mount /dev/sdb1 /data
![]()
To verify the file system has been mounted, use the mount command without any arguments:
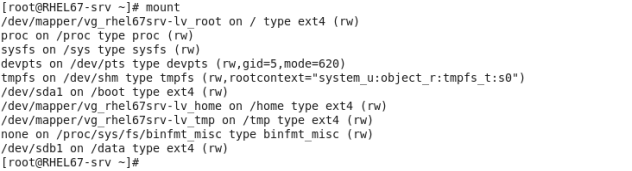
Now, you can use this file system exactly as you use any other file system. You can change to /data, create files and directories in it, and remove them as you prefer.
This is how to create and manage basic partitions using the GUI tool. Now, the other method is using the fdisk command.
That will be the subject of the next article. See you.

