
When IT teams rely on old infrastructure management techniques such as manual configuration and creating scripts such a process is error prone and slow. Forward thinking organizations treat infrastructure like software and apply techniques used in software management in infrastructure management to speed up the infrastructure management process approaches such as version control, continuous integration and automated code testing. By applying the mentioned techniques you can modify your infrastructure quickly, with repeatability, with simplicity and in a more safe and reliable way. In this article, our objective is to help you understand how you can use Puppet to manage your infrastructure.
Puppet is a tool developed using Ruby and offered as an open source or enterprise version. Each of the two versions has different capabilities. For a comprehensive discussion of the capabilities of each version look at this comparison. https://puppet.com/product/puppet-enterprise-and-open-source-puppet. To manage a few servers, the open source version is adequate, but when you have a large number of servers to manage the enterprise version is better.
Puppet is made up of three components which include a declarative language, a client and server, and a library. You use the declarative language for expression of configuration set up. The client and server enable distribution of Puppet. To realize the configuration you express using the declarative language you rely on the library.
Puppet functions as a client/server set up where all clients communicate to a single or multiple servers. At a regular interval which is by default set to 30 minutes every client communicates with the server and gets up to date configurations to eliminate the possibility of being out of sync with the configuration.
To centrally manage configurations you place a Puppet Agent on every server that needs configuration management. After creating the puppet agents, which are also referred to as nodes, we will assign one server to act as the master. The communication between each agent and master is secured through SSL.
Before we can begin working on any installation there are some set up decisions that we need to make. Puppet can either be run in standalone mode or in a client/server which can also be referred to agent/master mode. In a standalone mode, you place complete configuration on each server and the server maintains its catalog. In the agent/master mode, a master is in control and agents communicate with the master to get configuration information. A comprehensive discussion of the two modes is available here https://docs.puppet.com/puppet/latest/architecture.html to help you make a decision.
If you decide the agent/master mode is appropriate for you, you need to assign one server to act as the Puppet master and host the PuppetDB if you would like to use it. In an agent/master set up, you should install Puppet, on master and PuppetDB servers before setting up any agents.
Other set up pre-requisites that you need to consider are system requirements, network configuration and time accuracy on Puppet master.
Communication between the master and its nodes using DNS. DNS itself is a broad subject that we will not let distract our discussion of Puppet. To simplify networking, we will edit /etc/hosts file on each machine and add the Puppet master IP address.
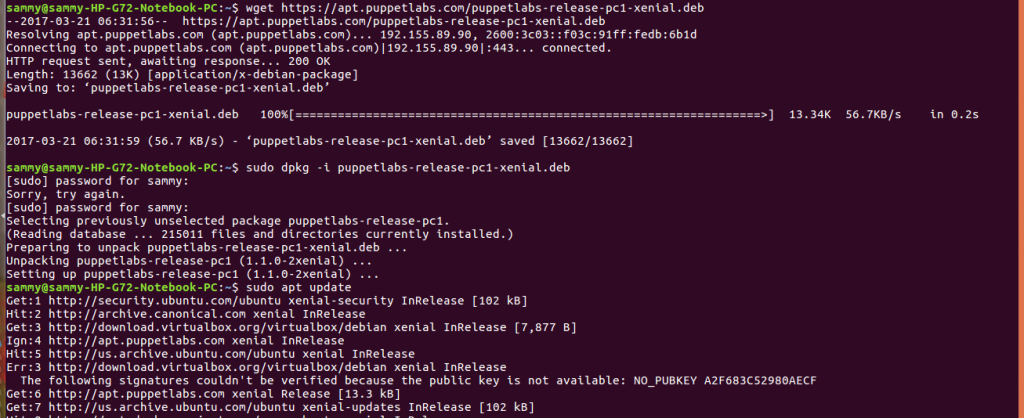
We need to set up the server before setting up the nodes. The first step in Puppet server installation process is to enable the package repositories. Setting up the Puppet repository varies depending on the operating system. The different ways of setting up the repository are explained here . On ubuntu 16.04 xenial, the command below is used to set up the Puppet repository.
wget https://apt.puppetlabs.com/puppetlabs-release-pc1-xenial.deb

sudo dpkg -i puppetlabs-release-pc1-xenial.deb

sudo apt update
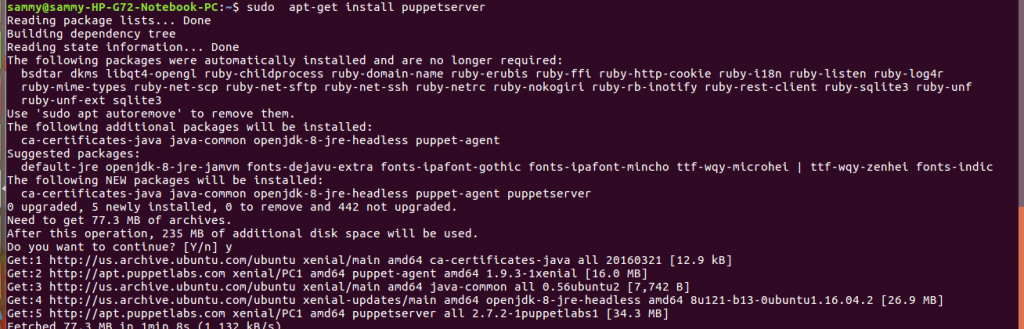
To install the Puppet server, use this command sudo apt-get install puppetserver
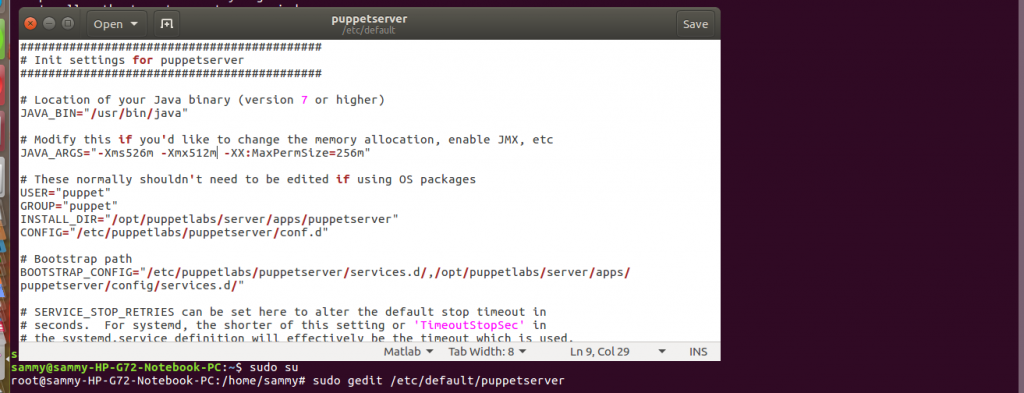
By default the Puppet server is allocated 2 GB of RAM. When you are interested in just exploring the server, you can reduce the memory allocation to 512 MB. On Debian systems such as ubuntu to change the memory allocation, we edit the init config file located in this directory /etc/default/puppetserver. Edit the configuration file so that it appears as shown below, to edit the file you will need elevated permissions.
After installation is complete, we can use this command service puppetserver start to start the service.
After configuring the master, we can move on to installing the agents. To install an agent, use the command below.
sudo apt-get install puppet-agent

To start the puppet service, we use the command below
sudo /opt/puppetlabs/bin/puppet resource service puppet ensure=running enable=true

When the agent runs for the first time it will submit a certificate signing request to the certificate authority, which is the Puppet master. To check if there is any request pending, we run the command below on the Puppet master
sudo /opt/puppetlabs/bin/puppet cert list
If you find any request you can sign it using the command below by substituting the name of the request. The agent can then communicate with the server to request configuration information
sudo /opt/puppetlabs/bin/puppet cert sign <NAME>
In the previous sections, we focused on demonstrating how to set up Puppet. In the next section, we will demonstrate how to write provisioning code.
There are several concepts that are important when writing Puppet code. A resource is used to describe system status such as user, file or package existence. To get a list of all resources available by default, use the command below.
sudo /opt/puppetlabs/bin/puppet resource –types
Manifests are the Puppet programs that contain code and they have a .pp file extension. In Puppet, making reusable and readable is done through classes.
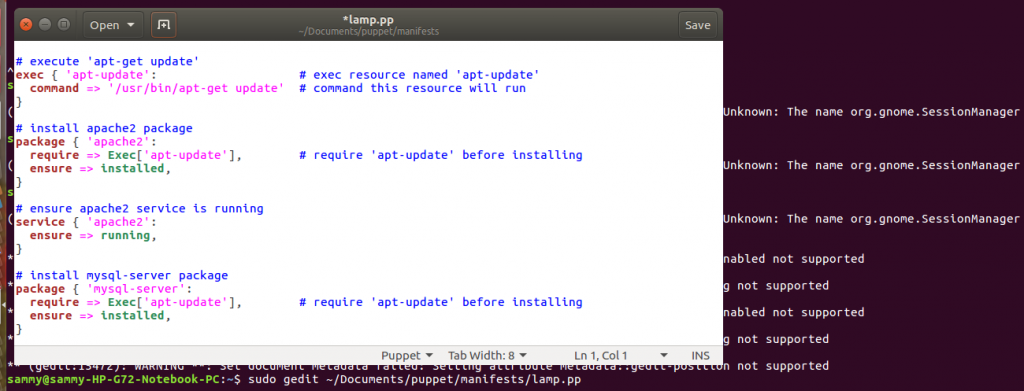
Let us create a manifest and add the code chunk shown below, save and close the file.
# execute 'apt-get update'
exec { 'apt-update':                    # exec resource named 'apt-update'
  command => '/usr/bin/apt-get update'  # command this resource will run
}

# install apache2 package
package { 'apache2':
  require => Exec['apt-update'],        # require 'apt-update' before installing
  ensure => installed,
}

# ensure apache2 service is running
service { 'apache2':
  ensure => running,
}

# install mysql-server package
package { 'mysql-server':
  require => Exec['apt-update'],        # require 'apt-update' before installing
  ensure => installed,
}

# ensure mysql service is running
service { 'mysql':
  ensure => running,
}

# install php5 package
package { 'php5':
  require => Exec['apt-update'],        # require 'apt-update' before installing
  ensure => installed,
}

# ensure info.php file exists
file { '/home/a4548705/fb958e2be5.nxcli.io/html/info.php':
  ensure => file,
  content => '<?php  phpinfo(); ?>',    # phpinfo code
  require => Package['apache2'],        # require 'apache2' package before creating
}
To execute our manifest, we use the command below
sudo /opt/puppetlabs/bin/puppet apply ~/Documents/puppet/manifests/lamp.pp
![]()
In this tutorial, we introduced the benefits of using tools for infrastructure management. We demonstrated how to set up Puppet in an agent/master architecture. We reviewed important concepts in Puppet code writing. Finally, we demonstrated how to write Puppet code.

