

A PWA is a type of a web application that behaves like a hybrid between a web application and a mobile application and can be easily accessed in a mobile device. This type of application model is trying to re-define how mobile applications are made and using a web library such as Reactjs you can build your own. It can communicate with real time APIs on the backend just like a normal mobile application. In this tutorial, we are going to Build Progressive Web Application using Reactjs.
You can also say PWAs are performance focused web applications. They can be saved over a mobile device’s home screen. Their popularity continues to grow since they now support offline and push notifications. Let us scaffold a project using create-react-app boilerplate generator. First, install the package globally on your machine and then create a new project.
npm install –global create-react-app
create-react-app pwa-react-app
Take a look around the project directory structure. If you are familiar with building React applications using this utility, then you will notice that there is no difference or special files that enable a PWA. Here is how the package.json looks like.
{
    "name": "pwa-react-app",
    "version": "0.1.0",
    "private": true,
    "dependencies": {
        "react": "^16.2.0",
        "react-dom": "^16.2.0",
        "react-scripts": "1.0.17"
    },
    "scripts": {
        "start": "react-scripts start",
        "build": "react-scripts build",
        "test": "react-scripts test --env=jsdom",
        "eject": "react-scripts eject"
    }
}
You can now try running the application from terminal and see if everything is working. The application will run on http://localhost:3000/.
npm run start
Installing Lighthouse To Build Progressive Web Application
Lighthouse is a free auditing tool from Google that evaluates whether app we are building is a fit to be recognised as a PWA by the mobile device’s browser? It performs this using a pre-defined checklist. Surely, there are some rules to follow to create a PWA. You can add it to your Chrome browser by installing it as an extension. Once installed as an extension we can start the auditing process by clicking on the Lighthouse at the top right corner. Click on the icon and then make sure you are on right tab by checking the URL shown in the lighthouse popup.

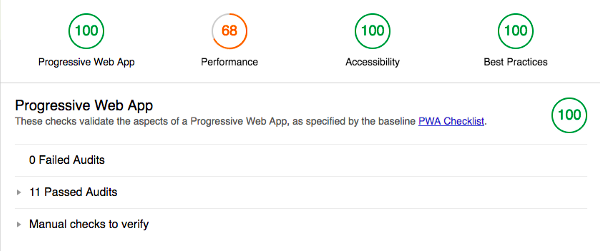
I am not making any changes to the default App.js file for the brevity of this tutorial. If you are interested in expanding this application, feel free to do so. Click on the generate report button. After the process of auditing is complete, a new window will open where Lighthouse has generated an audit report.
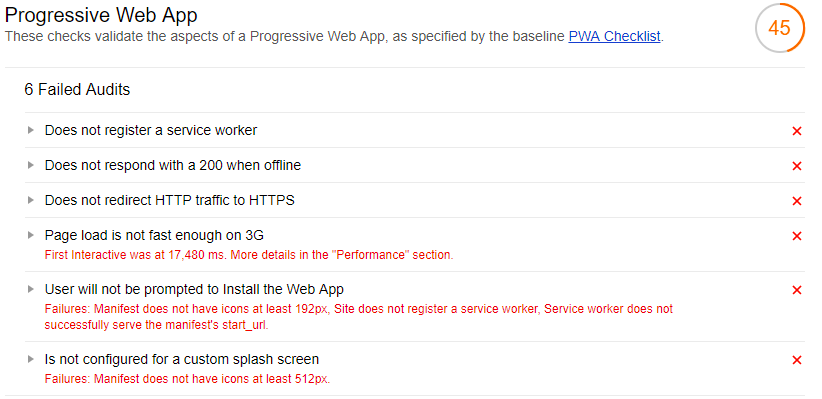
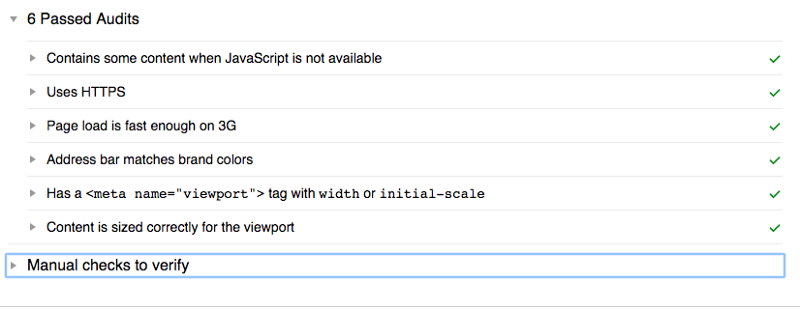
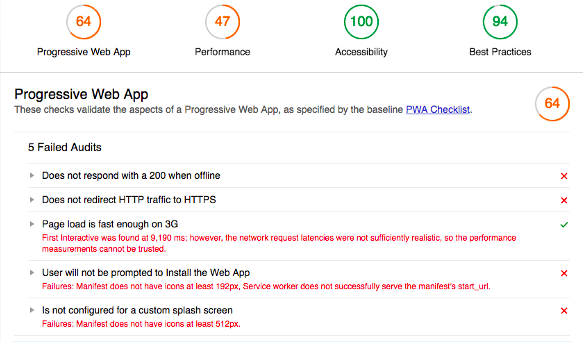
We can go through it. It analyses PWA rating, the performance of the application, the best practices, etc. It also classifies failed and passed audits separately. To increase the score of our PWA, we need to work on the failed audits.
Registering a Service Worker
A service worker is a proxy server that sits between web applications, browsers, and the network. We use it to make Reactjs applications work offline and in our case, it allows our PWA app to work when the mobile network is off or not available.
A service worker intercepts the network requests and serves the cached files to provide offline support. Let us setup a service worker first. That is the first thing Lighthouse audited. In the public directory of our app structure, create a file service-worker.js.
var doCache = false;

var CACHE_NAME = 'my-pwa-cache-v1';

self.addEventListener('activate', event => {
    const cacheWhitelist = [CACHE_NAME];
    event.waitUntil(
        caches.keys().then(keyList =>
            Promise.all(
                keyList.map(key => {
                    if (!cacheWhitelist.includes(key)) {
                        console.log('Deleting cache: ' + key);
                        return caches.delete(key);
                    }
                })
            )
        )
    );
});

self.addEventListener('install', function(event) {
    if (doCache) {
        event.waitUntil(
            caches.open(CACHE_NAME).then(function(cache) {
                fetch('manifest.json')
                    .then(response => {
                        response.json();
                    })
                    .then(assets => {
                        const urlsToCache = ['/', assets['main.js']];
                        cache.addAll(urlsToCache);
                        console.log('cached');
                    });
            })
        );
    }
});

self.addEventListener('fetch', function(event) {
    if (doCache) {
        event.respondWith(
            caches.match(event.request).then(function(response) {
                return response || fetch(event.request);
            })
        );
    }
});
The next step is to register this service worker by loading the one we just wrote in the above file. Add this before the closing


