

Angular is one of the most popular front-end frameworks. It is used to build client-side applications and interface for web, mobile, and desktop. It follows an architecture based on components and allows you to re-use a lot of your code in an application. Currently, Angular is in its version 7 release and has some new features which give it an edge over its competitors and make Angular 7 Routing easier.
You can even read “A Complete Guide to Angular“ for understanding Angular in detail. It covers a detail introduction, Benefits, Cons, Right Project Use-Cases, Features, Tools & other aspects!
Getting Started with Angular 7 Routing
In this tutorial, we are going to go through an important aspect when developing applications using Angular. To navigate to different pages in your application you will need routing. A Routing component can lead to sub-routes without changing the complete URL (in case of web applications) or completely reloading the whole page, thus, satisfying the application to be a SPA (Single Page Application).
Sub routes in an Angular application are nothing but components that generate and render different parts on a web page, not required that they compose a complete web page. If we want to make our Angular application modular, then it is the best practice to assign the routes according to different components. We will take an example of how we can create a route in this angular 7 routing tutorial with an example below.
To get started, you will need Angular CLI to generate a new Angular project. To install this command line tool, you will have to run the following command.

npm install -g @angular/cli
Once that is installed, we can move ahead and create a new project with the command below from your terminal. The directory for this new project will be created automatically.
ng new ng7routing-demo
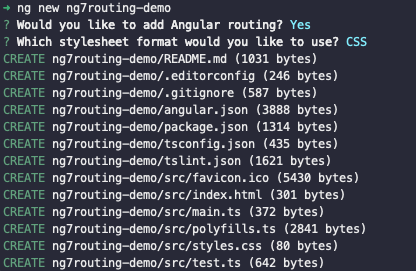
Since we need the routing in our application, Angular CLI asks you do whether you want to use the routing component or not? Next, it asks for which CSS framework you want to use. Look at the screenshot below and you are required to enter the same values as shown in order to follow this tutorial.
Next step, let us install the bootstrap CSS framework such that we won’t be wasting any time in writing styles for the components on our own. Traverse inside the project directory and install the framework.
npm install bootstrap --save
Also, add the Bootstrap file inside the angular.json file.

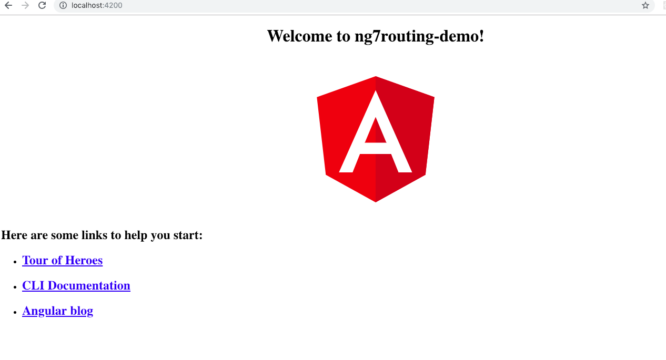
To run the project, type the command ng serve from a terminal window and see if everything is working correctly. This command opens up a live development server that listens to port number 4200 automatically. Any changes you make in your Angular project while this command is running will be automatically reflected. Visit http://localhost:4200/ to see the Angular app in action. Right now, it is the default Angular app the comes with the boilerplate.
Header Component
In this step, we are going to create a new Header component that will act as a navigation bar. Type the command below to create a new component.
ng g c header --spec=false
Next, we are going to create a navigation menu inside this. Open app/header/header.component.ts file and add the following.
<nav
    class="navbar navbar-expand-lg navbar-light"
    style="background-color: #e3f2fd;"
>
    <a class="navbar-brand brand-custom" href="#">Angular 7 Routing Demo</a>
    <div class="collapse navbar-collapse" id="navbarText">
        <ul class="navbar-nav ml-auto">
            <li class="nav-item">
                <a class="nav-link login-custom" href="#"
                    >Students <span class="sr-only">(current)</span></a
                >
            </li>
            <li class="nav-item">
                <a class="nav-link register-custom" href="#">Home</a>
            </li>
        </ul>
    </div>
</nav>
The header component will not show on http://localhost:4200 yet. You are required to add it to the main app component. Open app.component.html modify it like below.
<nav
    class="navbar navbar-expand-lg navbar-light"
    style="background-color: #ffee44;"
>
    <a class="navbar-brand brand-custom" href="#">Angular 7 Routing Example</a>
    <div class="collapse navbar-collapse" id="navbarText">
        <ul class="navbar-nav ml-auto">
            <li class="nav-item">
                <a class="nav-link login-custom" href="#"
                    >About <span class="sr-only">(current)</span></a
                >
            </li>
            <li class="nav-item">
                <a class="nav-link register-custom" href="#">Home</a>
            </li>
        </ul>
    </div>
</nav>
Now when you run ng serve you will see a yellow navigation bar appearing on the page.
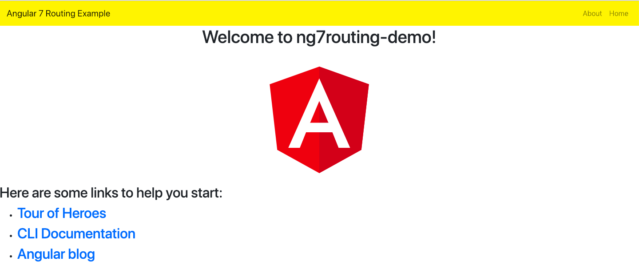
It has two navigation items on the right side and the title on the left.
Adding Root Route
To add a root route, we will generate a home route first with the following command.
ng g c home --spec=false
By enabling routing in an Angular project (as we did earlier), there is a file called app-routing.component.ts made available to us. You are going to add this newly route’s component to this file.
import { NgModule } from '@angular/core';
import { Routes, RouterModule } from '@angular/router';
import { HomeComponent } from './home/home.component';

const routes: Routes = [
    {
        path: 'home',
        component: HomeComponent
    }
];

@NgModule({
    imports: [RouterModule.forRoot(routes)],
    exports: [RouterModule]
})
export class AppRoutingModule {}
The root route is equivalent to a homepage in a single page application. You can have sub-routes from here. After adding the configuration for the root route, let us move on. The second step to this process is to add router-outlet inside the app.component.html file. This helps in displaying the content of the home route in our project. It acts as a placeholder in any project that Angular dynamically fills based on the current router state. For us, the router-outlet already exists. We can move on to the last step now.
In the last step, we have to add the home component route in the navigation bar. Open header.component.html file.
<li class="nav-item">
    <a class="nav-link register-custom" routerLink="/home">Home</a>
</li>
On clicking Home from the navigation bar right now will display the following result, without refreshing the whole web page.

This concludes our Angular 7 Routing tutorial. Now you know how to set up an Angular routing project, to create a new route, or a new root route, and the usage of the router-outlet component. In the meantime, you can learn all the concepts of Angular 7 by opting Angular 7- The Complete Guide.


You add the navigation code to header.component.ts, then you add almost the exact same code to app.component.html. How does that make any sense?
The HTML code that was described as going into the header.component.ts file should go into header.component.html. It is not generally considered a best practice to put that much html in the template field of the header definition.