

In this chapter, we are going to explore the replication feature in MongoDB. The phenomenon of synchronizing data across multiple servers is known as replication. It is an important and useful feature of MongoDB as it provides redundancy as well as increases the availability of data since there are multiple copies which are present on multiple database servers.
Replication feature in MongoDB
Consider a situation where data is present on a single server and that server suddenly crashes which would corrupt the entire data on that server due to severe outage. Under such situation, our entire application data is lost and the business running under that app will end up nowhere. Therefore, every organization keeps at least a copy of the data on a different servers which is made possible through the replication feature of MongoDB. Replication protects a database from the loss of a single server and helps to recover the application data from hardware failure and other service interruptions. Therefore, with the help of data replication, we can generate additional copies of the data, which we can dedicate to disaster recovery or continuity of business environment or reporting and backup database.
Advantages of Data Replication
The following are the advantages of data replication.
- The best tactic to keep or business crucial data safe.
- It ensures the highest i.e. (24*7) availability of data.
- It helps in creating a disaster recovery or continuity of business environment.
- With the data replication feature enabled, there is no need for downtime in case of maintenance such as data backups, index rebuilding activities, data compaction, etc.
- It increases the read scaling ie. extra copies to read from multiple servers.
- It ensures the replica set to be transparent for the built up application.
Execution of Replication process in MongoDB
Replication in MongoDB can be achieved through replica set. A replica set is nothing but a group of MongoDB instances which are hosting the same data set. In such a replica set, one MongoDB instance will serve as a primary node that receives all write operations from an application and all the other instances will serve as secondary nodes which receive the same data set through replication mechanism indirectly from the application. Therefore, the following points can be concluded.
- A Replica set can have only one primary node.
- A Replica set can have multiple secondary nodes or a group of two or more nodes (i.e. usually a minimum of 3 nodes are required in a replica set).
- Data is always replicated from a primary node to the secondary nodes.
- During the outage on a primary server, an automatic failover or maintenance is triggered which initiates the election of a primary node from the secondary nodes.
- Once the failed node is recovered, it once again joins the replica set and operates as a secondary node.
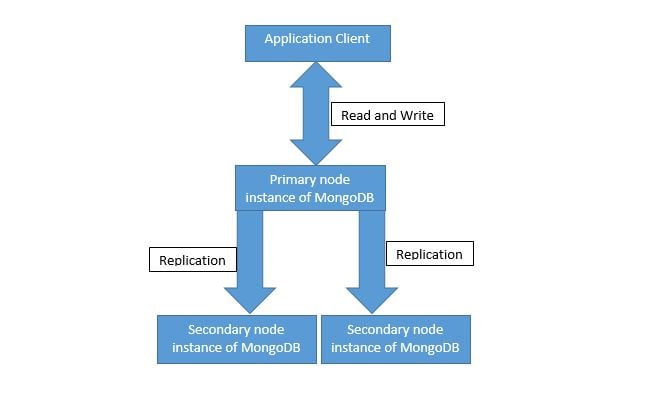
The following block diagram is the demonstration of the MongoDB replication phenomenon where the client application always work together with the primary node which further replicates the data to the associated secondary nodes in the replica set.
Features of Replica Set
- It is a cluster of N number of nodes (minimum three nodes).
- One of the node is admin or a primary node.
- All the read and write operations go to the primary node under normal way of operation of a cluster.
- It should support automatic failover to other working node as primary.
- It should support automatic recovery from failed condition.
- It should hold consensus for the election of a primary node under failover situation.
Setting up of a Replica Set in MongoDB
The following are the steps to set up the replica set in MongoDB.
Step 1: Let’s open a primary instance for MongoDB.
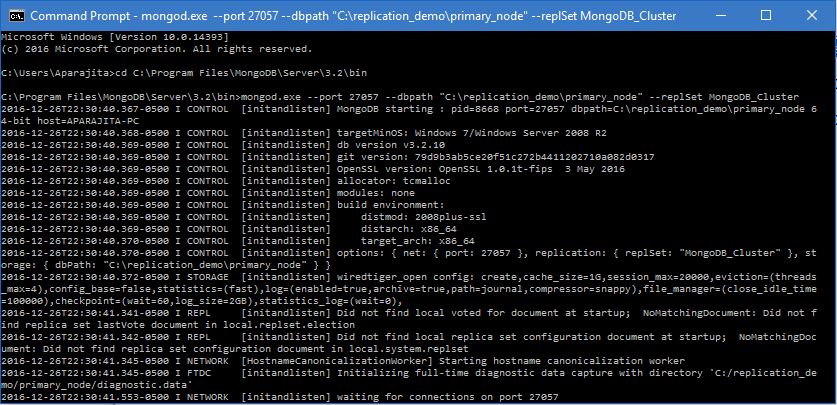
Open the command prompt and navigate to the bin directory (here “C:\Program Files\MongoDB\Server\3.2\bin”). Enter the following command.
C:\Program Files\MongoDB\Server\3.2\bin> mongod.exe --port 27057 --dbpath "C:\replication_demo\primary_node" --replSet MongoDB_Cluster
Explanation
- In the above syntax, we are running a MongoDB instance at port 27057.
- It has storage path for MongoDB as “C:\replication_demo\primary_node”.
- Lastly, we are creating a replica set with the name as ‘MongoDB_Cluster’. This is to be noted that this name always remains the same across all instance under this replica set.
Step 2: Let’s open first secondary instance for MongoDB.
Open a new command prompt and navigate to the bin directory (here “C:\Program Files\MongoDB\Server\3.2\bin”). Enter the following command.
C:\Program Files\MongoDB\Server\3.2\bin> mongod.exe --port 27058 --dbpath "C:\replication_demo\secondary_node1" --replSet MongoDB_Cluster
Explanation
- In the above syntax, we are running a MongoDB instance at port 27058.
- It has storage path for MongoDB as “C:\replication_demo\secondary_node1”.
- Lastly, we are creating a replica set with the name as ‘MongoDB_Cluster’ as this secondary instance is a member of this instance.

Step 3: Let’s open second secondary instance for MongoDB.
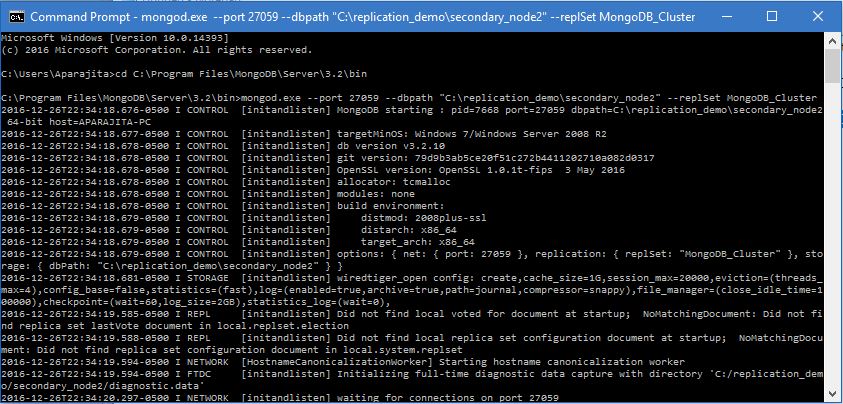
Open a new command prompt and navigate to the bin directory (here “C:\Program Files\MongoDB\Server\3.2\bin”). Enter the following command.
C:\Program Files\MongoDB\Server\3.2\bin> mongod.exe --port 27059 --dbpath "C:\replication_demo\secondary_node2" --replSet MongoDB_Cluster
Explanation
- In the above syntax, we are running a MongoDB instance at port 27059.
- It has storage path for MongoDB as “C:\replication_demo\secondary_node2”.
- Lastly, we are creating a replica set with the name as ‘MongoDB_Cluster’ as this secondary instance is a member of this instance.
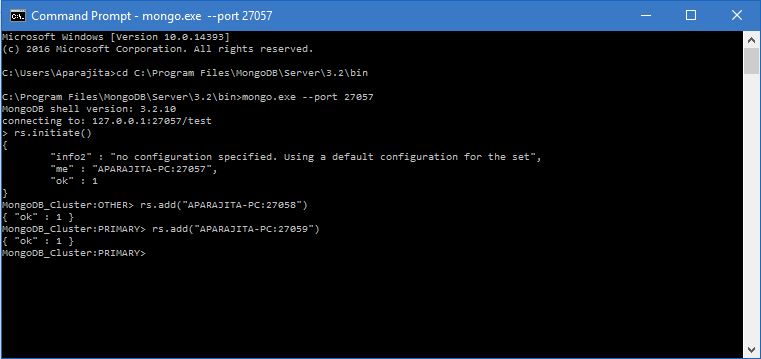
Step 4: Open a Mongo client and connect it to the PRIMARY MongoDB instance (here “APARAJITA-PC: 27057”) out of replica set ‘MongoDB_Cluster’ by executing the following commands.
Microsoft Windows [Version 10.0.14393]
(c) 2016 Microsoft Corporation. All rights reserved.

C:\Users\Aparajita>cd C:\Program Files\MongoDB\Server\3.2\bin

C:\Program Files\MongoDB\Server\3.2\bin>mongo.exe --port 27057
MongoDB shell version: 3.2.10
connecting to: 127.0.0.1:27057/test
> rs.initiate()
{
        "info2" : "no configuration specified. Using a default configuration for the set",
        "me" : "APARAJITA-PC:27057",
        "ok" : 1
}
MongoDB_Cluster:OTHER>
Explanation
- Firstly, we are connecting the MongoDB client with the MongoDB instance at port 27057.
- Next, we are executing ‘rs.initiate ()’ method to initiate a new replica set.
- It initiates a default configuration for the set at “APARAJITA-PC: 27057” i.e. (host: port).
Step 5: Here, we are going to add members to replica set with the help of ‘add ()’ method which has the following syntax.
>rs.add(HOST_NAME:PORT)
Example:
MongoDB_Cluster:OTHER> rs.add("APARAJITA-PC:27058")
{ "ok" : 1 }
MongoDB_Cluster:PRIMARY> rs.add("APARAJITA-PC:27059")
{ "ok" : 1 }
MongoDB_Cluster:PRIMARY>
Explanation
- Firstly, we have used the ‘add ()’ method to add the MongoDB instance running at port 27058.
- Secondly, we have used the ‘add ()’ method again to add the MongoDB instance running at the port 27059.
- The system response as ok indicates the replica set configuration is successful which can be verified by executing the ‘rs.conf ()’ method.
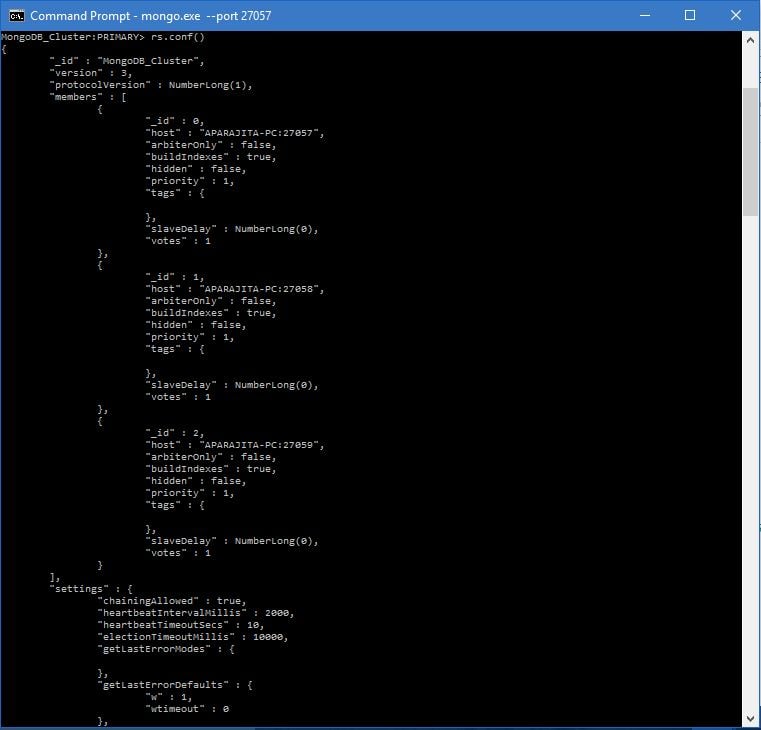
Step 6: Here we are going to verify the configuration of the replica set with the help of ‘conf ()’ method which has the following syntax.
>rs.conf()
Example:
MongoDB_Cluster:PRIMARY> rs.conf()
{
        "_id" : "MongoDB_Cluster",
        "version" : 3,
        "protocolVersion" : NumberLong(1),
        "members" : [
                {
                        "_id" : 0,
                        "host" : "APARAJITA-PC:27057",
                        "arbiterOnly" : false,
                        "buildIndexes" : true,
                        "hidden" : false,
                        "priority" : 1,
                        "tags" : {

                        },
                        "slaveDelay" : NumberLong(0),
                        "votes" : 1
                },
                {
                        "_id" : 1,
                        "host" : "APARAJITA-PC:27058",
                        "arbiterOnly" : false,
                        "buildIndexes" : true,
                        "hidden" : false,
                        "priority" : 1,
                        "tags" : {

                        },
                        "slaveDelay" : NumberLong(0),
                        "votes" : 1
                },
                {
                        "_id" : 2,
                        "host" : "APARAJITA-PC:27059",
                        "arbiterOnly" : false,
                        "buildIndexes" : true,
                        "hidden" : false,
                        "priority" : 1,
                        "tags" : {

                        },
                        "slaveDelay" : NumberLong(0),
                        "votes" : 1
                }
        ],
        "settings" : {
                "chainingAllowed" : true,
                "heartbeatIntervalMillis" : 2000,
                "heartbeatTimeoutSecs" : 10,
                "electionTimeoutMillis" : 10000,
                "getLastErrorModes" : {

                },
                "getLastErrorDefaults" : {
                        "w" : 1,
                        "wtimeout" : 0
                },
                "replicaSetId" : ObjectId("5861e3a1e477fa6e18dffd96")
        }
}
MongoDB_Cluster:PRIMARY>
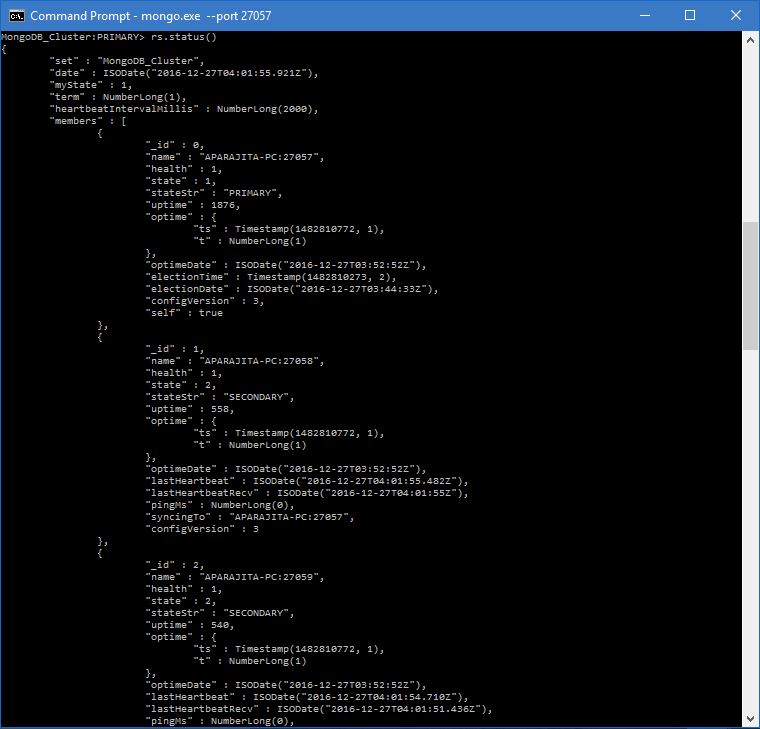
Step 7: Here we are going to check the status of the replica set with the help of ‘status ()’ method which has the following syntax.
>rs.status()
Example::
MongoDB_Cluster:PRIMARY> rs.status()
{
        "set" : "MongoDB_Cluster",
        "date" : ISODate("2016-12-27T04:01:55.921Z"),
        "myState" : 1,
        "term" : NumberLong(1),
        "heartbeatIntervalMillis" : NumberLong(2000),
        "members" : [
                {
                        "_id" : 0,
                        "name" : "APARAJITA-PC:27057",
                        "health" : 1,
                        "state" : 1,
                        "stateStr" : "PRIMARY",
                        "uptime" : 1876,
                        "optime" : {
                                "ts" : Timestamp(1482810772, 1),
                                "t" : NumberLong(1)
                        },
                        "optimeDate" : ISODate("2016-12-27T03:52:52Z"),
                        "electionTime" : Timestamp(1482810273, 2),
                        "electionDate" : ISODate("2016-12-27T03:44:33Z"),
                        "configVersion" : 3,
                        "self" : true
                },
                {
                        "_id" : 1,
                        "name" : "APARAJITA-PC:27058",
                        "health" : 1,
                        "state" : 2,
                        "stateStr" : "SECONDARY",
                        "uptime" : 558,
                        "optime" : {
                                "ts" : Timestamp(1482810772, 1),
                                "t" : NumberLong(1)
                        },
                        "optimeDate" : ISODate("2016-12-27T03:52:52Z"),
                        "lastHeartbeat" : ISODate("2016-12-27T04:01:55.482Z"),
                        "lastHeartbeatRecv" : ISODate("2016-12-27T04:01:55Z"),
                        "pingMs" : NumberLong(0),
                        "syncingTo" : "APARAJITA-PC:27057",
                        "configVersion" : 3
                },
                {
                        "_id" : 2,
                        "name" : "APARAJITA-PC:27059",
                        "health" : 1,
                        "state" : 2,
                        "stateStr" : "SECONDARY",
                        "uptime" : 540,
                        "optime" : {
                                "ts" : Timestamp(1482810772, 1),
                                "t" : NumberLong(1)
                        },
                        "optimeDate" : ISODate("2016-12-27T03:52:52Z"),
                        "lastHeartbeat" : ISODate("2016-12-27T04:01:54.710Z"),
                        "lastHeartbeatRecv" : ISODate("2016-12-27T04:01:51.436Z"),
                        "pingMs" : NumberLong(0),
                        "configVersion" : 3
                }
        ],
        "ok" : 1
}
MongoDB_Cluster:PRIMARY>
Step 8: At this step after verifying the replica set configuration and status as discussed before, we can conclude that the replica set with one primary and two secondary nodes have been set up successfully. Also, this should be noted that we can add more mongodb instance to replica set only when we are connected to primary node. We can execute the ‘db.isMaster ()’ command in MongoDB client in order to check whether we are connected to primary node or not as shown below.
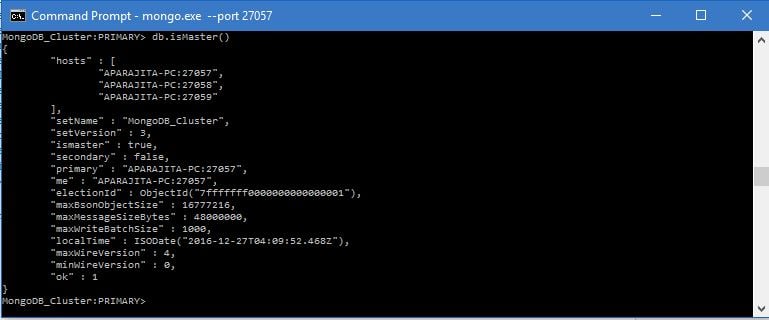
Conclusion
In this chapter, we have learnt the step by step process of how to practically set up of replica set in order to utilize the data replication feature of MongoDB with the help of suitable examples.

