

Writing code is equivalent to solving problems. Similarly, in modern day web development there so many new features supported that you can focus on solving problems rather than building and managing a tech stack. Among them, these days one of the most popular framework that is out there and adopted by most big tech companies in one way or another is called Serverless. Serverless computing is a very popular approach to building server-side applications, and the Serverless framework along with the Serverless Development claims to be the most flexible way to build Serverless applications.
Rather than stick with a given particular Serverless implementation from Amazon, Google, IBM, Microsoft or others, the Serverless framework abstracts away the particulars of each.
For this tutorial, we are going to need three things that will complete our tech stack. They are:
- AWS Lambda
- Node.js
- MongoDB Atlas
This article will show you how to hook up a MongoDB database as a service to a Serverless REST API.
What is AWS Lambda?
AWS Lambda is a pay-as-you-go serverless compute service. You can deploy your application’s source code to AWS and they handle the rest. The rest does include scaling when needed in the time of higher traffic to the application or the site. It scales automatically and has absolutely no downtime. AWS Lambda is also known as FaaS which means Function as a Service. A single Lambda function is a Node.js runtime environment.
What is MongoDB Atlas?
MongoDB Atlas is a database as a service developed by the team behind the MongoDB itself. Along with providing a free/paid tier for storing your data on cloud, MongoDB Atlas provide a lot of analytics that are essential to manage and monitor your application. MongoDB Atlas does provide a free tier that we will be using for our application.
Creating a database on MongoDB Atlas
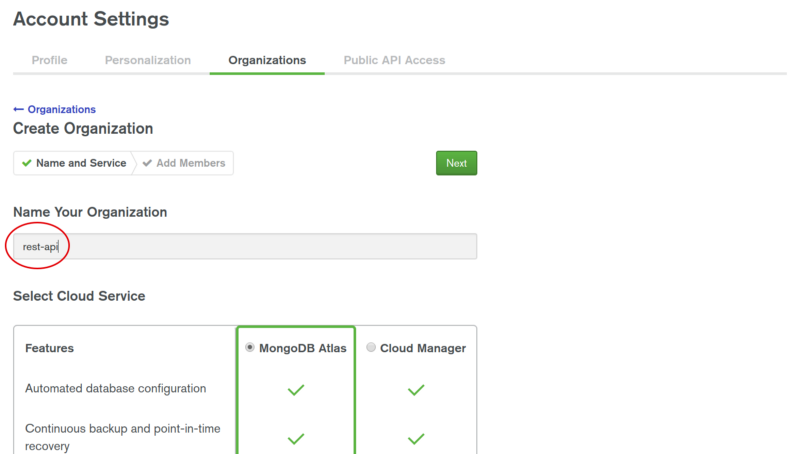
We will start by creating a database on the MongoDB Atlas. Login to the site. We just need sandbox environment to get hands on experience so we must opt for free tier. Once you have your account set up, open up your account page and add a new organization.
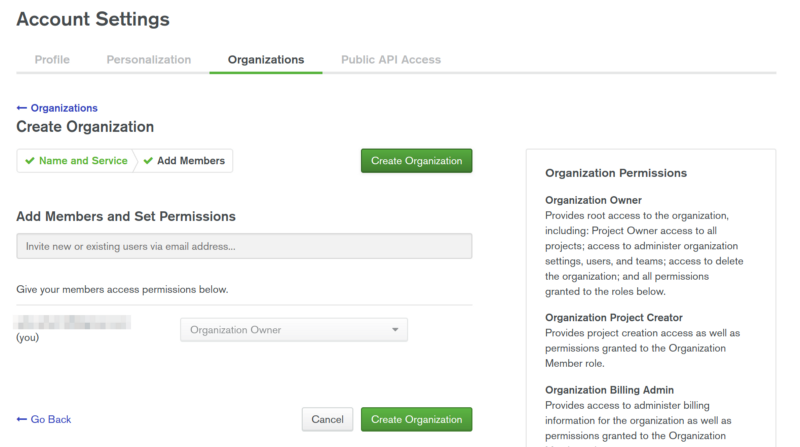
MongoDB Atlas is secured by default. You need to set permissions before we leverage its usage in our app.
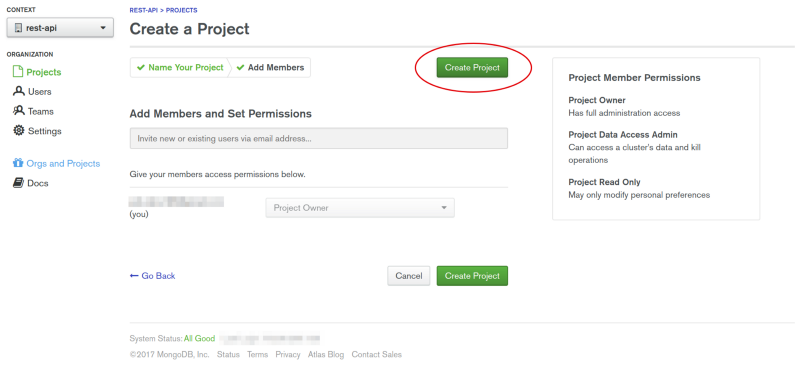
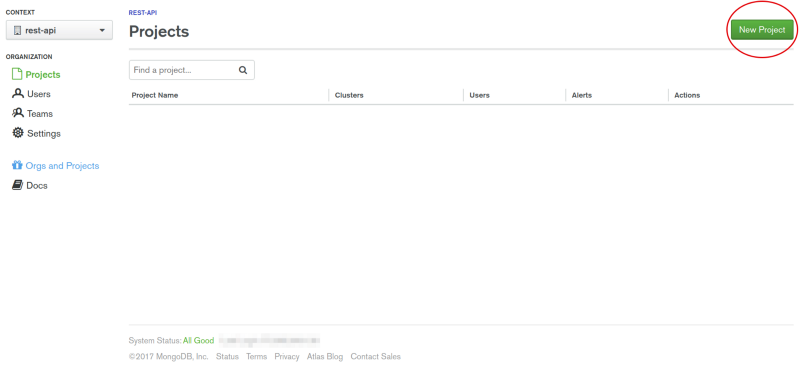
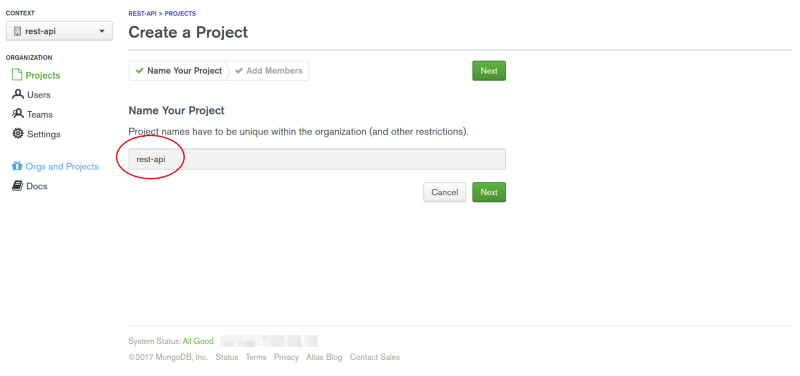
Now, we can add our free sandbox to this project. It is called a cluster.
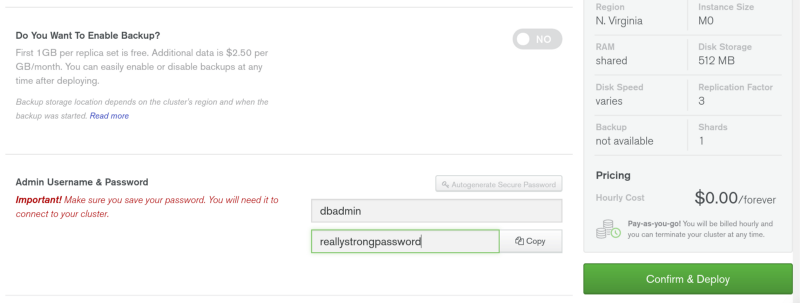
After all that, just add an admin user for the cluster and give him a really strong password. As you can see the price for this cluster will be $0.00/forever. Your cluster will take a few minutes to deploy. While that’s underway, let’s finally start writing some code.
Utilising AWS Lambda
AWS Lambda even though runs on Node.js supports many languages that are commonly used in modern day web development. For the brevity of this article, we will be using Node.js to build our REST API. Instead of using our traditional way of initializing a Node.js project npm init we will be using serverless command line utility sls to scaffold one. It automatically creates an instance of AWS Lambda function and will scaffold our project with all necessary files.
npm install -g serverless
sls config credentials --provider aws --key PUBLIC_KEY --secret SECRET_KEY
The second command demands an AWS registered user credentials. This step includes to create an IAM User in your AWS Console. Open up your AWS Console and press the services
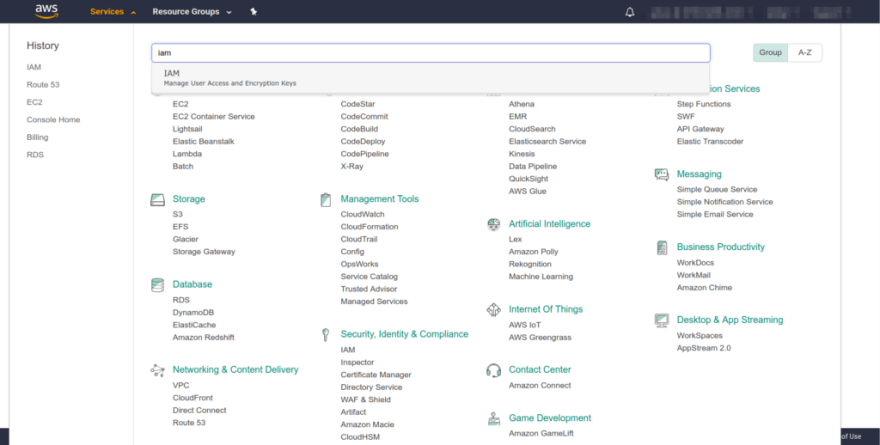
dropdown in the top left corner.
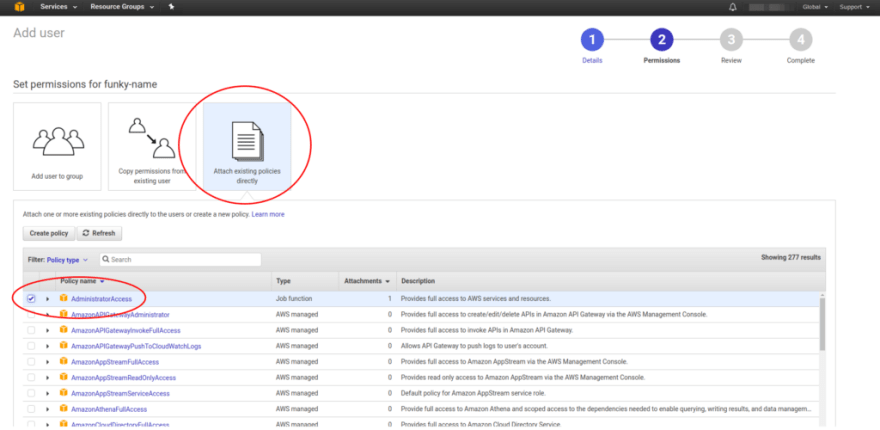
You will be redirected to the IAM page in your account. Proceed to add a new user. After, add a set of permissions to the newly created user. We need our serverless API to create and delete some of the assets in our REST API and for that we need AdministratorAccess.
Proceeding to the next step you will see the user was created. Now, and only now will you have access to the users Access Key ID and Secret Access Key.
Run the second command with PUBLIC_KEY and SECRET_KEY. Now, we have successfully linked our AWS Lambda function to our serverless account.
Creating the API
Run the following command to generate a new project.
sls create -t aws-nodejs -p rest-api && cd rest-api
The -p flag will create a new directory with name rest-api. Next we install all necessary dependencies.
npm init -y
npm i --save-dev serverless-offline
npm i --save mongoose dotenv
After that, we configure the serverless.yaml.
service: rest-api

provider:
  name: aws
  runtime: nodejs6.10 # set node.js runtime
  memorySize: 128 # set the maximum memory of the Lambdas in Megabytes
  timeout: 10 # the timeout is 10 seconds (default is 6 seconds)
  stage: dev # setting the env stage to dev, this will be visible in the routes
  region: us-east-1

functions: # add 4 functions for CRUD
  create:
    handler: handler.create # point to exported create function in handler.js
    events:
      - http:
          path: notes # path will be domain.name.com/dev/notes
          method: post
          cors: true
  getOne:
    handler: handler.getOne
    events:
      - http:
          path: notes/{id} # path will be domain.name.com/dev/notes/1
          method: get
          cors: true
  getAll:
    handler: handler.getAll # path will be domain.name.com/dev/notes
    events:
      - http:
          path: notes
          method: get
          cors: true
  update:
    handler: handler.update # path will be domain.name.com/dev/notes/1
    events:
      - http:
          path: notes/{id}
          method: put
          cors: true
  delete:
    handler: handler.delete
    events:
      - http:
          path: notes/{id} # path will be domain.name.com/dev/notes/1
          method: delete
          cors: true

plugins:
  - serverless-offline # adding the plugin to be able to run the offline emulation
This configuration file is what we need the serverless to deploy the REST API to AWS lambda. We are setting the maximum memory size of the Lambda function to be 128mb which is more than enough for right now.
The CRUD operations that will handle the functionalities of our REST API in a file called handler.js. In our configuration file we have defined each operation. There are always three main parameters of Node.js on AWS lambda. In above configuration we define five functions. They will be handling our API. Since our API will be hosted remotely, we have to sepcify cors: true for every handle function in the config file for a web application to use it.
Let us define them these functions now.
module.exports.create = (event, context, callback) => {
    context.callbackWaitsForEmptyEventLoop = false;

    connectToDatabase().then(() => {
        Note.create(JSON.parse(event.body))
            .then(note =>
                callback(null, {
                    statusCode: 200,
                    body: JSON.stringify(note)
                })
            )
            .catch(err =>
                callback(null, {
                    statusCode: err.statusCode || 500,
                    headers: { 'Content-Type': 'text/plain' },
                    body: 'Could not create the note.'
                })
            );
    });
};

module.exports.getOne = (event, context, callback) => {
    context.callbackWaitsForEmptyEventLoop = false;

    connectToDatabase().then(() => {
        Note.findById(event.pathParameters.id)
            .then(note =>
                callback(null, {
                    statusCode: 200,
                    body: JSON.stringify(note)
                })
            )
            .catch(err =>
                callback(null, {
                    statusCode: err.statusCode || 500,
                    headers: { 'Content-Type': 'text/plain' },
                    body: 'Could not fetch the note.'
                })
            );
    });
};

module.exports.getAll = (event, context, callback) => {
    context.callbackWaitsForEmptyEventLoop = false;

    connectToDatabase().then(() => {
        Note.find()
            .then(notes =>
                callback(null, {
                    statusCode: 200,
                    body: JSON.stringify(notes)
                })
            )
            .catch(err =>
                callback(null, {
                    statusCode: err.statusCode || 500,
                    headers: { 'Content-Type': 'text/plain' },
                    body: 'Could not fetch the notes.'
                })
            );
    });
};

module.exports.update = (event, context, callback) => {
    context.callbackWaitsForEmptyEventLoop = false;

    connectToDatabase().then(() => {
        Note.findByIdAndUpdate(event.pathParameters.id, JSON.parse(event.body), {
            new: true
        })
            .then(note =>
                callback(null, {
                    statusCode: 200,
                    body: JSON.stringify(note)
                })
            )
            .catch(err =>
                callback(null, {
                    statusCode: err.statusCode || 500,
                    headers: { 'Content-Type': 'text/plain' },
                    body: 'Could not fetch the notes.'
                })
            );
    });
};

module.exports.delete = (event, context, callback) => {
    context.callbackWaitsForEmptyEventLoop = false;

    connectToDatabase().then(() => {
        Note.findByIdAndRemove(event.pathParameters.id)
            .then(note =>
                callback(null, {
                    statusCode: 200,
                    body: JSON.stringify({
                        message: 'Removed note with id: ' + note._id,
                        note: note
                    })
                })
            )
            .catch(err =>
                callback(null, {
                    statusCode: err.statusCode || 500,
                    headers: { 'Content-Type': 'text/plain' },
                    body: 'Could not fetch the notes.'
                })
            );
    });
};
If you are familiar with Node.js/Express framework you will notice there is little difference in creating a controller function and defining a route for an app.
Every function has the same value of context.callbackWaitsForEmptyEventLoop set to false, and start with the connectToDatabase() function call. Once the connectToDatabase() function resolves it will continue with executing the database interaction through Mongoose. Remember, I told you that there are three main parameters in AWS Lambda.
Well let us disuss them briefly, what they are.
- The event parameter contains the current event info. That means the event that triggers the function will send along information to the function to use. An example would be the data an HTTP request sends along to the endpoint, such as whether it has request parameters or a body.
- The context contains all the information about the function itself. How long it has been running, how much memory it’s consuming among other things. This is viewed as the runtime information.
- The callback is pretty self-explanatory. When you want to tell the function to end its execution, you invoke the callback. It takes two parameters, the first is an error, the second is the data you wish to send back as the response of the Lambda function.
We have used all these parameters to define each route in our REST API in handler.js file.
MongoDB Connection
We need to create a connection between the handler.js and our MongoDB Atals such as to use the database in real-time. Create a file called db.js.
const mongoose = require('mongoose');
mongoose.Promise = global.Promise;
let isConnected;

module.exports = connectToDatabase = () => {
    if (isConnected) {
        console.log('=> using existing database connection');
        return Promise.resolve();
    }

    console.log('=> using new database connection');
    return mongoose.connect(process.env.DB).then(db => {
        isConnected = db.connections[0].readyState;
    });
};
It is basic mongoose connection. The only difference here is that we are exporting connectToDatabase() as discussed before. We need to require this file to work in our handler.js.
const connectToDatabase = require('./db');
Now let us define the only model of our REST API using Mongoose. Yes, we can even use an ODM like mongoose since serverless is unopinionated about that. Create a new file called Notes.js and add the following code.
const mongoose = require('mongoose');
const NoteSchema = new mongoose.Schema({
    title: String,
    description: String
});
module.exports = mongoose.model('Note', NoteSchema);
To use this model, we will require it in the handler.js file.
const Note = require('./models/Note');
Using a dotenv for Environment Variables
Protecting our keys and other essentials is the first step to a secured backend application. Create a new file called variables.env. In this file, we will add our MONGODB connection URL that we have already used in db.js as a process.env.DB. The good thing about environment variables is that they are global to the scope of the application.
To find out our MongoDB URL, we need to go back to the mongodb atlas, to out previously created cluster. Click the button Connect and then you will be prompted a page where you can choose how to access the application. Click Allow Access From Anywhere.

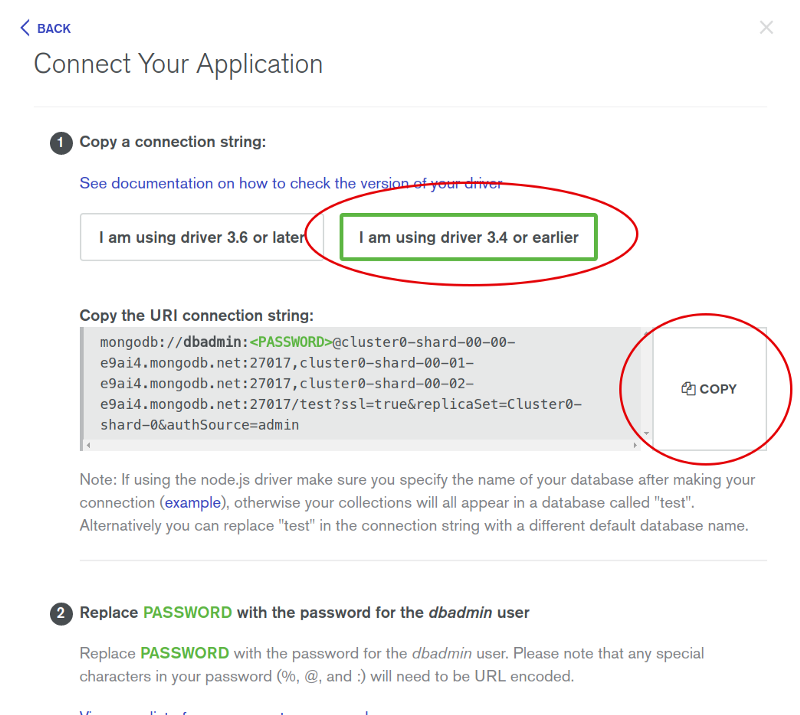
Copy the mongodb url from above and paste it in the variables.env file.
DB=mongodb://
Replace the user and password field with your credentials. Now to make it work, all we have to add the following line in our handler.js
require('dotenv').config({ path: './variables.env' });
Deployment
This is the most easiest step in the whole of this tutorial. All you have to do is run the depoy command from the command line.
sls deploy
Since we have connected our Lambda function, this command will prompt us with a different endpoints. Each handler function is deployed as a separate REST endpoint.
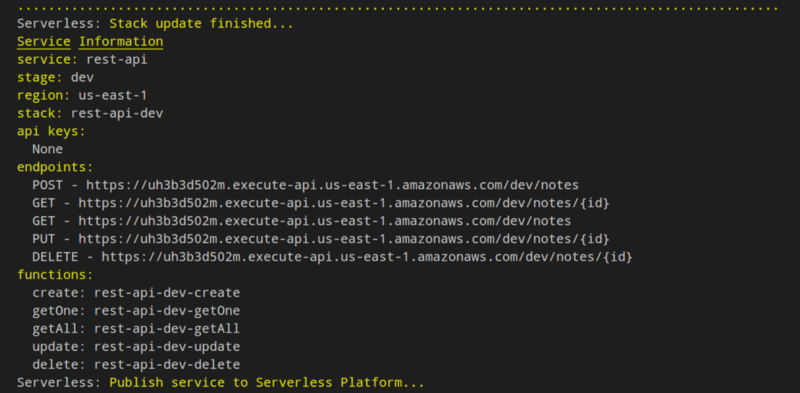
We have reached the end of the tutorial and you have just deployed your first serverless application successfully.


I’ve tried out several similar tutorials. Whenever I attempt to post to my Atlas database using Postman or Insomnia I always get 502 Bad Gateway Internal Server Error.