

In this chapter, we are going to discuss the number of ways the database connections could be created with the MySQL database.
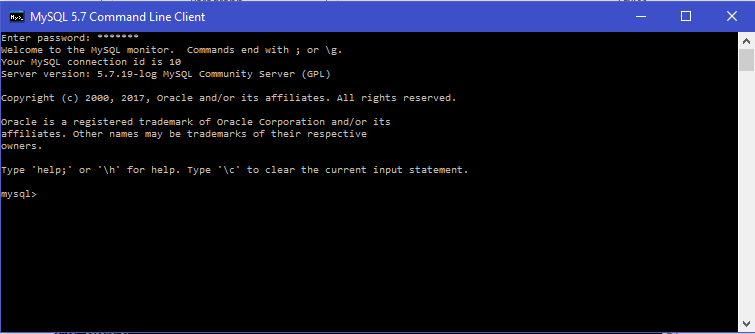
* Connection using MySQL 5.7 command line client: You can start the MySQL 5.7 command line client by simply clicking on the desktop icon or opening it from the Window’s Program Menu. Once MySQL 5.7 command line client opens, you can see the following command line window which will be asking you to enter the root password (i.e. mysqldb). Once the password is entered, you will be successfully able to establish database connection with the MySQL database.
* JDBC Connection with MySQL database: You can perform various database operations on MySQL database by simply establishing JDBC (“Java Database Connectivity”) connection. Before we jump to MySQL JDBC connection. Let’s understand what actually JDBC is.
JDBC (Java Database Connectivity)
JDBC is a Java API (Application Programming Interface) that interacts with the backend database after obtaining a database connection and allows you to execute various SQL statements through this database connection. JDBC API supports database connection to multiple databases through their database drivers. Therefore, we require MySQL connector driver in order to establish JDBC connection with MySQL. Following are the classes and interfaces that are provided by the JDBC API.
• Driver Manager Driver Manager class helps to return a database connection object. It accepts three parameters. They are DB connection URL, username and password.
• Driver Driver is nothing but a database specific driver e.g. com.mysql.jdbc.Driver. It helps to create a JDBC connection with the MySQL database.
• Connection Connection is an interface. It helps to provide database information such as table descriptions, SQL grammar supported by the database, associated stored procedures, and the various connection capabilities, etc.
• Statement Statement is an interface. It helps to pre-compile the object and use it to execute SQL statements efficiently into MySQL database.
• ResultSet ResultSet is an interface to the object. It maintains a cursor that points to its current row of data. At the start, the cursor is always positioned at the top of the first row. The cursor keeps on rotating to the next row and returns a Boolean value only if the fetched rows from database actually exists.
• SQLException SQLException is an exception class in Java. It defines the various SQL exceptions that could be thrown during the run time. Whenever, we attempt to execute any SQL statement through JDBC connection, it is compulsory to catch the SQL exception or declare this class with throws statement at the method level.
STEPS to create JDBC Connection using MySQL database
As we discussed earlier, that we require a MySQL connector driver. The Driver class helps to create a JDBC connection with MySQL database. We can download SQL connector driver API through the link below.
When you browse above link in the web browser, you will notice the following download links on the web page as shown below.
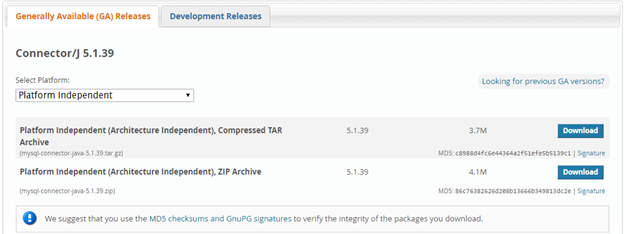
Click on the ‘Download’ link which offers the ZIP Archive. The downloaded zip file has the name as ‘mysql-connector-java-5.1.39.zip’, you can unzip this archive file to procure the jar or connector API that acts as our actual driver API. The following are the steps to make JDBC connection using SQL connector JAR just downloaded and eclipse as IDE (Integrated Development Environment).
Step 1: – Create a new project using the name as ‘mysql-jdbc-connection-demo’ in eclipse. Next, add class ‘MySqlJdbcConnector.java’ to this project.
Step 2: – On the left hand side from Package Explorer, right click on the project and navigate as ‘Build Path’ ‘Configure Build Path…’ as shown below.

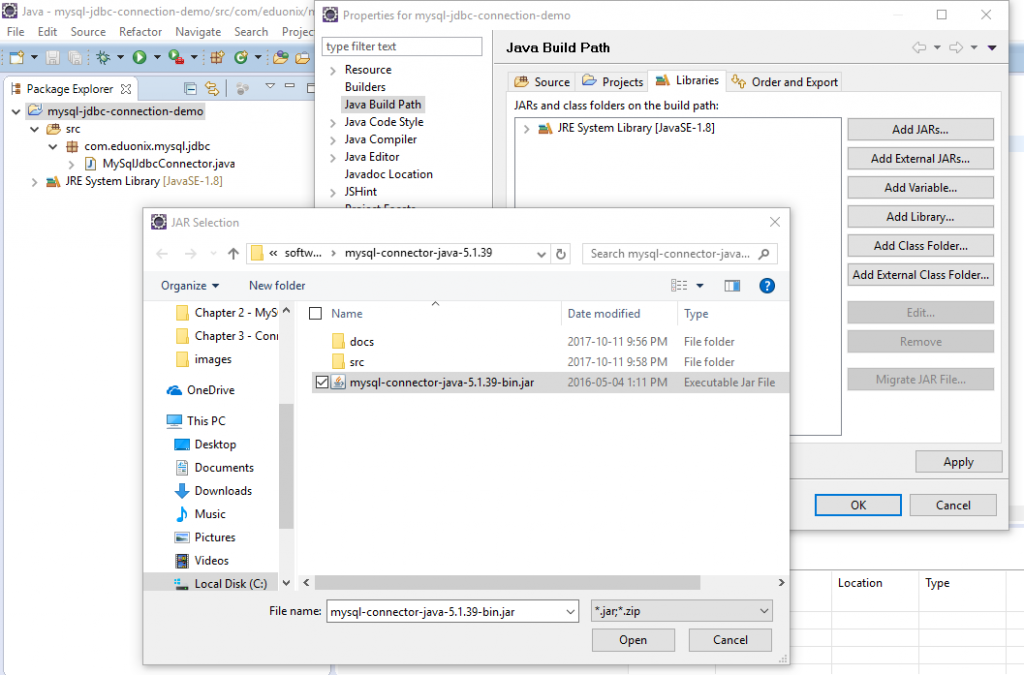
Step 3: – Next, click on the ‘Libraries’ tab followed by clicking on the ‘Add External JARs…’ button. Select the path where you have placed unzipped SQL Connector API (i.e. ‘mysql-connector-java-5.1.39.jar’) which was downloaded earlier. Lastly, click on the Open button in order to complete this step.
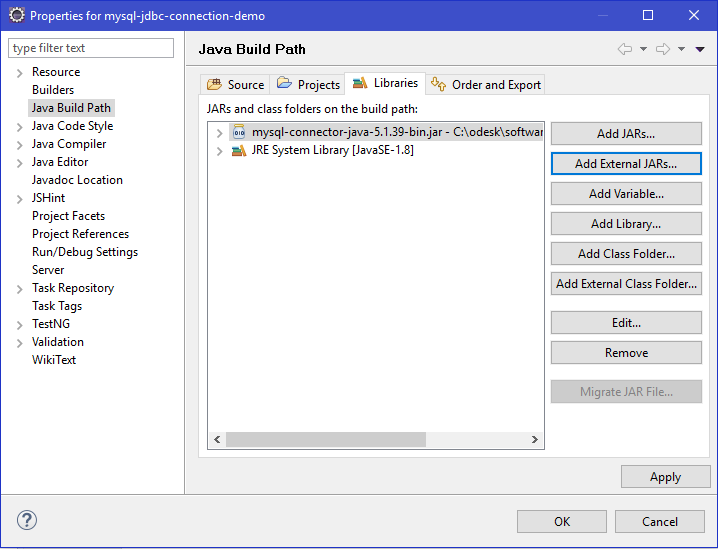
Step 4: – Next, click on the ‘OK’ button to complete the build path set up as shown below.
Step 5: – Once SQL connecter JAR is available at the project build path, you can write the following JAVA program to establish JDBC Connection with MySQL database as shown below.
package com.eduonix.mysql.jdbc;

import  java.sql.Connection;
import  java.sql.DriverManager;
import  java.sql.ResultSet;
import  java.sql.SQLException;
import  java.sql.Statement;

/**
 *
 * @author Aparajita
 *
 */
public class MySqlJdbcConnector {

	public static final String QUERY = "select *  from USER;";

	public static void main(String[] args)  throws  ClassNotFoundException, SQLException{
		// TODO Auto-generated method stub
		 String host = "";
	        String user = "";
	        /**
	         * Load MySQL JDBC driver
	         */
	   	    Class.forName("com.mysql.jdbc.Driver");
	   		/**
	   		 * Create Connection to DB
	   		 */
	    	Connection con = DriverManager.getConnection("jdbc:mysql://localhost:3306/mysql","root","mysqldb");
	    	/**
	    	 * Create Statement Object.
	    	 */
		    Statement stmt = con.createStatement();
		    /**
		     * Execute the SQL Query. Store results in ResultSet.
		     */
	 		ResultSet rs= stmt.executeQuery(QUERY);
	 		/**
	 		 * While Loop iterates through all data present in a table.
	 		 */
			while (rs.next()){
		        		 host = rs.getString(1);
	                     user = rs.getString("User");
	                     System.out.println("Host: "+host);
	         			 System.out.println("Username: "+user);
	            }
				con.close();
	}

}
Output: –
When we execute the above program as a JAVA application in eclipse IDE, then we can observe the following output. The output has printed the host and user name of three records from the user table.
Host: localhost
Username: root
Host: localhost
Username: mysql.session
Host: localhost
Username: mysql.sys
Explanation of JAVA Program
1) Creation of a Database connection: You are creating the MySQL DB connection after loading the JDBC driver through the DriverManager class. This class requires the following parameters viz. URL, username and password i.e. (jdbc: mysql://localhost:3306/mysql”, “root”, “mysqldb).
2) Execution of the SQL queries in MySQL Database via JDBC connection: You have to create a SQL query that can select the records from User table (here we are displaying just Host and user name from USER table) present in the mysql database. The Statement interface and the ‘createStatement’ method of the Connection interface prepare the SQL in the pre-compiled state.
3) Processing of the result set returned from database: At this execution point, we executes the pre-compiled SQL and with the help of the ‘executeQuery’ method, the database will return a result set that contains three records for user as displayed in the program output (i.e. host and user name for each user). We iterate over the returned result, set and print the values on the console.
Conclusion
In this chapter, we have demonstrated two ways using which we can connect to MySQL database along with the suitable examples.

