
In this article, we are going to focus on the Angular 2 scripting, which is done in the TypeScript language. It is a typed language which is nothing but a super set of JavaScript. It is chosen by the Angular team for being a very robust language and is maintained by Microsoft Inc. The Angular 2 set up compiles the TypeScript files (file extension as .ts) into the JavaScript files (file extension as .js) and is very less susceptible to run time errors due to the presence of types in TypeScript language.
Pre-requisite for building a basic Angular 2 App
To begin with scripting in Angular 2, we need to make sure that the angular 2 framework setup is successfully installed which includes the installation of Node.js module and executing the number of npm installation commands on the command line. The steps could be referred to from the article ‘My first Angular 2 program’.
Employee Details App in Angular 2
Step 1: Firstly, we need to create the directory structure as ‘app’, ‘assets’, ‘resource’ and index.html file. The index.html starter file has the selector ‘employee-app’ in the body section of the HTML as shown below. This is the start point of the ‘Employee Details App’ which we are creating in this article.
Index.html
<html>
<head>
  <base href="/">
<title>Angular2 Core Concepts</title>
<meta charset="UTF-8">
<meta name="viewport" content="width=device-width, initial-scale=1">
<link rel="stylesheet" href="assets/appstyle.css">
<!-- 1. Load libraries -->
<!-- Poly-fills for the older browsers -->
<script src="node_modules/core-js/client/shim.min.js"></script>
<script src="node_modules/zone.js/dist/zone.js"></script>
<script src="node_modules/reflect-metadata/Reflect.js"></script>
<script src="node_modules/systemjs/dist/system.src.js"></script>
<link rel="stylesheet"
      href="node_modules/bootstrap/dist/css/bootstrap.min.css">
<!-- 2. Configure SystemJS -->
<script src="systemjs.config.js"></script>
<script>
      System.import('app').catch(
    		  function(err){
    			  console.error(err);
    			  }
    		  );
</script>
</head>
<!-- 3. Display the application -->
<body>
	<div align="center">
		<employee-app>A moment please...</employee-app>
	</div>
</body>
</html>
As discussed, the programming of Angular 2 is done in TypeScript, therefore we will be developing the following TypeScript files along with their styles and the HTML template file.
Step 2: We create a model class as ‘Employee’ that has two attributes namely id and name with their defined data types as shown below.
- File employee.ts: It is a Typescript file and should be created under the app folder.
export class Employee {
  id: number;
  name: string;
}
Step 3: We need to supply data i.e. the list of employees with their id and name. Therefore, we are creating the following Employee array that is defined with the const EMPLOYEES as shown below. In this app, we will be playing around with the data supplied through this Employee array.
- File mock-employees.ts: It is a Typescript file and should be created under the app folder. It has the employee’s data that includes their ID and Name.
import { Employee } from './employee';

export const EMPLOYEES: Employee[] = [
  {id: 308251, name: 'Aparajita'},
  {id: 308252, name: 'Anita'},
  {id: 308253, name: 'Chandra'},
  {id: 308254, name: 'Anmol'},
  {id: 308255, name: 'Arpit'},
  {id: 308256, name: 'Atul'},
  {id: 308257, name: 'Renu'},
  {id: 308258, name: 'Mohit'},
  {id: 308259, name: 'Gyan'},
  {id: 308250, name: 'Kusum'},
  {id: 308249, name: 'Lavi'}
];
Step 4: Now, we need to create a way through which we can get this data as a service in other controller classes’ method. Therefore, we will be creating an EmployeeService class which is capable of injecting dependency to retrieve Employee data. We have the Injectable function present in ‘@angular/core’ package which helps in dependency injection.
- File employee.service.ts: It is a Typescript file and should be created under the app folder. It has a dependency injection class as EmployeeService that provides the employee data as a service which is injectable.
import { Injectable } from '@angular/core';
import { Employee } from './employee';
import { EMPLOYEES } from './mock-employees';

@Injectable()
export class EmployeeService {

  getEmployees(): Promise<Employee[]> {
    return Promise.resolve(EMPLOYEES);
  }
  getEmployee(id: number): Promise<Employee> {
  return this.getEmployees()
             .then(employees => employees.find(employee => employee.id === id));
	}
}
Step 5: Next, we are creating an EmployeesComponent controller class which has the following methods ‘getEmployees ()’, ‘onSelect (employee: Employee)’, and ‘gotoDetail ()’.
- File employees.component.ts: It is a Typescript file and should be created under the app folder. It has the component and the controller class as EmployeesComponent which implements OnInit interface. The component has a selector as ‘my-employees’, styleUrls as ‘assets/employees.component.css’ and templateUrl as ‘resource/employees.component.html’.
import { Component, OnInit } from '@angular/core';
import { Router } from '@angular/router';
import { Employee } from './employee';
import { EmployeeService } from './employee.service';

@Component({
  selector: 'my-employees',
  templateUrl: 'resource/employees.component.html',
  styleUrls:  ['assets/employees.component.css']
})

export class EmployeesComponent implements OnInit {
  employees: Employee[];
  selectedEmployee: Employee;

  constructor(
    private router: Router,
    private employeeService: EmployeeService) { }

  getEmployees(): void {
    this.employeeService.getEmployees().then(employees => this.employees = employees);
  }
  ngOnInit(): void {
    this.getEmployees();
  }
  onSelect(employee: Employee): void {
    this.selectedEmployee = employee;
  }
  gotoDetail(): void {
    this.router.navigate(['/detail', this.selectedEmployee.id]);
  }
}
The following are the content of styleUrls as ‘assets/employees.component.css.
.selected {
	background-color: #ff8040!important;
	color: white;
}

.employees {
	margin: 0 0 2em 0;
	list-style-type: none;
	padding: 0;
	width: 15em;
}

.employees li {
	cursor: pointer;
	position: relative;
	left: 0;
	background-color: #EEE;
	margin: .5em;
	padding: .3em 0;
	height: 1.6em;
	border-radius: 4px;
}

.employees li.selected:hover {
	background-color: #ff0000!important;
	color: white;
}

.employees li:hover {
	color: #ff8040;
	background-color: #DDD;
	left: .1em;
}

.employees .text {
	position: relative;
	top: -3px;
}

.employees .badge {
	display: inline-block;
	font-size: small;
	color: white;
	padding: 0.8em 0.7em 0 0.7em;
	background-color: #008040;
	line-height: 1em;
	position: relative;
	left: -1px;
	top: -4px;
	height: 1.8em;
	margin-right: .8em;
	border-radius: 4px 0 0 4px;
}
h1 {
	color: #369;
	font-family: Arial, Helvetica, sans-serif;
	font-size: 250%;
}
h2, h3 {
	color: #444;
	font-family: Arial, Helvetica, sans-serif;
	font-weight: lighter;
}

body {
	margin: 2em;
}

body, input[text], button {
	color: #888;
	font-family: Cambria, Georgia;
}
{
	font-family: Arial, Helvetica, sans-serif;
}
The following is the content of the templateUrl as ‘resource/employees.component.html’.
<h1>{{title}}</h1>
<h2>Our Employees</h2>
<ul class="employees">
	<li *ngFor="let employee of employees"
		[class.selected]="employee === selectedEmployee" (click)="onSelect(employee)">
		<div align="left">
		<span class="badge">{{employee.id}}</span>
		{{employee.name}}
	    </div>
	</li>
</ul>
<div *ngIf="selectedEmployee">
  <h2>
    {{selectedEmployee.name | uppercase}} is the Best Employee.
  </h2>
  <button (click)="gotoDetail()">View Details</button>
</div>
Step 6: Next, we are creating an EmployeeDetailComponent controller class which displays the employee details and has the go back button to take a web page history back.
- File employee-detail.component.ts: It is a Typescript file and should be created under the app folder. It has a component and the controller class as EmployeeDetailComponent which implements OnInit interface. The component has a selector as ‘my-employee-detail’, styleUrls as ‘assets/employee-detail.component.css’ and templateUrl as ‘resource/employee-detail.component.html’.
import { Component, Input, OnInit } from '@angular/core';
import { ActivatedRoute, Params } from '@angular/router';
import { Employee } from './employee';
import { EmployeeService } from './employee.service';

@Component({
  selector: 'my-employee-detail',
  templateUrl: 'resource/employee-detail.component.html',
  styleUrls: ['assets/employee-detail.component.css']
})
export class EmployeeDetailComponent implements OnInit {

  @Input() employee: Employee;

  constructor(
  	private employeeService: EmployeeService,
  	private route: ActivatedRoute) {

	}
  ngOnInit(): void {
  	this.route.params.forEach((params: Params) => {
    	let id = +params['id'];
    	this.employeeService.getEmployee(id)
      	.then(employee => this.employee = employee);
  		});
	}
  goBack(): void {
  	window.history.back();
  }
}
The following is the content of styleUrls as ‘assets/employee-details.component.css.
label {
  display: inline-block;
  width: 3em;
  margin: .5em 0;
  color: #000080;
  font-weight: bold;
}
input {
  height: 2em;
  font-size: 1em;
  padding-left: .4em;
}
button {
  margin-top: 18px;
  font-family: Arial;
  background-color: #eee;
  border: none;
  padding: 6px 12px;
  border-radius: 5px;
  cursor: pointer; cursor: hand;
}
button:hover {
  background-color: #00ff00;
}
button:disabled {
  background-color: #eee;
  color: #ccc;
  cursor: auto;
}
The following is the content of the templateUrl as ‘resource/employee-detail.component.html’.
<div *ngIf="employee">
  <h2>{{employee.name}} details!</h2>
  <div>
    <label>id: </label>{{employee.id}}</div>
  <div>
    <label>name: </label>
    <input [(ngModel)]="employee.name" placeholder="name" />
  </div>
  <button (click)="goBack()">Back</button>
</div>
Step 7: Next, we are creating a DashboardComponent controller class which serves as a home page that has two methods ‘ngOnInit ()’ and ‘gotoDetail (employee: Employee)’.
- File dashboard.component.ts: It is a Typescript file and should be created under the app folder. It has a component and the controller class as DashboardComponent which implements the OnInit interface. The component has a selector as ‘my-dashboard’, styleUrls as ‘assets/dashboard.component.css’ and templateUrl as ‘resource/dashboard.component.html’.
import { Component, OnInit } from '@angular/core';
import { Router } from '@angular/router';
import { Employee } from './employee';
import { EmployeeService } from './employee.service';

@Component({
  selector: 'my-dashboard',
  templateUrl: 'resource/dashboard.component.html',
  styleUrls: ['assets/dashboard.component.css']
})

export class DashboardComponent implements OnInit {

  constructor(
  private router: Router,
  private employeeService: EmployeeService) {

  }
  employees: Employee[] = [];

  ngOnInit(): void {
    this.employeeService.getEmployees()
      .then(employees => this.employees = employees.slice(1, 5));
  }

  gotoDetail(employee: Employee): void {
  	let link = ['/detail', employee.id];
  	this.router.navigate(link);
  }
}
The following is the content of styleUrls as ‘assets/dashboard.component.css.
[class*='col-'] {
  float: left;
}
*, *:after, *:before {
    -webkit-box-sizing: border-box;
    -moz-box-sizing: border-box;
    box-sizing: border-box;
}
h3 {
  text-align: center; margin-bottom: 0;
}
[class*='col-'] {
  padding-right: 18px;
  padding-bottom: 18px;
}
[class*='col-']:last-of-type {
  padding-right: 0;
}
.grid {
  margin: 0;
}
.col-1-4 {
  width: 25%;
}
.module {
    padding: 20px;
    text-align: center;
    color: #eee;
    max-height: 140px;
    min-width: 140px;
    background-color: #ff0080;
    border-radius: 3px;
}
h4 {
  position: relative;
}
.module:hover {
  background-color: #EEE;
  cursor: pointer;
  color: #ff8080;
}
.grid-pad {
  padding: 10px 0;
}
.grid-pad > [class*='col-']:last-of-type {
  padding-right: 18px;
}
@media (max-width: 800px) {
    .module {
      font-size: 12px;
      max-height: 80px; }
}
@media (max-width: 1024px) {
    .grid {
      margin: 0;
    }
    .module {
      min-width: 75px;
    }
}
The following is the content of the templateUrl as ‘resource/dashboard.component.html’.
<div *ngFor="let employee of employees" (click)="gotoDetail(employee)" class="col-1-4">
Step 8: Next, we are defining all the routing links for various controlling classes that we have defined before in this article. The routing services are provided by the Routes, and RouterModule which are present in ‘@angular/router’ package.
- File app.routing.ts: It is a Typescript file and should be created under the app folder.
import { Routes, RouterModule } from '@angular/router';
import { EmployeesComponent }      from './employees.component';
import { DashboardComponent }   from './dashboard.component';
import { EmployeeDetailComponent }  from './employee-detail.component';

const appRoutes: Routes = [
  {
    path: '',
    redirectTo: '/dashboard',
    pathMatch: 'full'
  },
  {
    path: 'dashboard',
    component: DashboardComponent
  },
  {
    path: 'detail/:id',
    component: EmployeeDetailComponent
  },
  {
    path: 'employees',
    component: EmployeesComponent
  }
];

export const routing = RouterModule.forRoot(appRoutes);
Step 9: Now, it is the time to build the app component which has the selector as ’employee-app’ and is called in the index.html. It has the following template that has define the two router links to display two navigation menu as ‘Dashboard’ and ‘Employees’.
- File app.component.ts: It is a Typescript file and should be created under the app folder. It has the following template code that has multiple router links as shown below.
import { Component } from '@angular/core';

@Component({
  selector: 'employee-app',
  template: `
  <h1>{{title}}</h1>
  <nav>
    <a routerLink="/dashboard" routerLinkActive="active">Dashboard</a>
    <a routerLink="/employees" routerLinkActive="active">Employees</a>
  </nav>
  <router-outlet></router-outlet>
   `,
  styleUrls: ['assets/app.component.css']
})

export class AppComponent {
  title = 'List of Productive Employees in the Organization';
}
It has the styleUrls which is a CSS file under the assets directory. It has the following styling content as shown below.
assets/app.component.css
h1 {
  font-size: 1.2em;
  color: #999;
  margin-bottom: 0;
}
h2 {
  font-size: 2em;
  margin-top: 0;
  padding-top: 0;
}
nav a {
  padding: 5px 10px;
  text-decoration: none;
  margin-top: 10px;
  display: inline-block;
  background-color: #eee;
  border-radius: 4px;
}
nav a:visited, a:link {
  color: #ff8000;
}
nav a:hover {
  color: #039be5;
  background-color: #ffff80;
}
nav a.active {
  color: #004080;
}
Step 10: Next, we are writing the Module.ts file which has the following content. Here, we are including all the required imports, declarations and providers within the @NgModule.
- File Module.ts: It is a Typescript file and should be created under the app folder.
import { NgModule }       from '@angular/core';
import { BrowserModule }  from '@angular/platform-browser';
import { FormsModule }    from '@angular/forms';
import { AppComponent }   from './app.component';
import { EmployeesComponent }  from './employees.component';
import { DashboardComponent }  from './dashboard.component';
import { EmployeeDetailComponent }  from './employee-detail.component';
import { EmployeeService }  from './employee.service';
import { routing }        from './app.routing';

@NgModule({
  imports: [
    BrowserModule,
    FormsModule,
    routing
  ],
  declarations: [
    AppComponent,
    EmployeesComponent,
    DashboardComponent,
    EmployeeDetailComponent
  ],
  providers: [
    EmployeeService
  ],
  bootstrap: [ AppComponent ]
})
export class AppModule {
}
Step 11: Lastly, we are writing the main.ts file which has the following content.
- File main.ts: It is a Typescript file and should be created under the app folder. It is the files that help bootstrap the Angular 2 module.
import { platformBrowserDynamic } from '@angular/platform-browser-dynamic';
import { AppModule } from './Module';
platformBrowserDynamic().bootstrapModule(AppModule);
We are all set and done with the Angular 2 scripting and now it is time to build our first app after executing the npm command at the project root directory as shown below.
Output
After building the employee app, we can see the following home page loaded on the default browser.

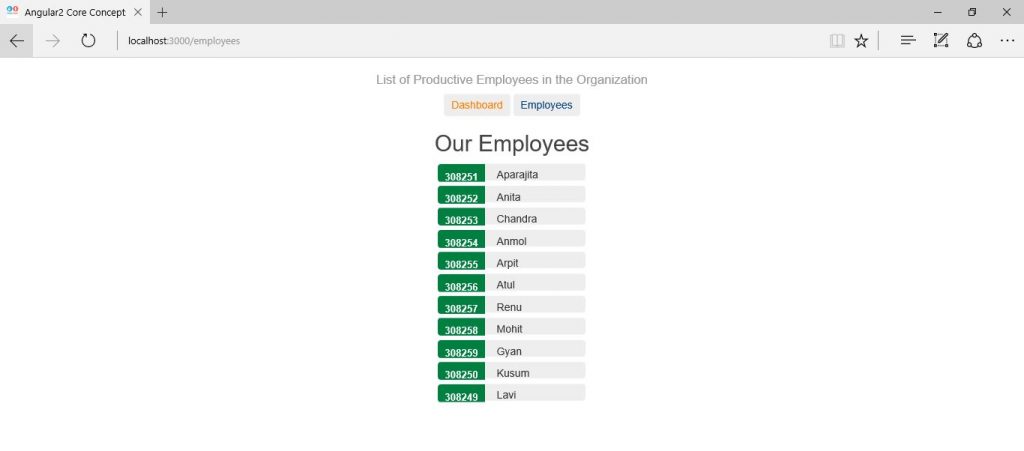
When we click on the ‘’ tab, then we can see the list of employees displayed on the screen as shown below.
When we click on any of the employee (Say ‘Aparajita’), we can see the message displayed as ‘APARAJITA is the Best Employee’ as shown below.
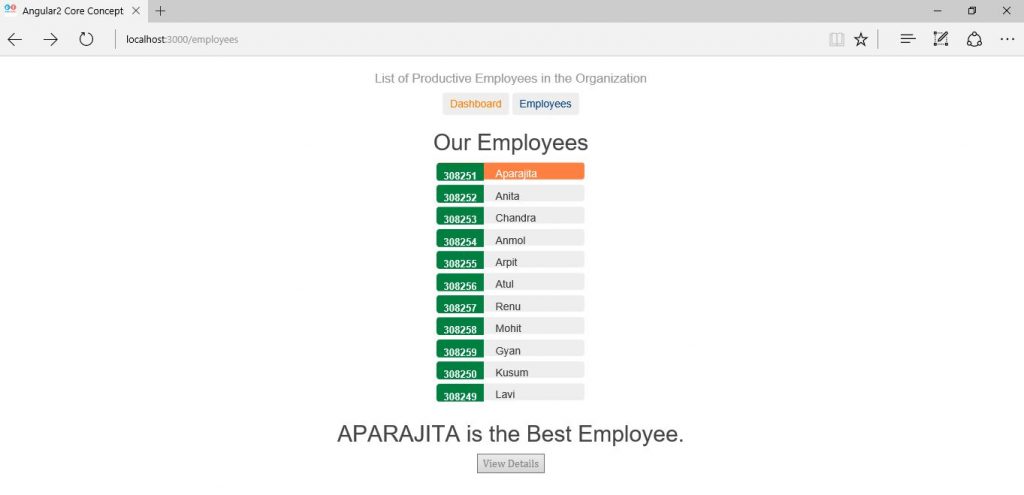
Further, we can click on the ‘View Details’ button to see employee details as shown below.
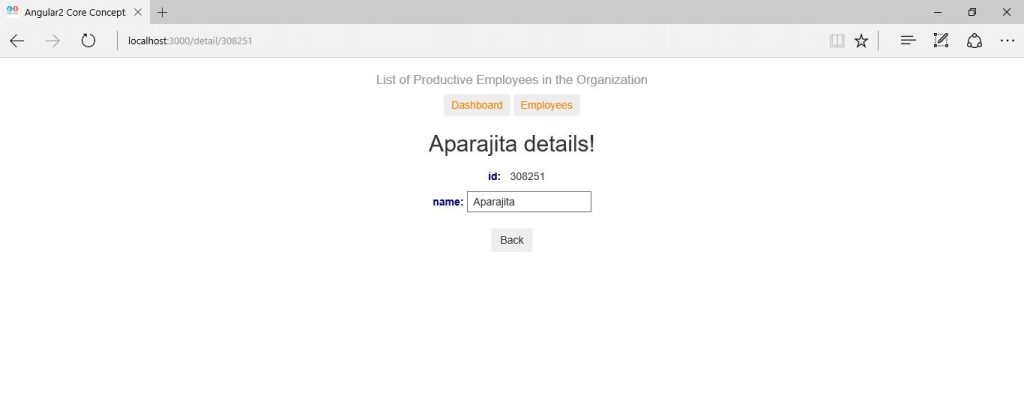
Lastly, we can click the ‘Back’ button to go to the last page as stored in the browser history.
Source Code for How to Write Angular 2 Scripts
Conclusion
In this article, we have learnt how write scripts using TypeScript language in Angular 2 and using this language we have built an ‘Employee Details’ app.