
Continuous integration (CI) is a software development practice, where developers integrate code immediately and testing happens on every commit before and after code merging by an automated process. CI has the benefit of reducing development cycle and minimizing production risks but it is not easy to set up. The automated build process runs in a different environment from the development environment therefore dependencies and configurations may be different. One solution that is available to help developers in the CI process is Jenkins.
When using CI, there are several best practices that you need to be aware of. These are listed below.
1. A single source repository is the best. Therefore in your development, aim to maintain just one repository. Resources for building code and running software are kept in a version control system (VCS). Git is a widely used VCS and hosting Git on Github is widely used by developers.
2. Automated build is better than using an IDE or a command line to build artifacts. Automated build has the advantage of being reproducible to other developers. Jenkins supports automated build process thereby providing transparency to all developers in the team.
3. Self-testing builds are the best way to approach CI.
4. All developers should commit to mainline on a daily basis. In case of any problems on the developer machine you can fall back to committed code. Daily committing also ensures immediate checking of whether the committed code is compatible with existing code.
5. Unsuccessful builds should be immediately worked on. Jenkins helps you define actions that happen after a build job such as sending messages to inform developers about a broken build.
When using Jenkins for your CI, there is a six step process as listed below:
1. A commit is pushed to Github by a developer.
2. Jenkins is notified of the update by Github via a webhook
3. The Github repository that contains the image Dockerfile, test and application code is pulled by Jenkins
4. On the Jenkins slave node, a Docker image is built.
5. On the slave node Jenkins runs the Docker container and the required tests
6. Finally, when a successful test happens the image is sent to a trusted registry
Before you can begin using Docker and Jenkins for CI there are several pre-requisites that need to be satisfied. You need the Jenkins master with the Github plugin running in a container, as well as a Docker registry.
The easiest way to get started with Jenkins is to use a Dockerfile that that will install Jenkins and Docker. Create a new directory and add a Dockerfile using the commands below:
mkdir jenkinssetup
cd jenkinssetup
sudo touch Dockerfile
![]()
Open the Dockerfile and add the commands highlighted in yellow, save and close.
sudo gedit Dockerfile
FROM ubuntu:14.04
MAINTAINER sammy
ENV REFRESHED_AT 2014-06-01
RUN apt-get update -qq && apt-get install -qqy curl
RUN curl https://get.docker.io/gpg | apt-key add -
RUN echo deb  docker main > /etc/apt/ ↩
sources.list.d/docker.list
RUN apt-get update -qq && apt-get install -qqy iptables ca- ↩
certificates lxc openjdk-6-jdk git-core lxc-docker
ENV JENKINS_HOME /opt/jenkins/data
ENV JENKINS_MIRROR http://mirrors.jenkins-ci.org
RUN mkdir -p $JENKINS_HOME/plugins
RUN curl -sf -o /opt/jenkins/jenkins.war -L $JENKINS_MIRROR/war- ↩
stable/latest/jenkins.war
RUN for plugin in chucknorris greenballs scm-api git-client git ↩
ws-cleanup ;\
do curl -sf -o $JENKINS_HOME/plugins/${plugin}.hpi \
-L $JENKINS_MIRROR/plugins/${plugin}/latest/${plugin}.hpi ↩
; done
ADD ./dockerjenkins.sh /usr/local/bin/dockerjenkins.sh
RUN chmod +x /usr/local/bin/dockerjenkins.sh
VOLUME /var/lib/docker
EXPOSE 8080
ENTRYPOINT [ "/usr/local/bin/dockerjenkins.sh" ]
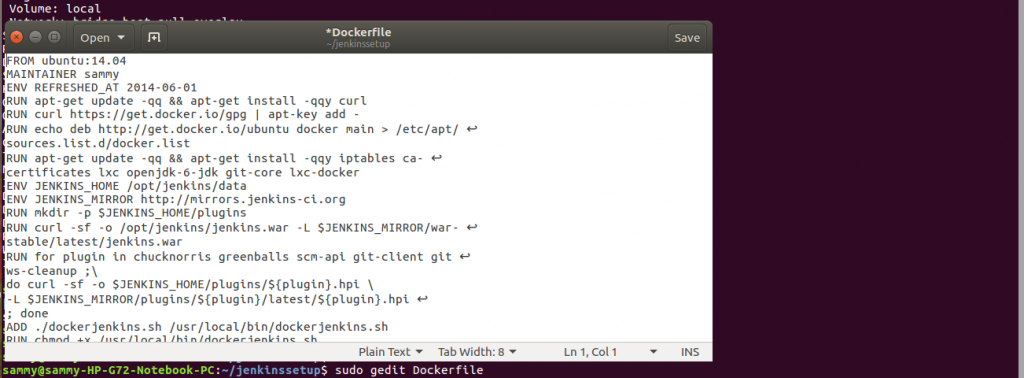
In the above Dockerfile we are creating an image based on ubuntu 14.04. In the Dockerfile, we set up the Docker APT and ubuntu repositories. The Docker repository GPG key is also added. Necessary packages for running Docker and Jenkins are installed. We download Jenkins together with plugins that provide additional functionality. The other commands in the Dockerfile are self explanatory.
With our Dockerfile ready, we use the build command as shown below to build our image.
sudo docker build.

After our image has been built, we can use the run command to create a container. After starting your container, you can navigate to the port you specified using your web browser to access the Jenkins web interface. With the Jenkins web interface we are able to create jobs.
We need to specify a command script that contains tests to be run. The script is created using a Dockerfile that specifies the test environment. In the Dockerfile below, an image is created using a hosted Git Dockerfile.
# Build the image to be used for this job.
IMAGE=$(docker build . | tail -1 | awk '{ print $NF }')
# Build the directory to be mounted into Docker.
MNT="$WORKSPACE/.."
# Execute the build inside Docker.
CONTAINER=$(docker run -d -v "$MNT:/opt/project" $IMAGE /bin/bash ↩
-c 'cd /opt/project/workspace && rake spec')
# Attach to the container so that we can see the output.
docker attach $CONTAINER
# Get its exit code as soon as the container stops.
RC=$(docker wait $CONTAINER)
# Delete the container we've just used.
docker rm $CONTAINER
# Exit with the same value as that with which the process exited.
exit $RC
After specifying a script, we are ready to run our Jenkins job.
In this tutorial, we introduced CI in software development and identified its benefits. We discussed some best practices that are worth following when doing CI. We discussed the steps followed when doing CI with Jenkins. We discussed what is required to run Jenkins and how to easily and quickly set up a Jenkins development environment. We also discussed how to create a shell script containing tests to be performed. This tutorial was just an eye opener on what can be achieved using Jenkins. Jenkins is a broad platform and the reader is encouraged to read more to fully understand its capabilities.

