

Overview
It wasn’t long ago that Google came up with the release of Angular 6, which was only about in March last year. Now, coming to the closing months of the year, it released Angular 7 around autumn. Naturally, the newer version has come with plenty of changes abound, including both features and updates. These are namely, CLI Prompts, Drag, Virtual, Drop, Scrolling, etc.
Thus, we shall be learning how to create a full stack application using Angular 7 and Spring Boot.
What is Angular 7?
To simply define, Angular is a simple platform that allows one to build simple applications on the web. It combines the usage of declarative templates, dependency injection, an end to end tooling along with integrated practices in order to meet development challenges. Angular also allows developers to build applications that not only live on the web but also on the desktop and mobile.
Today, Angular is considered to be one of the most popular JavaScript frameworks for front-end work, along with the likes of React and Vue.js. It has been available for almost a decade and has gone through several upgrades.
What is Spring Boot?
Spring Boot is a project set atop the Spring framework. It is a really simple way to setup, configure and run applications, simple and web-based. However, one major problem with the Spring framework is that one needs to configure everything by themselves. Hence, it results in having plenty of files to configure, which can be difficult. Now, this is where Spring Boot steps in.
Spring Boot can smartly choose your dependencies and hence, configures all the features that you may be using. Therefore, one can just proceed to start their application with a single click.
Why Angular and Spring Boot is used?
One of the biggest advantages of using Angular 7 or even Angular is that it is supported by Google. It is part of Google’s Long-Term Support and they are very positive about its stability. Applications also make use of TypeScript language, a superscript of JavaScript, which allows for better security with support for types. It is also easier when checking for errors, during coding and maintenance.
The usage of declarative UI, in the form of HTML is a bonus point here as it is a declarative language. The Angular framework also comes with the MVC (Model-Controller-View) setup, which asks developers to divide the app only. Using this simpler MVC structure allows developers to cut down on unnecessary code making development easier. Furthermore, testing is easy with the use of Angular.
Coming to Spring Boot, as earlier mentioned, one major plus point is that dependencies are auto-configured. This is one major advantage that favors the use of Spring Boot.
Secondly, Spring Boot literally functions as standalone. As a developer, one does not need to go through the pain of having a particular environment or a web server. An application can merely run on a click. The third plus point for Spring Boot is that it is opinionated. It is contextually aware and smart, and so the framework can choose how to things for itself.
What are the new features in Angular 7?

Angular 7, the present version, has been a great release. In fact, it comes with several key features that we shall discuss now.
- CLI prompts: CLI prompts in the latest version have been updated with newer features. For example, it now prompts users when typing commands such as ng-new, ng-add to help them learn about SCSS support, routing. Also, these CLI prompts have been added to Schematics such that it benefits all package publishing schematics.
- Angular material and the component dev kit (CDK): Angular 7 introduced minor visual changes in terms of Material Design. However, other improvements in CDK and Angular Material include virtual scrolling, refresh, dynamic loading and unloading of DOM parts and large data lists.
- Drag & drop: There is a new Drag & drop module that offers an easy way to create drag-and-drop interfaces. It is also backed by a sorting feature, animations, free dragging, custom drag holders, placeholders, previews, etc. In simple terms, drag and drop is now a part of CDK and includes automatic rendering.
- Virtual scrolling: The new Virtual Scrolling feature in Angular 7 does the job of loading and unloading elements from the DOM depending upon visible parts of lists. This result is much faster experiences for those with large scrollable lists.
Installation/update
In this section, we will discuss the installation and the set-up process. This will help you understand the environment and how it works. We will talk about each and every component required to run an Angular 7 application.
Following are the tools, components, and frameworks:
- Node.js: Node.js is a JavaScript runtime. It provides the complete runtime environment to run Angular 7 applications. It is built on Chrome’s JavaScript engine. Node.js runtime is used to build scalable applications. It also supports the network-based application and concurrency. The concurrency model in Node.js is different from the thread-based concurrency model. So, the deadlock situation does not arise in Node.js based applications.
- npm package manager: The npm package manager is an important component for developing Angular based applications. Angular, Angular CLI and other Angular apps depend on different libraries, which are available as npm packages. So, the npm package manager must be there to run those packages. The client application for npm package manager, npm client is installed by default when Node.js is installed.
- Angular 7: This is the framework required to build the application. Here, we will be using Angular (version 7) for our sample application. The release information of different Angular versions can be available as a quick reference.
- Angular 7 CLI: Angular CLI is the most important component to build Angular 7 application. The CLI (Command Line Interface) is the core component to create projects, libraries, components, and various development activities. Angular CLI is also used to bundle, test and deploy Angular applications. Angular CLI comes as an npm package. Use the following command to install it. In the following code, ‘-g’ is used to install the CLI globally
[code]
npm install -g @angular/cli
[/code]
Now, we will start the server and check if the installation is working or not.
Step 1: Create a workspace
Run the CLI command ‘ng new app’. It will ask for different features. You can accept default values to create the workspace. This will take some time to create the project structure with the root folder name as ‘app’.
Step 2: Start the server and the application
First, go to the root folder ‘app’.
cd app
Now, start the server by the following command.
ng serve –open
This will open the browser at the default port 4200. It will show the welcome message.
Application development
In this section, we will build a simple application based on the workspace created in the previous section.
Following is the project structure created for this sample application.
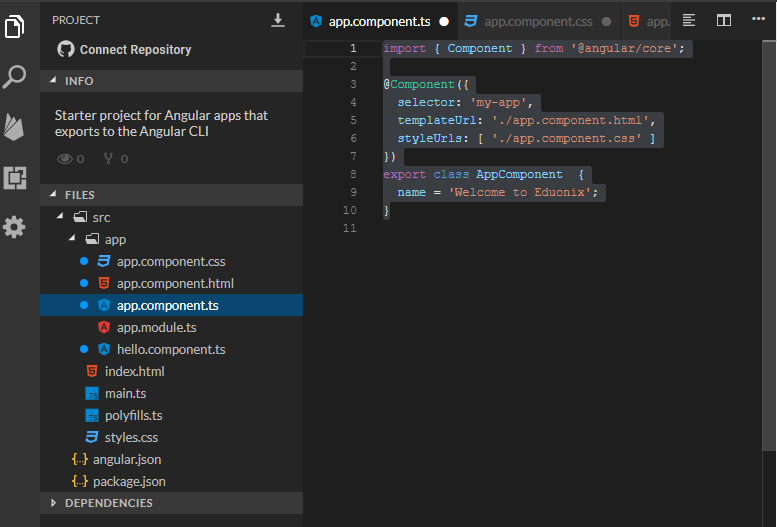
Following are the components created for the sample application:
Listing 1: app component (app.component.ts)
[code]
import { Component } from ‘@angular/core’;
@Component({
selector: ‘my-app’,
templateUrl: ‘./app.component.html’,
styleUrls: [ ‘./app.component.css’ ]
})
export class AppComponent {
name = ‘Welcome to Eduonix’;
}
[/code]
Listing 2: app module (app.module.ts)
[code]
import { NgModule } from ‘@angular/core’;
import { BrowserModule } from ‘@angular/platform-browser’;
import { FormsModule } from ‘@angular/forms’;
import { AppComponent } from ‘./app.component’;
import { HelloComponent } from ‘./hello.component’;
@NgModule({
imports: [ BrowserModule, FormsModule ],
declarations: [ AppComponent, HelloComponent ],
bootstrap: [ AppComponent ]
})
export class AppModule { }
[/code]
Listing 3: html component (html.component.ts)
[code]
import { Component, Input } from ‘@angular/core’;
@Component({
selector: ‘hello’,
template: `<h1>Hello!! {{name}}!</h1>`,
styles: [`h1 { font-family: Lato; }`]
})
export class HelloComponent {
@Input() name: string;
}
[/code]
Listing 4: css component (app.component.css)
[code]
{
font-family: Arial, Helvetica, sans-serif;
font-size: 250%;
color: #365;
}
[/code]
Listing 5: html component (app.component.html)
[code]
<hello name="{{ name }}"></hello>
<p>
Let us learn Angular 7
</p>
[/code]
Now, once you run the application, it will show the following output.

This entire project can be imported in a spring boot environment by using Spring Tool Suite. And, the Angular 7 application can be tested in a similar way.
Conclusion
To conclude, Angular 7 is certainly here for the better and the development team did a fine job in making the platform better. It is a modern, efficient and up-to-date framework that will help develop next-generation products. Thus, using Angular 7 and Spring Boot to work on a project, be it, mobile or the web is a good way to go about things. We hope this tutorial will just set you on that course.
And if you are inclined towards knowing more about Angular 7, you can opt for ‘Angular 7: The Ultimate Guide‘ which will help you master this topic.

