
In the ‘Learn How To Set Up a Vagrant Environment’, we demonstrated how to set up a basic Vagrant environment. Vagrant provides far much powerful features to customize server environments. The Vagrant API, which is accessed through Vagrantfiles offers different options that we can use to customize our virtual environments. In this article, we will focus on demonstrating how to create Vagrantfiles, managing VM and host OS resources and using a specific hypervisor.
The vagrant up command we used earlier started a single machine, but we did not take a closer look at how configuration files are defined. Ruby syntax is used to define Vagrantfiles but Ruby programming skills are not required to build a Vagrantfile because mostly defining a Vagrantfile involves assigning variables.
There are some Vagrant behaviors you need to be aware of before we can begin writing Vagrantfiles. The first behavior you need to understand is the lookup path. When we run the vagrant command, a search for the first occurrence of a Vagrantfile beginning in the current directory upwards. This Vagrant flexibility enables you to call vagrant from your directory of choice. To override search from the current directory to a specific directory, you use VAGRANT_CWD variable which is set at the environment level to specify the directory where Vagrant files will be searched.
Another Vagrant behavior that is important is how Vagrant handles many files. Vagrantfiles are merged from one step to the next with subsequent settings overriding previous settings. The steps that are followed when merging Vagrantfiles are explained below. In case there is no Vagrant file at any stage the loading process continues uninterrupted.
- The first Vagrantfile to be loaded is the one bundled together with the box that will be used
- The second file to be loaded is the one stored in the Vagrant home directory, which enables you to specify defaults
- The third Vagrantfile to be loaded is the one located in the project directory
- Other Vagrantfiles that are loaded if they are available are multi-machine and provider-specific files
The basic building block of a Vagrantfile is a configuration file. At the minimum one configuration object must be included in the Vagrantfile. The configuration object is a representation of a VM and additions to the configuration control the behavior of the machine.
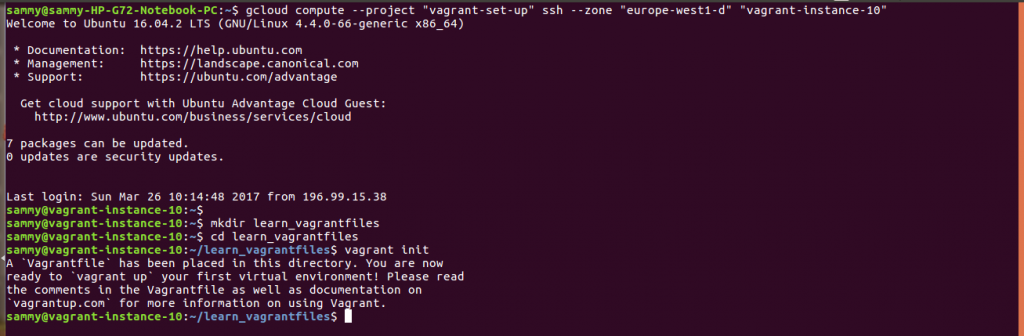
To proceed with our demonstrations, let us connect to a Google cloud instance and initialize a Vagrant directory using the commands below.
gcloud compute --project "vagrant-set-up" ssh --zone "europe-west1-d" "vagrant-instance-10"

mkdir learn_vagrantfiles

cd learn_vagrantfiles

vagrant init
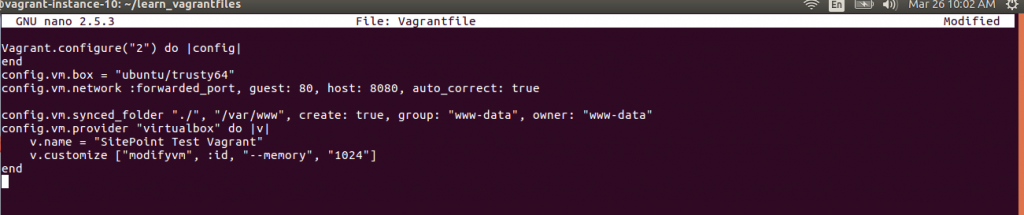
At the beginning of our Vagrantfile, we need to specify the API version that we will use. Version 2 is the current API which is supported in Vagrant version 1.1 and later. We specify the API version as shown below.
Vagrant.configure(“2”) do |config|
end
The next element that we need to add to our Vagrantfile is a base box. We only need to specify the name of the box and Vagrant will automatically download it for us. The Vagrant cloud cloud hosts boxes from where you can search for a box that meets your needs. To specify, we would like to use a ubuntu box we add the entry shown below to our Vagrantfile.
config.vm.box = "ubuntu/trusty64"
Another important element we need to include in our Vagrantfile is the network configurations. Techniques that are supported for communicating with the VM are public networks, private networks and port forwarding. In this article, we will focus on demonstrating how to use port forwarding. When we use port forwarding the Vagrant VM is able to listen on local ports. We are therefore able to forward a VM port to a host system port. Let us use an example to clarify how port forwarding works. On the Vagrant VM, port 80 is the standard HTTP port if we forward it to port 8080 on the host, we can access a server on the VM using this address http://localhost:8080/. The entry shown below will forward a port.
config.vm.network :forwarded_port, guest: 80, host: 8080, auto_correct: true
The auto_correct flag instructs Vagrant to automatically resolve port conflicts. Port conflicts arise when the same port is being used by more than one box.
When using virtual environments, it is best practice to sync files between the VM and the host to avoid file copying and loss of files when a VM is deleted. When sharing files between the VM and host there are several points to consider:
- You can only share folders that existed on the host before Vagrant was started
- To push data created by a VM to the host you need to configure a folder that existed before so that it can be be written.
- It is important to plan folder sharing before implementing it.
A sample Vagrantfile entry to share folders is shown below.
config.vm.synced_folder "./", "/var/www", create: true, group: "www-data", owner: "www-data"
You begin by specifying the folder on the host followed by the folder on the VM. When the create flag is set to true if the directory on the VM does not exist it will be created. The group and owner flags are used to specify the group and owner of VM folder.
To enable file sharing specific hypervisor tools need to be installed on the host. VirtualBox needs guest additions installed while Vmware needs VMware tools.
Other options that can be used to implement folder sharing are Vagrant machine and network file systems.
Another element that we can configure is the VirtualBox. We can specify the name, memory and other options of interest. A sample VM configuration block is shown below:
config.vm.provider "virtualbox" do |v|
    v.name = "SitePoint Test Vagrant"
    v.customize ["modifyvm", :id, "--memory", "1024"]
end
The last element we will look at is provisioning. Shell provisioning is simple and it eliminates the need for tools such as Ansible and Puppet. To use shell provisioning, we need to add the entry below to our Vagrantfile.
Once you are satisfied with your environment, set up open the Vagrantfile using this command nano Vagrantfile, remove auto generated content, add configuration objects and save. You can add comments in your Vagrantfile for better documentation. You can then start your VM.
In this file, we introduced the building blocks of a vagrantfile. We demonstrated how you can configure the API, base box, port forwarding, folder sharing and provisioning.


