

In the previous two articles, we have learned how to work with the LVM approach using both the command line, and the graphical user interface tool. Using both methods, we have illustrated how to create a physical volume, volume group, logical volume, and file system. Besides to these basic tasks, we are going to learn some more advanced ones, like extending a file system, shrinking a file system, extending a volume group, and removing a disk from a volume group for replacement maintenance. These advanced tasks are the subject of today’s article. Wish you find it useful.
Extending a File System
One of the disadvantages of using basic partitions was the impossibility of enlarging a small file system. Consider the case where data in a file system has grown over time, and the file system is almost full. In this case, we need some way to increase the available size by adding some disk space to that file system. Fortunately, LVM has a great solution for this problem. To extend a file system, we need to do three basic steps:
- Check there is sufficient free space in the volume group.
- Extend the logical volume containing the file system.
- Resize the file system to sense the increase.
For example, the /data file system that is almost full:

Out of 3 Gigabytes size, only 242 Megabytes are available. Your manager asked you to increase that file system’s size to 4 Gigabytes. How would achieve that?
Here is the procedure:
- Use the command lvs to display the logical volumes and the volume group of each:
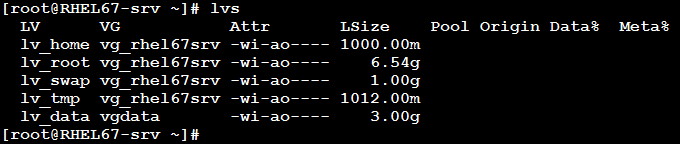
lv_data is created in the vgdata volume group.
- Use the vgs command to check the available unallocated space in that volume group:

The volume group has about 7 Gigabytes unallocated space that is available for creating new logical volumes, and extending the existing one(s).
- Extend the lv_data logical volume using the lvextend command:
lvextend -L +1G /dev/vgdata/lv_data

- Now, the file system should be resized to be aware of the newly allocated space. This is done using the command resize2fs.
resize2fs /dev/vgdata/lv_data

- Now, if you check the /data file system utilization, you will notice the change:

We have extended /data without need to un-mount the file system or interrupt users accessing it. This is one of beautiful capabilities that LVM provides.Shrinking a File System
Consider having an oversized file system, which is allocated for example 150 GB, while the real usage noticed was about kilos. The file system utilization never exceeds 2%. This is a truly oversized file system that should be shrunk to save the logical extents for later need by another file system requiring increase, or new file system to be created.The shrinking operation is easy, but is a bit longer, and requires first un-mounting the file system to be reduced.
In words, to shrink a file system, we need to:- Un-mount the file system.
- Run file system check on the un-mounted file system.
- Resize the file system to the required size.
- Reduce the logical volume containing the file system.
- Re-mount the file system, and check to verify the new size.
Okay, let’s do it for a 10 GB file system that we need to shrink to 3 GB:
-
- Check the size before starting:

-
- un-mount /data.

-
- Run file system check using the e2fsck command.

-
- Resize the file system using the resize2fs command.

-
- Now, reduce the size of the logical volume. This is done using the lvreduce command. When asked if you really want to reduce the logical volume, type y and press Enter.

-
- Mount /data again, and check the new size.

- That is it!!Adding New Disks to Existing Volume Group
If you are about to run out of free space in a volume group, you can “extend” it. In other words, you can increase the size of the volume group by adding new disk(s) to it. Actually, this is the easiest task in today’s article. The operation is done in one step using the vgextend command.
Syntaxvgextend VolumeGroupName PhysicalDevicePath [PhysicalDevicePath...]
The vgextend command adds one or more physical volumes to a volume group.
Consider we need to extend /data. As we learned earlier in this article, the first step is to check there is sufficient free space in the volume group. By checking vgdata using the vgs command, we found the free extents are less than required. In this case, the solution is to add another volume to the volume group.

The physical volume /dev/sdc is not member of any volume group. So, let’s add it to the vgdata volume group:

Now, check the volume group:

That is it!!!Reducing a Volume Group
What if a physical disk that is member of a volume group has failed, or started to generate errors? What did you say? Exactly!! We need to replace it. To replace a malfunctioning disk that is used as physical volume in a volume group, we need first to take it out of that volume group. Then replace it with a new one, initialize the new disk as a physical volume, and finally re-add it to the volume group.
In high level steps, the procedure is simply as follows:- Make sure the physical volume doesn’t contain any used physical extents.
- If some of the physical extents on that physical volume are used, migrate them to other physical volumes in the same volume group. This is done using the pvmove command.
- If the free extents on the other physical volumes were not sufficient to store the migrated PEs, extend the volume group with a new disk (even temporarily), then do the migration step.
- When the physical volume is totally free, remove it from the volume group using the vgreduce command.
- Replace the failed disk.
- Configure the new disk as physical volume.
- Add the new physical volume to the volume group.
– Okay, let’s do it…
Sure, but that will be in the next article. I will wait you to do this task together. So, don’t be late!!


