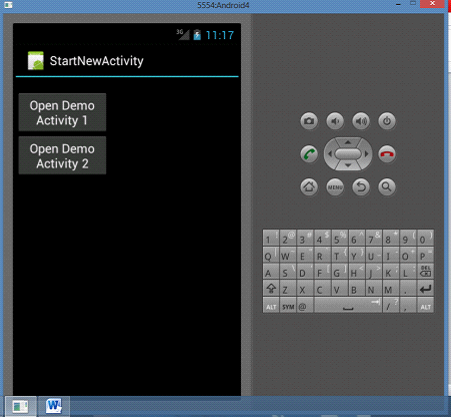
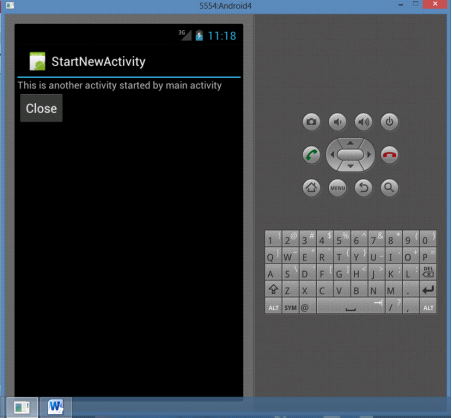
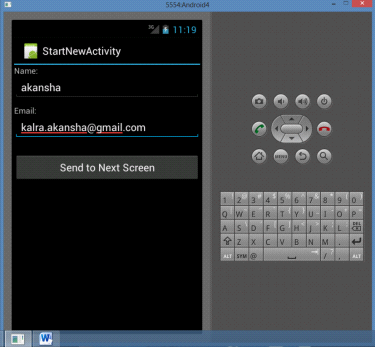
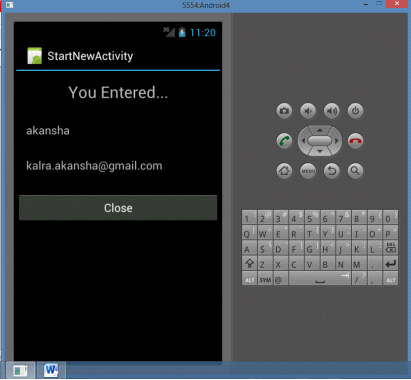
In our blog today you will learn to create a new activity from another activity. We have the main activity called as “StartNewActivityActivity.java”. It will call two activities namely “ChildActivity.java” and “second_child.java”. ChildActivity is a simple activity that just displays a message. “second_child” demonstrates the method of passing values to activities by calling another activity “SecondChildResultActivity.java”. The result from “second_child.java” is passed onto SecondChildResultActivity.java. Let us start writing the code
Step 1
Create an Android Project and name it “StartNewActivity”. Select the Android SDK version of your choice. Once the project gets created open the “StartNewActivityActivity.java” and write the code below
package com.akansha.startnewactivity;

import android.app.Activity;
import android.content.Intent;
import android.os.Bundle;
import android.view.View;
import android.view.View.OnClickListener;
import android.widget.Toast;

public class StartNewActivityActivity extends Activity implements OnClickListener {
    /** Called when the activity is first created. */

    @Override
    public void onCreate(Bundle savedInstanceState) {
        super.onCreate(savedInstanceState);
        setContentView(R.layout.main);

        View v = findViewById(R.id.btn1);
        v.setOnClickListener(this);
        v = findViewById(R.id.btn2);
        v.setOnClickListener(this);

    }

	@Override
	public void onClick(View v) {
		// TODO Auto-generated method stub
        Intent i = null;
		switch (v.getId()) {
		case R.id.btn1:
			Toast.makeText(getApplicationContext(), "Button 1 clicked", 5000);
			i= new Intent("android.intent.action.AnotherActivity");
			//startActivity(i);
			break;
		case R.id.btn2:
			 i= new Intent("android.intent.action.SecondActivity");
			//startActivity(i);
			break;
		default:
			return;
		}
		startActivity(i);

	}


}
Update the main.xml files as follows
<?xmlversion="1.0"encoding="utf-8"?>
<LinearLayoutxmlns:android="http://schemas.android.com/apk/res/android"
android:orientation="vertical"
android:layout_width="fill_parent"
android:layout_height="fill_parent"
>
	<TextView
android:layout_width="125dp"
android:layout_height="wrap_content"
/>
<Button
android:id="@+id/btn1"
android:layout_width="134dp"
android:layout_height="wrap_content"
android:text="@string/lblBtn1"/>
<Button
android:id="@+id/btn2"
android:layout_width="134dp"
android:layout_height="wrap_content"
android:text="@string/lblBtn2"/>
</LinearLayout>
Step 2
Create “ChildActivity.java” under src folder and add the following
package com.akansha.startnewactivity;

import android.app.Activity;
import android.os.Bundle;
import android.view.View;
import android.widget.Button;

public class ChildActivity extends Activity {

	public void onCreate(Bundle savedInstanceState) {
        super.onCreate(savedInstanceState);
        setContentView(R.layout.child_layout);
        Button btnClose = (Button) findViewById(R.id.button1);
	btnClose.setOnClickListener(new View.OnClickListener() {

		public void onClick(View arg0) {
			//Closing SecondScreen Activity
			finish();
		}
	});
	}
}
Step 3
Update the child_Layout.xml with the following
<?xml version="1.0" encoding="utf-8"?>
<LinearLayout xmlns:android="http://schemas.android.com/apk/res/android"
    android:layout_width="match_parent"
    android:layout_height="match_parent"
    android:orientation="vertical" >

       <TextView
        android:id="@+id/txt"
        android:layout_width="match_parent"
        android:layout_height="wrap_content"
        android:text="@string/lblTxt"
        />
 <Button
     android:id="@+id/button1"
     android:layout_width="wrap_content"
     android:layout_height="wrap_content"
     android:text="Close" />

</LinearLayout>
Step 4
Create and update the second_child.java and second_child.xml
package com.akansha.startnewactivity;

import android.app.Activity;
import android.content.Intent;
import android.os.Bundle;
import android.view.View;
import android.widget.Button;
import android.widget.EditText;

public class second_child extends Activity{

	EditText inputName;
	EditText inputEmail;
	@Override
	public void onCreate(Bundle savedInstanceState) {
		super.onCreate(savedInstanceState);
		setContentView(R.layout.second_child);

		inputName = (EditText) findViewById(R.id.name);
		inputEmail = (EditText) findViewById(R.id.email);
		Button btnNextScreen = (Button) findViewById(R.id.btnNextScreen);

		//Listening to button event
		btnNextScreen.setOnClickListener(new View.OnClickListener() {

			public void onClick(View arg0) {
				//Starting a new Intent
				Intent nextScreen = new Intent(getApplicationContext(), SecondChildResultActivity.class);

				//Sending data to another Activity
				nextScreen.putExtra("name", inputName.getText().toString());
				nextScreen.putExtra("email", inputEmail.getText().toString());

				// starting new activity
				startActivity(nextScreen);

			}
		});
	}
}
<?xml version="1.0" encoding="utf-8"?>
<LinearLayout xmlns:android="http://schemas.android.com/apk/res/android"
    android:layout_width="match_parent"
    android:layout_height="match_parent"
    android:orientation="vertical" >

    <TextView android:layout_width="fill_parent"
    		android:layout_height="wrap_content"
    		android:text="Name: "/>
    <EditText android:id="@+id/name"
    		android:layout_width="fill_parent"
    		android:layout_height="wrap_content"
    		android:layout_marginBottom="10dip"/>
    <TextView
	    android:layout_width="fill_parent"
	    android:layout_height="wrap_content"
	    android:text="Email: "
	    />
    <EditText android:id="@+id/email"
    		android:layout_width="fill_parent"
    		android:layout_height="wrap_content"
    		android:layout_marginBottom="10dip"/>
    <Button android:id="@+id/btnNextScreen"
     		android:layout_width="fill_parent"
    		android:layout_height="wrap_content"
    		android:text="Send to Next Screen"
    		android:layout_marginTop="15dip"/>

</LinearLayout>
Step 5
Create and update the SecondChildResultActivity.java and second_child_result.xml
package com.akansha.startnewactivity;

import android.app.Activity;
import android.content.Intent;
import android.os.Bundle;
import android.view.View;
import android.widget.Button;
import android.widget.TextView;

public class SecondChildResultActivity extends Activity {

	public void onCreate(Bundle savedInstanceState) {
        super.onCreate(savedInstanceState);
        setContentView(R.layout.second_child_result);

        TextView txtName = (TextView) findViewById(R.id.txtName);
        TextView txtEmail = (TextView) findViewById(R.id.txtEmail);
        Button btnClose = (Button) findViewById(R.id.btnClose);

        Intent i = getIntent();
        // Receiving the Data
        String name = i.getStringExtra("name");
        String email = i.getStringExtra("email");

        // Displaying Received data
        txtName.setText(name);
        txtEmail.setText(email);

        // Binding Click event to Button
        btnClose.setOnClickListener(new View.OnClickListener() {

			public void onClick(View arg0) {
				//Closing SecondScreen Activity
				finish();
			}
		});

    }
}
<?xml version="1.0" encoding="utf-8"?>
<LinearLayout
  xmlns:android="http://schemas.android.com/apk/res/android"
  android:orientation="vertical"
  android:layout_width="match_parent"
  android:layout_height="match_parent">

  <TextView android:layout_width="fill_parent"
  			android:layout_height="wrap_content"
  			android:text="You Entered..."
  			android:textSize="25dip"
  			android:gravity="center"
  			android:layout_margin="15dip"/>

  <TextView android:id="@+id/txtName"
  			android:layout_width="fill_parent"
  			android:layout_height="wrap_content"
  			android:layout_margin="15dip"
  			android:textSize="18dip"/>

  <TextView android:id="@+id/txtEmail"
  			android:layout_width="fill_parent"
  			android:layout_height="wrap_content"
  			android:layout_margin="15dip"
  			android:textSize="18dip"/>

  <Button android:id="@+id/btnClose"
  			android:layout_width="fill_parent"
  			android:layout_height="wrap_content"
  			android:layout_marginTop="15dip"
  			android:text="Close"/>

</LinearLayout>
Step 6
Make sure your Android manifest file looks like the following
<?xml version="1.0" encoding="utf-8"?>
<manifest xmlns:android="http://schemas.android.com/apk/res/android"
    package="com.akansha.startnewactivity"
    android:versionCode="1"
    android:versionName="1.0" >

    <uses-sdk android:minSdkVersion="15" />

    <application
        android:icon="@drawable/ic_launcher"
        android:label="@string/app_name" >
        <activity
            android:name=".StartNewActivityActivity"
            android:label="@string/app_name" >
            <intent-filter>
                <action android:name="android.intent.action.MAIN" />

                <category android:name="android.intent.category.LAUNCHER" />
            </intent-filter>
        </activity>
        <activity
            android:name=".ChildActivity"
            android:label="@string/app_name" >
            <intent-filter>
                <action android:name="android.intent.action.AnotherActivity" />

                <category android:name="android.intent.category.DEFAULT" />
            </intent-filter>
        </activity>
        <activity
            android:name=".second_child"
            android:label="@string/app_name" >
            <intent-filter>
                <action android:name="android.intent.action.SecondActivity" />

                <category android:name="android.intent.category.DEFAULT" />
            </intent-filter>
        </activity>
        <activity
            android:name=".SecondChildResultActivity"
            android:label="@string/app_name" >
            </activity>
    </application>

</manifest>
You are now ready to compile and execute the code. The output will look like the following
Output