
When selling a product, the first thing that the customer encounters is the photo you display. Whether it’s in a printed catalog or online, product photography is an integral part of your selling process.0
Actually, product photography can be the make or break of any business.
How important is good product photography, you ask?

Well picture this scenario:
Say you are selling a handbag for example. This handbag comes in a rose gold chain together with the leather hand straps and a copper zipper as a finishing touch. The bag only has a small internal pocket.
Now on your website, you post the product photo of how the bag looks from the outside. Days later, a customer buys your product and the bag is on its way.
Customer gets the handbag, thinks its lovely… but wait, no big pockets inside and zipper is copper and not bronze?
You get a 2-star review for this item.
She wanted big internal pockets and thought the zipper was bronze based on the photo. But what you’ve pictured on the website was only the overview look of your handbag. You forgot to take note of the details!
This is where good product photography makes or breaks the business. If it doesn’t show the “close-to-real-feel” of the products, then the customer ends up feeling disappointed, or worse, cheated on.
Even if you have a refund policy in place, there will be less sales from this particular customer. And if we’re talking bad business, word can pass around that your handbags are not up to par as to how they really look in terms of exact quality.
And that’s not what you want. Right?
That said, it’s essential to have good quality photos that demonstrate the attributes of what you’re selling
Since the customer cannot literally touch the product, photos are your best bet when telling your brand’s story and the quality of what you sell.
Today we’re going to demonstrate to you an easy solution for your product photography, so that you can tell more and sell more.
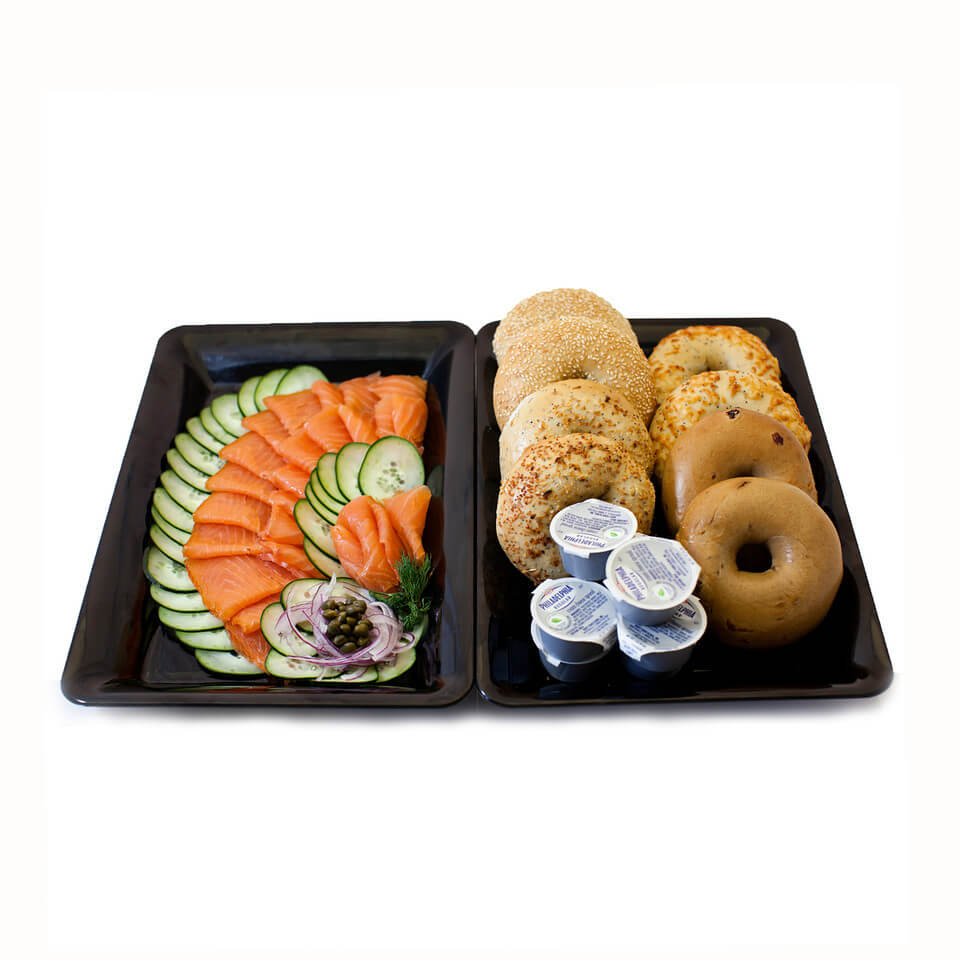
(Also, look at this photo of salmon, bagel and cream cheese. Looks tempting isn’t it? Now that’s the power of clean product photography!)
Common Mistakes People Make When Doing Product Photography
1. Poor lighting
A lot of business owners make the mistake of shooting in auto mode with and without flash.
This comes across as a newbie mistake because if you do shoot auto with flash, the result will either be a product photo with light bomb or there will an imbalance in the lighting (background is darker and there’s more light shown on the product than needed).
Now if you do shoot auto without flash, the tendency is also poor: you get a blurry photo or you get a product photo with a really dark background.
The Solution: Shoot in auto mode with an anti-handshake feature. You can also shoot in HDR mode, but the best solution will be to shoot manual without flash and in daylight.
Daylight is the best option because it gives your product photography natural lighting that will highlight its best features.
Another option is to shoot in macro if you’re taking photographs of jewelry or food to showcase the finer details as possible.
2. Not utilizing the camera settings
If you’re not doing manual photography yet, now is the time to explore and shoot.
Manual photography allows more options than auto photography. It also enhances your skill as a basic photographer by letting you choose which options are best for each product shoot.
The solution:
• Shoot manually with auto focus.
• Half-press the shutter button to select the correct focus.
• Use the appropriate white balance with respect to your light source. Say, you’re using a fluorescent or incandescent light, choose a setting that reflects that. Most digital cameras have this feature.
• Check your shutter and aperture settings. For brighter atmosphere, take the shutter up a notch (like if you’re shooting outside it’s safe to say a shutter speed of 200-800 would be optimal), while in low light settings you could use a lower shutter speed (around 10-25). And the aperture could vary, depending on how much light you want your object to be exposed to. For a more in-depth understanding of how ISO, shutter speed and aperture works, refer to this article.
• Make sure to use a clean background or a lightbox when doing product shoots.
3. Messy or inappropriate background
If you’ve seen our salmon and bagel photo, you’ve noticed the clear white background, correct?
That’s because white backgrounds highlight food better.
Well, not just food, but any product in general – especially if you have multiple colors and patterns on the product.
Customers will be shying away from bringing you sales if you use a messy or inappropriate background. Remember, we are aiming the “close-to-real-feel” aspect for them to be convinced that your product is the one.
The solution:
Use white background as a fail-safe solution. If you’re feeling fancy or playful, use any other color as a solid backdrop. Patterns can also be used as long as they are not conflicting with the foreground object.
The main idea is not to clutter the product too much so you can still highlight its core features.
4. Not showing the hidden or internal features of the product
Since your customer cannot touch your product, what else can you do to bring them closer to it?
That’s right, photograph the hidden parts.
Remember our example with the handbag customer? What the business owner forgot was to take a photo of the close-up look of the zipper plus the inside pockets.
This is one huge reason why every shop owner should put themselves in the customers’ shoes.
Some questions to ask…
• What will the customer want to see?
• What is expected of this product?
• How can this be of use to the customer?
These questions not only help you form the product description, but they also help you angle the way your products would look in the photoshoot.
5. Not removing the background
Besides messy backgrounds, product photography is much more effective when there’s no actual background. (Think .PNG files!)
Clear-cut photos are way more professional when they only focus on the product. This is because product photography is twice effective when it shows more detail upfront than what’s going on behind.
Learn How To Make Instagram Looking Photos With photoshop tutorial
So if you are selling products, the best way to clean them is to do the following:
1. Load up the raw product photo in Photoshop.
2. Use the Magic Wand (W) tool to select the background. If the selection bleeds into the product, then you have to use a much more specific solution like the Pen Tool (P).
3. For Pen: Select the edges of the product and right click to show the drop-down menu “Make Selection”.
4. Once you have selected the product and the “marching ants” show (the marching ants are the moving dashed line around your selection), invert the selection by clicking Select > Inverse in the menu or using Ctrl+Shift+I (Windows).
5. Hit Delete to clear the background.
Now you have a clean product. Congratulations!
Wasn’t that easy? We hope you keep these tips in mind when doing your next product photography.
To simplify yet strong alters, combine two or more images, eliminate undesirable objects, or upgrade your picture with filters using our picture editor online
If you have questions, comments, or suggestions for our next tutorial, let us know by leaving us a note below.