

Jest is a library for testing JavaScript code. It is an open source project maintained by Facebook, and it is especially well suited for React code testing, although not limited to that, it can test any JavaScript code. Its strengths are:
- fast
- can perform snapshot testing
- opinionated, and provides everything out of the box without requiring you to make choices
Mocha is a popular testing framework with NodeJS developers. Up until now, Jest has spiked interest in many developers. The approach of using one testing suite with both frontends (if using React) and server-side (with Node) is both tempting and time-saving at the same time. Jest is a tool very similar to Mocha, although they have differences:
- Mocha is less opinionated, while Jest has a certain set of conventions
- Mocha requires more configuration, while Jest works usually out of the box, thanks to being opinionated
- Mocha is older and more established, with more tooling integrations
The biggest feature of Jest is it is an out of the box solution that works without having to interact with other testing libraries to perform its job.
In this tutorial, you are going to learn how to integrate Jest in a Nodejs application and write unit tests that run using the Jest testing library.
Setup
Create a new NodeJS project by initializing it with command from your terminal npm init. Once the package.json file is generated, you are good to go. Next step is to install the following modules.
npm install -D jest eslint-plugin-jest eslint-config-airbnb-base
Using eslint with this a personal choice as well as a way to show you pick a more pragmatic approach with your own NodeJS project.
After all three devDependencies are installed, the next step is to create a new file called .eslintrc.js with the following configuration.
module.exports = {
    extends: ['airbnb-base', 'plugin:jest/recommended'],
    plugins: ['import', 'jest'],
    env: {
        node: true,
        'jest/globals': true
    }
};
To simplify running ESLint and Jest, go to package.json and update it as following with three commands for linting, testing and code coverage.
"main": "index.js",
  "scripts": {
    "lint": "eslint src/**",
    "test": "jest src",
    "coverage": "jest --collectCoverageFrom=src/**.js --coverage src"
  },
Writing our First Test
Since the setup is complete, you can move ahead and write the first test. Before writing the test, we need to create the project file which we are going to test. So, create a new file called sum.js and add the following code to it.
module.exports = (a, b) => a + b;
This is a simple program to add to numbers. Now, add the following content to index.js. In this file, you will be executing your sum.js functionality.
/* eslint-disable no-console */
const sum = require('./sum');
console.log(sum(1, 2).toString());
At this point, you can run linting checks through to make sure that the code passes (does not contain any syntax errors) it by running the command npm run lint from your terminal window.
Now to test sum.js, let us create a new file called sum.text.js with the following code.
const sum = require('./sum');
test('adds 1 + 2 to equal 3', () => {
    expect(sum(1, 2)).toBe(3);
});
To test it, all you have to do is run the command npm run test from a terminal window.
Each specific test block is started with the syntax test that is expected and only understandable by Jest testing library. With Jest, it is also easy to create code coverage reports using the attribute –coverage and adding it to package.json file like we did earlier. No additional setup or libraries needed, which can be considered as a huge advantage over other testing libraries (such as Mocha). This is why it is popular! Jest can collect code coverage information from entire projects, including untested files.
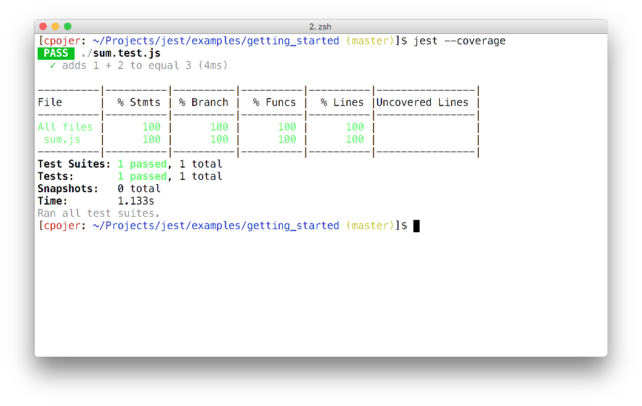
The result is as we expect, we have 100% coverage for sum.js.
The Matchers
In the above testing file, the syntax toBe() is called the matcher method. A matcher is a method that lets you test values. Most commonly used matchers, comparing the value of the result of expect() with the value passed in as the argument, are:
- toBe compares strict equality, using===
- toEqual compares the values of two variables. If it’s an object or array, it checks the equality of all the properties or elements
- toBeNull is true when passing a null value
- toBeDefined is true when passing a defined value (opposite to the above)
- toBeUndefined is true when passing an undefined value
- toBeCloseTo is used to compare floating values, avoiding rounding errors
- toBeTruthy true if the value is considered true (like an if does)
- toBeFalsy true if the value is considered false (like an if does)
- toBeGreaterThan true if the result of expect() is higher than the argument
- toBeGreaterThanOrEqual true if the result of expect() is equal to the argument, or higher than the argument
- toBeLessThan true if the result of expect() is lower than the argument
- toBeLessThanOrEqual true if the result of expect() is equal to the argument, or lower than the argument
- toMatch is used to compare strings with regular expression pattern matching
- toContain is used in arrays, true if the expected array contains the argument in its elements set
- toHaveLength(number): checks the length of an array
- toHaveProperty(key, value): checks if an object has a property, and optionally checks its value
- toThrow checks if a function you pass throws an exception (in general) or a specific exception
- toBeInstanceOf(): checks if an object is an instance of a class
Conclusion
This tutorial was walk-through to get you started with setting up and basic functionality of Jest as a testing library and using it in a Nodejs project.

