Laravel Queue is an effective way of deferring the processing of a time consuming task in your application. Examples of such tasks could include sending out verification emails whenever a new user registers on your application or sharing a post via social media. Laravel Queues help to defer such tasks thus improving the speed of web requests to your application.
To follow along, you will need to have an intermediate knowledge of Laravel.
What we will be building?
We’ll be building a simple blog application that allows you submit a post and sends an email whenever a new post has been created. We’ll be making use of Queues to handle the sending of emails.
For the purpose of this tutorial, I’ll assume you’ve set up Laravel already.
Getting Started
Let’s set up our Model, Controller, and Migration. Thankfully, Laravel can handle all of this with a single command. Using artisan run the following command:
php artisan make:model Post -m -c
Tip: The -m and -c flags will create a migration and controller file associated with the model for you.
In the database/migrations directory, delete the users and password migrations created by Laravel as we will not be needing it for this tutorial. Let’s edit the post migration to reflect the structure our database should take.
<?php

use Illuminate\Support\Facades\Schema;
use Illuminate\Database\Schema\Blueprint;
use Illuminate\Database\Migrations\Migration;

class CreatePostsTable extends Migration
{
    /**
     * Run the migrations.
     *
     * @return void
     */
    public function up()
    {
        Schema::create('posts', function (Blueprint $table) {
            $table->increments('id');
            $table->string('title');
            $table->string('body');
            $table->timestamps();
        });
    }

    /**
     * Reverse the migrations.
     *
     * @return void
     */
    public function down()
    {
        Schema::dropIfExists('posts');
    }
}
Adding the Queues Table
Laravel provides support for using different drivers for your queues. You can see a list of queue drivers Laravel supports here. For the purpose of this tutorial, we’ll be using database as our queue driver. As a result, we’ll need a table to hold the jobs. To generate a migration that creates this table, run the following command:
php artisan queue:table
This will create a migration file for a table called jobs, because all our queues will be logged on a table called jobs. We need to tell Laravel that we’ll be using the database as our queue driver in the .env file.
QUEUE_DRIVER=database
Also, edit the .env file with your database details and run the migrations using:
php artisan migrate
Sending Emails
Since our application will require us to send emails, let’s setup a mail provider for development purposes. Head over to Mailtrap and create an account if you don’t already have one. Mailtrap provides a fake SMTP server for sending emails. Once you’ve created an account and logged in, a Demo inbox will be provided for you. Click on the Demo inbox and copy your username and password details.
Next, edit the .env file with the details you just noted.
MAIL_DRIVER=smtp
MAIL_HOST=smtp.mailtrap.io
MAIL_PORT=2525
MAIL_USERNAME=[username]
MAIL_PASSWORD=[password]
MAIL_ENCRYPTION=null
Setting up the routes
Our application will only have two routes. Edit the web/routes.php file with the following code:
<?php

/*
|--------------------------------------------------------------------------
| Web Routes
|--------------------------------------------------------------------------
|
| Here is where you can register web routes for your application. These
| routes are loaded by the RouteServiceProvider within a group which
| contains the "web" middleware group. Now create something great!
|
*/

Route::get('/index', 'PostController@index');
Route::post('/posts', 'PostController@store');
Controller Methods and Views
Edit the PostController located at the app\Http\Controllers directory with the following code:
<?php
namespace App\Http\Controllers;
use Illuminate\Http\Request;
use App\Post;
class PostController extends Controller
{
public function index()
{
	return view('index');
}
public function store(Request $request)
{
	$request->validate([
       'title'=>'required|min:6',
       'body'=> 'required|min:6',
	]);
$post = new Post;
$post->title = $request->title;
$post->body = $request->body;
$post->save();
 return redirect()->back()->with('status', 'Your post has been submitted successfully');
}
}
The index method returns an index view we shall be creating shortly. The store method performs a set of validation rules on our request inputs and stores the records to our database.

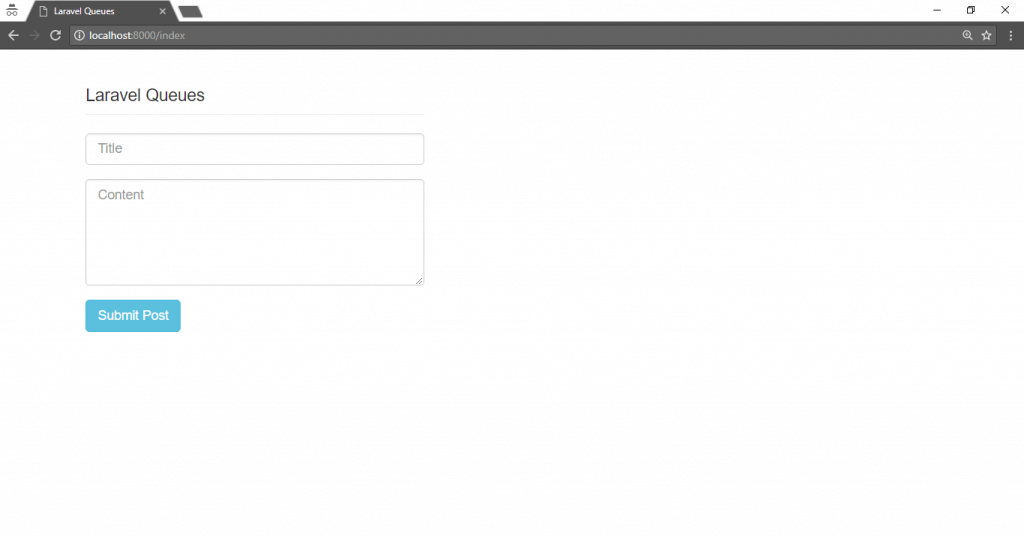
Let’s create the form for adding a post. In the resources/views directory, create an index.blade.php file and edit it with the following code:
<!DOCTYPE html>
<html>
<head>
<meta name="viewport" content="width=device-width">
<title>Laravel Queues</title>
<meta name="description" content="">
<link rel="stylesheet" href="https://maxcdn.bootstrapcdn.com/bootstrap/3.3.5/css/bootstrap.min.css">
</head>

<body>
<div class="container">
<div class="col-md-5">
<h4 class="page-header">Laravel Queues </h4> @foreach ($errors->all() as $error)
<p class="alert alert-danger">{{ $error }}</p>
@endforeach
@if (session('status'))
<div class="alert alert-success">
{{ session('status')}}
</div>
@endif
<form class="form-vertical" role="form" method="post" action="/posts">
{{csrf_field()}}
<div class="form-group">
<input type="text" name="title" class="form-control" placeholder="Title">
</div>
<div class="form-group">
<textarea class="form-control" rows="5" name="body" class="form-control" placeholder="Content"></textarea>
</div>
<div class="form-group">
<button type="submit" class="btn btn-info">Submit Post</button>
</div>
</form>
</div>
</div>
</body>
</html>
You can start your local server and navigate to the /index route in your browser to see the form we just created.
Send Emails with Queues
Let’s create the queued job for sending emails whenever a new post has been submitted. Using artisan, run the following command:
php artisan make:job SendPostEmail
This will create a SendPostEmail class for us in the App\Jobs directory. The class contains only a handle() method which is called when the job is processed by the queue. At the top of the SendPostEmail file, import the following dependencies:
use Mail;
use App\Post
Next, we inject the Post dependency directly into the job’s constructor.
protected $post;
public function __construct(Post $post)
    {
        //
        $this->post= $post;
    }
Now, let’s set up the actual sending of emails. In the handle() method of the job, add the following code:
public function handle()
    {
     $data= array(
     'title'=> $this->post->title,
     'body'=> $this->post->body,
    );

Mail::send('emails.post', $data, function($message){
$message->from('[email protected]', 'Laravel Queues');
$message->to('[email protected]')->subject('There is a new post');
});

    }
}
We created an array of data that contains the title and body of each post to pass to the email view we shall be creating shortly. Next, we use the send method on the mail Façade which accepts three argumentsLet’s quickly create the view for the email. In the resources\views directory, create an emails folder and then create a post.blade.php inside the folder. Add the following code to the file you just created:
1) The name of the view we want to use send emails.
2) An array of data to pass to the email.
3) A closure to customize our email subjects, senders, and recipients.
public function handle()
    {
     $data= array(
     'title'=> $this->post->title,
     'body'=> $this->post->body,
    );

Mail::send('emails.post', $data, function($message){
$message->from('[email protected]', 'Laravel Queues');
$message->to('[email protected]')->subject('There is a new post');
});

    }
}<p> A new post has been created </p>
 <p> {!! $title !!}</p>
 <p> {!! $body  !!} </p>
Dispatching Jobs
Let’s add the queued job to our PostController. At the top of the PostController, import the SendPostEmail class.
Use App\Jobs\SendPostEmail;
The store() method in our controller will look like this:
public function store(Request $request)
{
$request->validate([
  'title'=>'required|min:6',
  'body'=> 'required|min:6',
]);
 $post = new Post;
 $post->title = $request->title;
 $post->body = $request->body;
 $post->save();
$this->dispatch(new SendPostEmail($post));
 return redirect()->back()->with('status', 'Your post has been submitted successfully');
}
If you are wondering what changed here, we added this line of code:
$this->dispatch(new SendPostEmail($post));
We dispatch the job using the dispatch method on the job itself and then inject the post dependency which is given to the job’s constructor.
Listening to Queues
To get our application to listen to the queue, run the following command:
php artisan queue:work
Once the command has started, it will continue to run until you manually stop it or close your terminal.
Now, you can try submitting a post and see what happens.
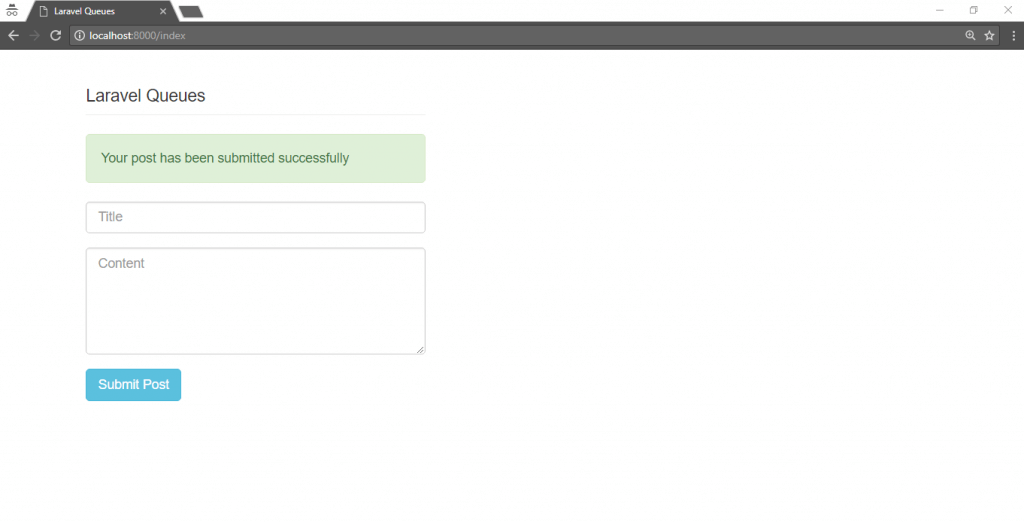
Take a look at the command line, you will see that a new job has been processed and an email has been sent.

Conclusion: –
We have learned how to build a simple blog app that utilizes Laravel queues which are a great way to speed up web requests to your applications.